Absolute Value is Always Positive

Absolute value is always positive. (Nice to know.)
It’s been almost 100 degrees every day in this place: the sun is screaming hot and the air is stifling. We lay around like rags covering the furniture. We have an AC but we need three. Tomorrow we’ll get a couple more.
It’s 1:34 a.m. and it’s deliciously cool in here at the moment. Josh and I are considering exchanging our days and nights so we can work in the cool hours and sleep in the heat. It’s likely.
To recap for the day, we took a mile walk at the park after eating chicken salad sandwiches. The mile walk is a fair trade for a frozen pumpkin yogurt in a large waffle cone. Not that I have to, mind you. I still have a kicking little figure (even at 43) and although I rarely exercise, I do take very good care of my cells, particularly from the inside out. I’ve learned that if your cells are healthy, the rest of you follows. People are quite hung up on “the big picture” with their bodies- over all weight, etc. and I really think the answer to good body maintenance is in blood cleansing, colon cleansing, and proper oxidation. (Because well…proper oxidation does cleanse the blood.)
I really can’t get started on colon cleansing at 1:40 in the morning. Don’t I have better things to write about?
Which brings me right back to absolute value.
I’ve manages to bring my grade up a whole notch in pre-calculus. Just that word “precalculus” used to scare the crap out of me. Who knew that I’m actually pretty good at it? Go figure. I love it, and, I find it very easy to understand. (Hence my notes above.) Let’s see…let’s see…I scored a 50 out of 50 on a monster assignment in Health Psychology- didn’t see that one coming.
Josh is fiddling around with his gadgets and electronics- he continues to amaze me with his inventions. He’s always building something. I hear him now singing and playing his guitar. He’s happy. So am I. :0)
My head is throbbing and I’m sure I should go to bed but I have some reading to do in Public Speaking. Bob is out with friends, and Meatball has come home again! I may have forgotten to mention that Meatball (our 17 lb. cat) went missing several days ago. Alas, Josh rescued him earlier today. Josh is picking away “hillbilly style” now and having a downright foot-stomping jamboree in the other room.
“Wow, you sound really good,” I said to him.
“I sound like Hank Williams, don’t I?” He asked me.
“No,” I said. “You sound like Josh trying to sound like Hank Williams.”
There’s a celebratory vibe hanging in the air now. It’s 1:51.
I think we’re celebrating the cool night air! We know we’re going to be comfortable for at least 6 more hours. I’ve just realized that I haven’t had a migraine in quite some time.
Speaking of which, it’s time to hit the books.
Stress Management
Take picture. Edit photo.
It always works for me.
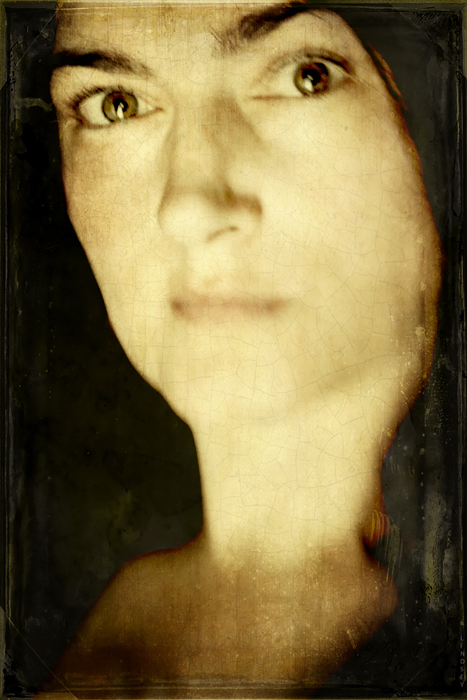 Selfie. Taken this morning. Lensbaby Composer/Double Glass/f/ 5.6
[20+ layers in GIMP]
Lensbaby Composer (Plastic Optic)
I may or may not go out today and experiment with my new Lensbaby lens: the plastic optic from the Swap Kit. It’s so darn hot.
I took this SOOTC/straight out of the camera pic using the plastic optic:
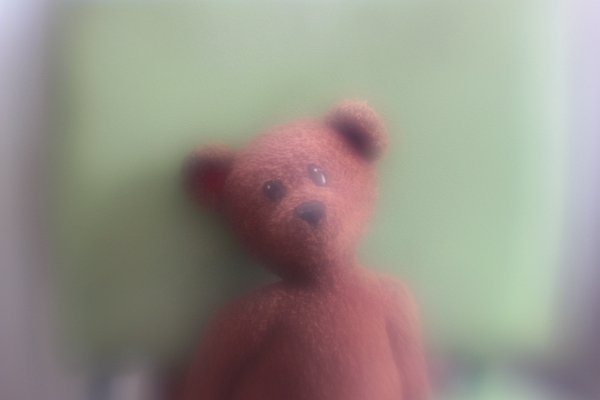
I like the soft focus haze it puts over everything: in the right setting, this would be perfect. Of course, it wouldn’t work for everything. A street scene or a detail-oriented shot such as facial features wouldn’t be ideal for this lens, but a forest shot, any flower shot, or landscape (barn, abandoned house, etc.) it would be great.
I’m still stuck on the Double Glass optic- I love the focal control it gives you while allowing the warped blur in the rest of the frame.
I’m looking at another solid day of schoolwork. All of these toys and no time to play!
On Green Things and other Deep Subjects

I love my very, VERY weird kids.
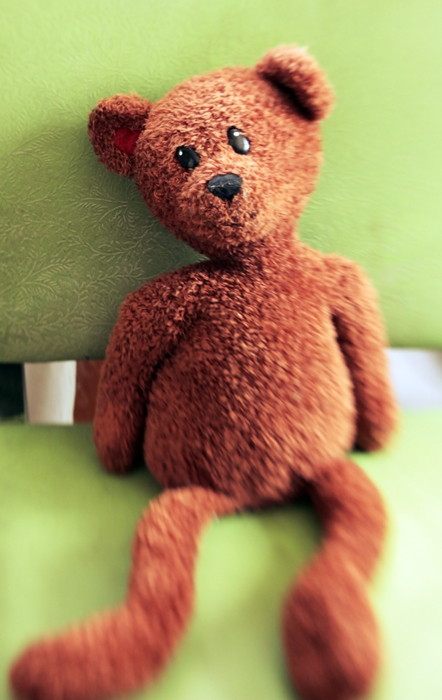
This is Brian Bob.
He has a green mouth. It’s usually blue. Today it’s green.
I don’t ask him why his mouth is different colours any more.
I just accept the fact that my kids are a little bit…different looking sometimes.
This makes me smile. And feel very proud of my weird artistic children.
If more people in the world had green mouths then…I guess there would be more green in the world.
This concludes my deep thoughts for the day.
It was good to get away from the schoolwork for a few minutes.
For more on this subject, see: TAGS.
Photo Walk [For Y]
Sometimes, when I don’t have the words of comfort that I’m looking for, I take pictures instead. This is for you, Y, and your friend. I wanted to take pictures of flowers for you, and I changed my mind at the last minute. I took a few pics of the riverside instead.
I hope you like them. xo
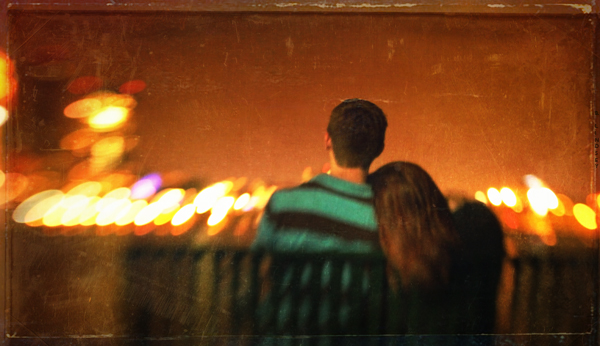
Unknown couple, sharing an intimate moment
Lensbaby Composer/Double Glass/f/2.8

Josh existing my mother’s house after dropping off his homemade burgers
Lensbaby Composer/Double Glass/f/2.8
 A drinking crowd gathers outside of Third Base tavern.
Lensbaby Composer Pro/Double Glass/ f/2.8

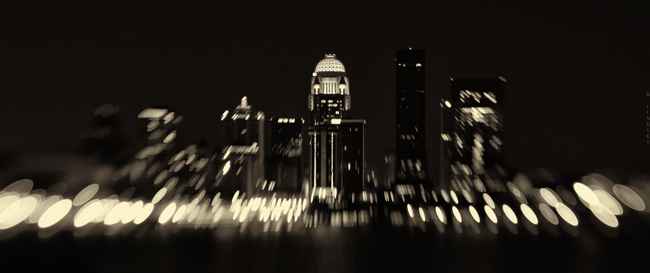
Second Street bridge- joining Indiana and Kentucky
Lensbaby Composer/Double Glass/f/2.8
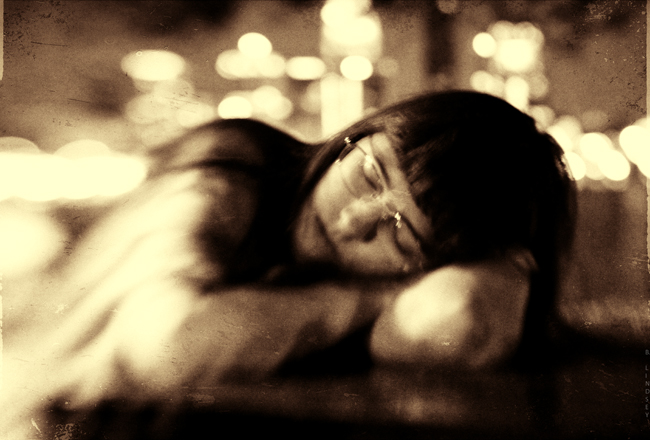 Brianna sleeps on a picnic table by the riverside
Lensbaby Composer/Double Glass/f/2.8
“The most painful goodbyes are the ones that are never said and never explained …”
-Anonymous
The Dance

“I’m swearing off all sugar,” I said, to Josh.
“Good! You can do it.”
“Yep. Starting tomorrow. ‘Cause I start my fast tomorrow, so…that would be a good time to start. Besides, there’s a strawberry cake on the stove.”
“Well good, Birgy. I know you can do it,” says Josh again with a hint of boredom.
“Oh crap! I just found a whole bag of Blow Pops!”
I can’t explain this sugar craze I’ve been on lately. I’ve been eating so many Lifesaver Gummies- it’s sick. Whole packages. Generally, I fast 5 days per week. I do this because it brings me closer to God. I intentionally suffer. On the week ends, I eat whatever I want, but really, I usually eat in moderation- never a second plate and I don’t eat until I’m stuffed. Why blow your levels all out of whack?
Besides, I eat to sustain life- not to cram stuff in my face. I respect that my body belongs to God- and it’s His “house”. So I keep that in mind when I’m preparing food and cooking. Usually, I’ll have a small (healthy) breakfast, oatmeal, etc. and take my daily regimen of pills which consist of:
Cayenne pepper
Evening Primrose Oil
Super B Complex
Milk Thistle (cleanses and detoxes the liver)
Fish Oil
Colon Cleanser (psyllium husk/herbal)
Multi-vitamin + Iron
After this, I won’t eat until 6:00 p.m. After breaking my fast at 6, I’ll eat a healthy meal: veggies cooked in either 100% canola oil or imported cold pressed olive oil, + meats (beef/chicken/pork, usually) + multi-grain baguettes toasted in olive oil or something along those lines- but always pretty healthily. I allow myself to snack on fruit and cheese usually, and ice cream and chips- I don’t limit myself to ounces and stuff. I don’t count calories. I don’t “diet” as it were, not in the traditional sense. I don’t fast for aesthetic purposes. I fast for spiritual discipline and cleansing- I’m a big believer in fasting.
Five days per week- Monday-Friday.
What this does is teaches me inner strength and control. When you have the ability to control what you do and do not eat most every day and aren’t “governed” by it, then you’re able to control your thoughts, behaviors, willpower, and many other areas that we often battle and give up control to.
And generally, I don’t go around telling people that I fast often- many people don’t understand. They don’t see why it matters. But it brings me closer to God and His will rather than my own. Also, when you take food out of the equation and “pleasing the self” for 8 hours of the day- it teaches you to “lay down”. It teaches you to be still and be very quiet. At least for that time. And over time, you learn to appreciate these low places in the spirit and soul. Good comes from it. Growth.
So usually, I don’t go hog-wild on whole bags of Lifesavers. I justified it by my fasting I suppose, but then, it does little good to fast like I do, if I give up complete control and eat whole bags of candy after my fast ends. It defeats the purpose of the whole thing.
So, no more wheelbarrows of sugar!
I thought it was about time for an update on my relentless jaw and tongue chewing habit. “Habit” is a mild way of looking at it, actually. When you spend 10 hours a day doing something, it’s no longer a habit, but an obsession and addiction. I was biting the sides of my tongue and jaws on the inside so much that it often bled and was sore much of the time. This exacerbated my TMJ tremendously. What I was doing daily went against all of my beliefs and norms and everything I knew to do. I simply couldn’t stop. I researched it and made a remarkable discovery: this is an area in psychology that is rarely focused on and discussed! I couldn’t even find the scientific name for it and barely was able to find forums where it was openly discussed. Not many cries for help- not many confessions. This confirmed my suspicions that this disease is still done in secret mostly, and so well hidden that it’s rarely discussed. There’s a tremendous amount of shame that accompanies this disorder because it doesn’t make sense to begin with. To confess would be an open acknowledgement that “something is wrong with me”. It’s so much easier to keep it in a locked closet and pretend that it doesn’t exist.
It’s no different than cutting or any other form of self- mutilation. It’s the same processes in the brain that sanction gashing open the flesh and feeling the pain. Not only feeling it, but welcoming it. In my case, it was my teeth doing the cutting instead of a knife. I guess I had to get so sick and tired of being sick and tired of the disease controlling me rather than me controlling it, but finally, I was able to get to the place and recognize that “jaw-biting” was like an abusive partner that I swore to love and commit myself to and even protect. I needed to view it differently if I expected real change. I needed to break up with it.
Update:
After “breaking up with” my sick disease, it’s been three months. I haven’t done it once even! A life-time addiction- gone in once second. And I have been through some serious ^&%$ since then. At first, my thoughts were overwhelming. My anxiety was through the ceiling. I didn’t know what to do with my hands. My thoughts were working overtime and very much in an OCD-related way. So much chatter. It wasn’t easy- I just knew I needed to stick it out. After many uncomfortable weeks, the chatter dissipated and all was quiet. Finally, there was peace.
Recapping the letter:
[Originally posted February 12, 2013]

Dear bad habit,
I don’t know how to tell you this, but I just want to be friends I want to break up with you. You know I love you! And it’s not you- I swear- it’s me. I just can’t do this anymore. I don’t like the way you’re constantly attacking me, and it’s like I have no time to myself. What you’re doing to me seems harmless, but it’s abuse, and I will not stay with somebody that abuses me. We’ve been together for 35 years. I know I’ll never see you again after today. I can’t say that I’m sorry about that. Goodbye. And thanks for everything.
-Birgitta
Photography Basics and Layering with Textures
So Jen, I realize that if I’m waiting for a chance to “open up” for me to not be so busy, I’ll be waiting for a very long time. I’ve decided to sacrifice a bit of my schoolwork to share with you some of the photography tips and tricks that I’ve developed over the past decade. I’m going to demonstrate the four main areas of a photograph that are the most important to me:
- Composition
- Lighting and exposure
- Mood
- Rule of thirds
These are four areas that must be present in most of my photos and if they aren’t, then I supplement one of the other areas with an extra amount. Such as, if the lighting isn’t the best, kick up the mood. (Etc.) This is a good short list to stick with and think about these things always when taking your photo. Because of the ability to simply slap a filter on a photo in post processing (Iphone apps, Photoshop, Gimp, Picmonkey, etc.) it’s all too easy to fall into the “lazy photographer” trap and think, “Eh…I’ll fix it in Photoshop.” But again, this makes for bad pictures that are heavily “shopped”. I’m going to teach you a few in-camera basics that will give you a good solid pic to start out with. That way, when you dress it up, it’ll be that much better (not that much worse). What I’m going to teach you is going to seem like a lot of hard work! That’s because it is. Everything I do is manually done in “layers” – sometimes one photo can have 20+ different layers blended together. If you learn how to do these things though, instead of just “slapping a filter on it”, you’ll have your own style that is tailor made and it will be very difficult to replicate. Editing is very much like gourmet cooking. We photographers all have our own “recipes” and we guard them closely! I’m going to give you all of the ingredients for you to create your own style. And, if you have your own style- you’ll stand out from your peers in this area. Compare every photograph you take with a painting. The SOOTC / straight out of the camera pic is the canvas. We’re going to use our photo editor to “paint it”.
First, here’s a small list of abbreviations that you’ll need to learn:
SOOTC: straight out of the camera
AP: aperture
Sh. Sp.: shutter speed
WB: white balance
PS: Photoshop
“Shopping”: Photoshopping
BG: background
FG: foreground
B&W: black and white
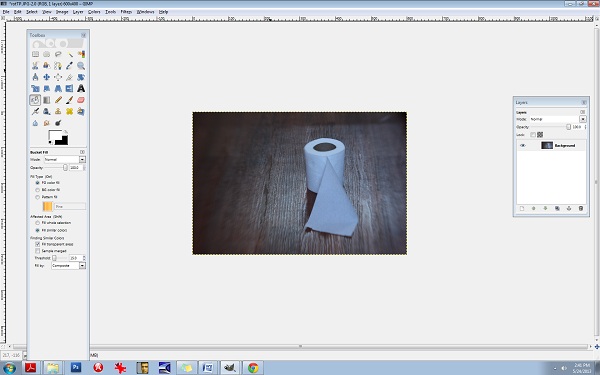
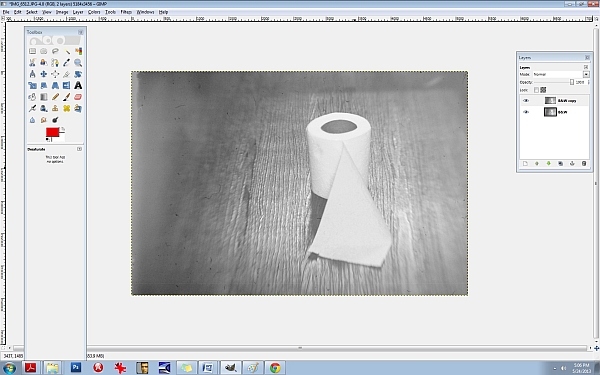
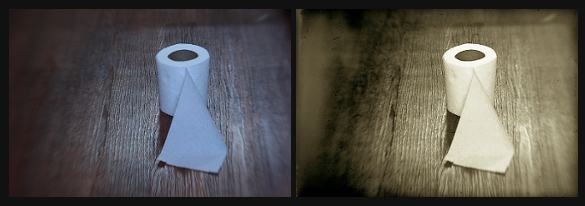
Let’s start with toilet paper.
I took this shot a moment ago on my bathroom floor. I like using toilet paper because it’s simple.
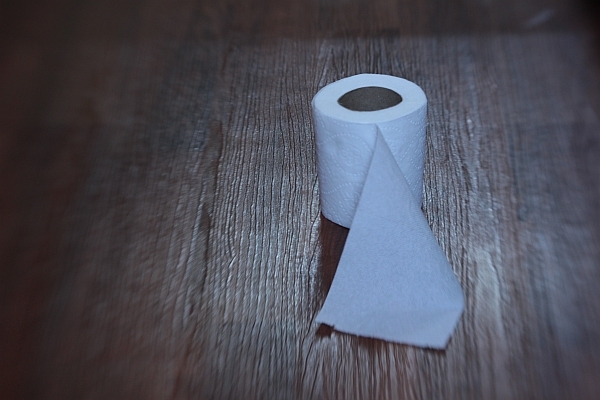
This is a SOOTC shot, or, “straight out of the camera”. I like using the Lensbaby Composer lens because as you can see, it naturally blurs the edges of the frame. This particular kind of lens is great for moody, dramatic images (my trademark style) and especially vintage pieces. Here are the specs for this shot:
Lens used: Lensbaby Composer
Aperture: f/4
ISO: 400
Shutter speed: 1/15 sec.
I know you’re using a point and shoot and that’s ok; it’ll do just fine for this.
The first thing to do, always, with a shot is correct the WB/white balance if necessary, and much of the time, it’s necessary. You can see that the toilet paper is a little blue looking. It’s a good thing to make sure your WB/ white balance is preselected on your camera (this is the shady, cloudy, night shot area). If I would have paid attention beforehand, I would have selected “cloudy”, alas, half the time I don’t. For the record, it’s best if you do.
We’ll adjust the levels (midtones, shadows, contrast, lighting, and highlights in a few moments but let’s continue on first with the basics). Notice the composition: it’s off-centered. When composing your single subject, you should always try to off-center them slightly, no matter how slightly. This is where you’ll learn about “rule of thirds”. Imagine that a 4 lined grid is over your image: 2 lines vertically- 2 lines horizontally. It would look like this:
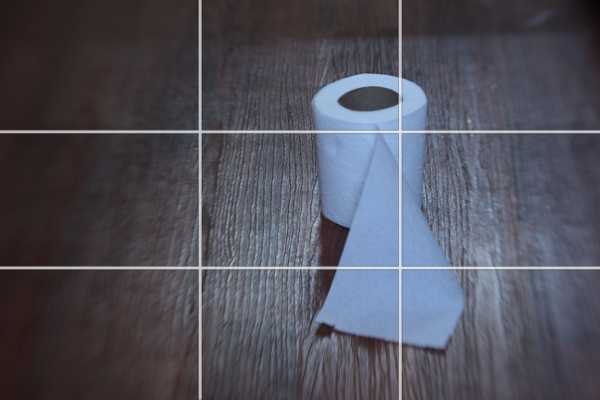
Notice the 4 connecting areas in the center: these are known as “power points”. Always place your subject, or subjects, in one of these areas. I have an invisible grid in my mind’s eye that is always there when I shoot and I’m always mindful of this. Over time, your “natural rule of thirds grid” will kick in and it will become like a second skin: you won’t even need to think about it.
Now let’s do a bit of post processing.
We’ll start with our levels.
We’re going to use GIMP because it’s a free photo editor. It’s a lot like Photoshop and much of the time, I actually prefer GIMP over PS/Photoshop. It can be daunting or overwhelming if you’ve never used it. Remember, fear is nothing more than the lack of education in an area. We’re afraid of what we don’t know much of the time. By learning the basics of photo editing, you’ll take the fear out of the equation and it won’t seem overwhelming any more.
You can find GIMP here:
http://www.gimp.org/downloads/
Just click on the 3rd or 4th line down in the first section.
Install the program and open up your pic : FILE/OPEN
It should look like this:
Be sure to open up your Toolbox panel on the left and have your “layers” there on the right. If these two crucial boxes do not open up on their own, you can do it manually by clicking on the WINDOWS tab at the top right corner. WINDOWS/DOCKABLE DIALOGS/LAYERS and WINDOWS/TOOLBOX.
You’ll need to keep these two boxes open throughout all of your editing.
Almost everything I do has to do with “layers” and this is not uncommon in photo editing. Even the most basic of editing (level adjustments) will often contain several layers and it’s one of the areas of photo editing that is an absolutely MUST to learn. Otherwise, you’ll be stuck with cheesy filters and one dimensional photos.
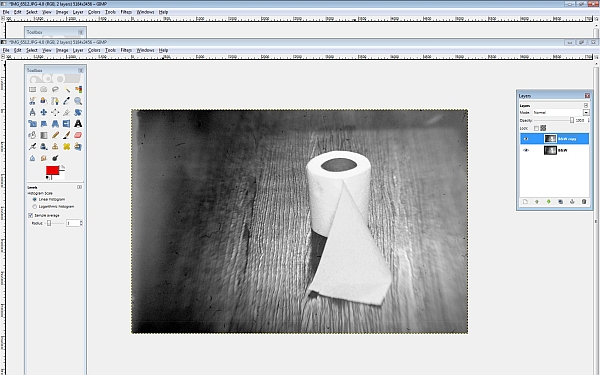
Right click on the Background layer in the LAYER box on the right. Select DUPLICATE LAYER. Now let’s go to the LEVELS area so you can make some minor adjustments.
Go to the COLORS tab at the top and select LEVELS.
You’ll see the LEVELS box pop up:

The diagram at the top is what you’ll want to adjust. Underneath the words INPUT LEVELS you’ll see 3 sliders. These control your shadows/midtones/and highlights. The shadows are the blackest/darkest parts of your image, the midtones are the midrange tones and the highlights are the brightest parts of the image. Always be careful with the highlights slider- you can easily blow out your whites. Let’s start with the middle slider:
It’s naturally set at 1.00 so set it at 36. Set the 1st slider (on the left) that controls the blacks or the shadows to 1.11 and set your highlights slider (the one all the way to the right) to 1.97.
You can see that the lighting is a bit more dramatic. Go ahead and duplicate this layer again. Double click on the text to rename it, (Rename it LEVELS) and then press enter to stabilize it. Rename the new layer CB for COLOR BALANCE.
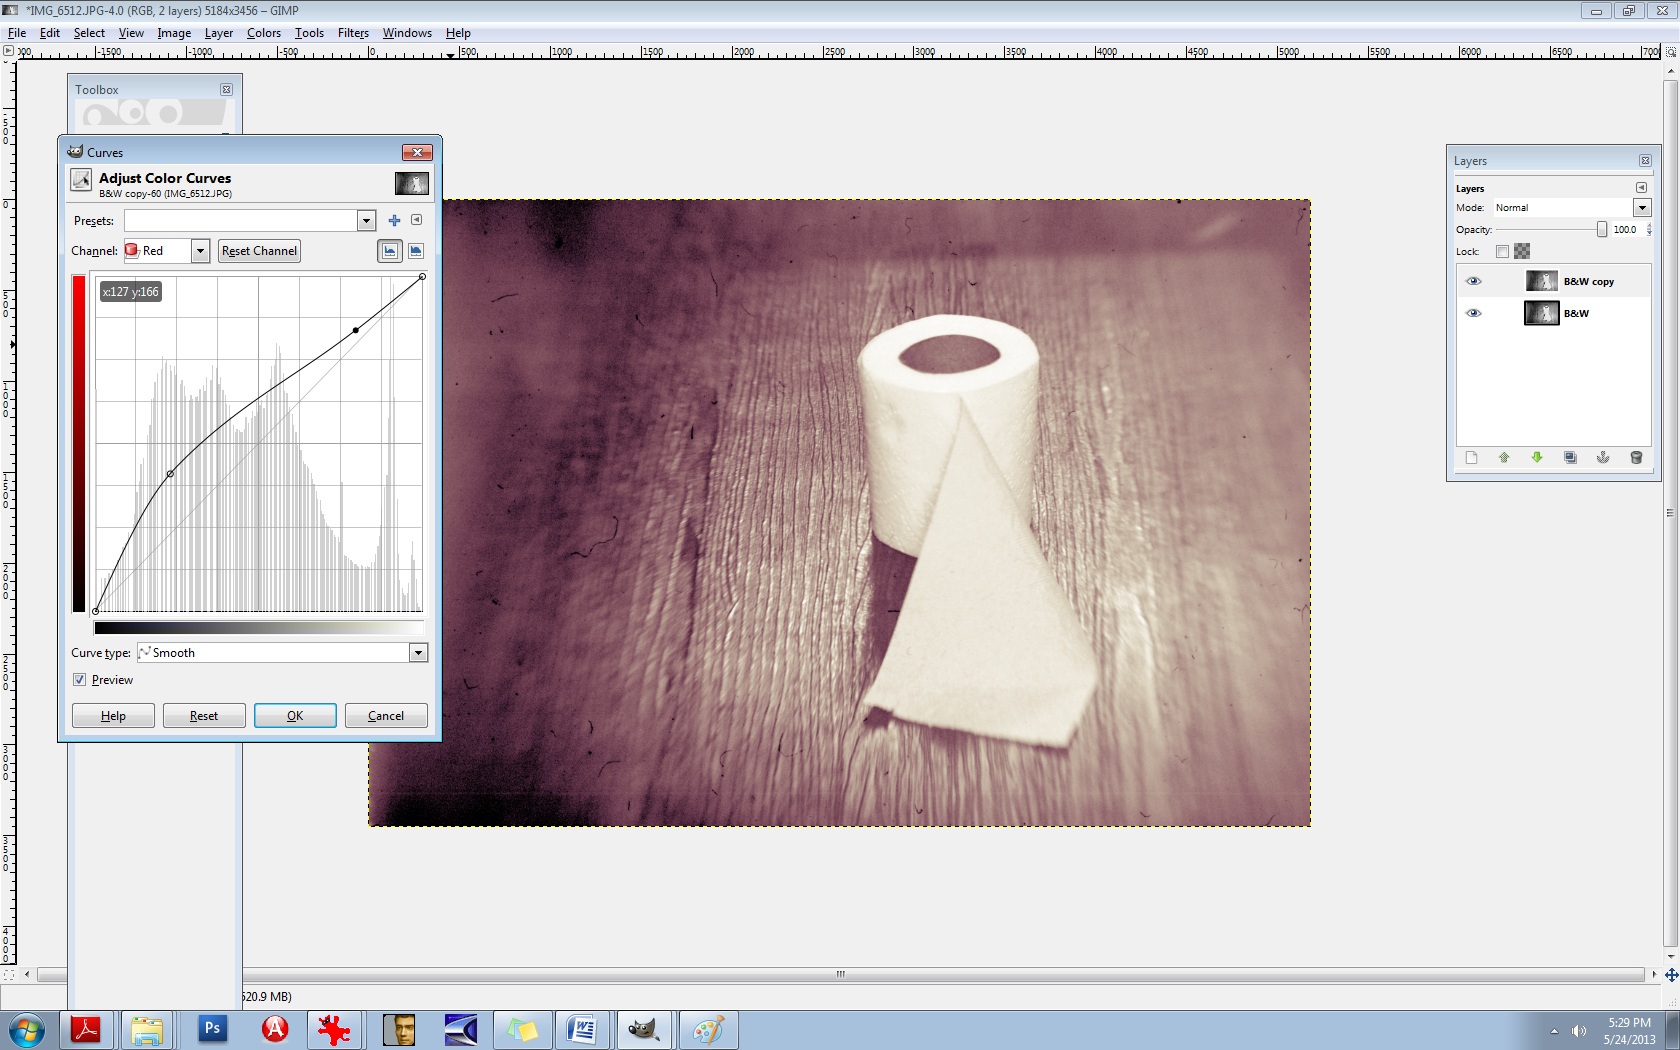
Now let’s fix the colours and the WB/white balance. Go to your COLORS tab at the top and select COLOR BALANCE. This is another area that I’m constantly using. Let’s get rid of that blue cast. You’ll notice in your COLOR BALANCE area 3 specific ranges: shadows, midtones, and highlights. There are 3 sliders for each one and 6 hues to adjust, per slider. Remember, your highlights are the brighter areas of the photo, in this case, it pertains directly to the toilet paper, so select HIGHLIGHTS. Your goal here will be to move your sliders AWAY from the dominant colours here, which hare CYAN and BLUE. Every photo is different and the colour values and ranges will be different for every one. Instead of simply telling you which values to set your sliders to here, I want you to analyze the photo’s values, highlights in this case, and adjust each slider accordingly. I’ve learned over the years that a good counterbalance to CYAN is yellow and red, so let’s increase those channels’ values, decreasing the CYAN. Again, be sure that your HIGHLIGHTS channel is selected. Be sure to check that it’s indeed the top layer you’re working on (the layer named CB). Ok, let’s go.
Highlights:
Move slider AWAY from CYAN- +29
Move slider AWAY from MAGENTA- + 13
Move slider AWAY from BLUE (toward the YELLOW) -17
Be sure that your readings are the same:
29, 13, -17
The midtones look pretty good so let’s move on to the shadows and give them some warmth.
Move the top slider TOWARD the RED- +9.
Keep the center slider set at 0.
Move the bottom slider TOWARD the YELLOW- -11.
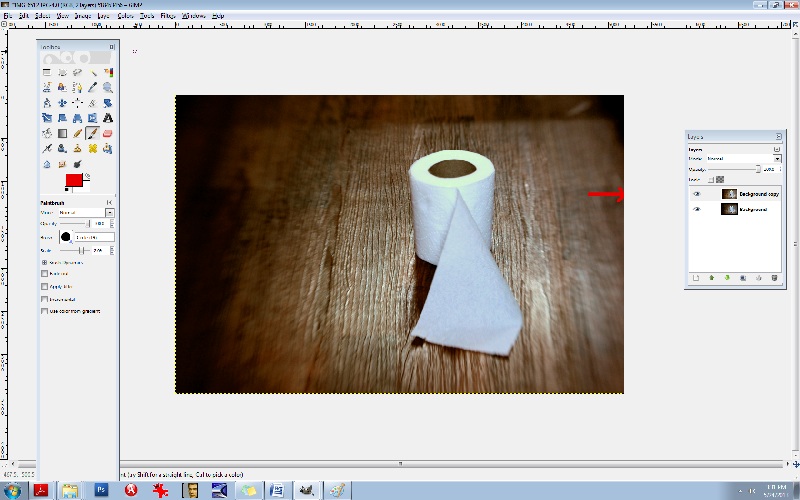
Notice in the LAYERS box, you’ll see a small EYE icon. This is your visibility toggle. If you can see the eye there, it means that that layer is visible. If you uncheck the eye, it means that that layer is currently invisible. This is especially useful as it allows you to toggle back and forth between pics for comparisons. Go ahead and click on the top layer which will set it to “invisible”. Continue clicking the CB-layer EYE and compare your LEVELS pic and your CB/color balance pic.
You’ll notice that the top layer has more reds and yellows- it’s your “warmer” layer. The layer underneath has stronger greens and blues- this is your cooler layer. Let’s mix the two. Notice that each layer has an OPACITY slider. This controls the visibility amount for each layer. Again, always be sure that you’re working in the correct layer beforehand. Choose the top layer, and bring your OPACITY slider down some. Let’s take it to 45%. This will give us a well balanced amount of reds, greens, yellows, and blues in the pic. What this does is increases your colour ranges and adds more depth.
Now, merge all of the layers together. Go to the IMAGE tab at the top, and select FLATTEN IMAGE.
It’s always best to duplicate any image you flatten. You’ll find in editing, it really is a continual cycle of merging and duplicating. So, duplicate it and be sure that you’re working in the top layer. Now, let’s add a textured layer to this. We’re going to bring a dramatic flair to this and give it a haunting feeling.
For this, let’s convert it to a B&W. Yes, all of that colour modification just to convert it to a B&W! The reason for this is to give it a better value and tonal range once it has been converted. There will be added layers of depth by adjusting the colours beforehand.
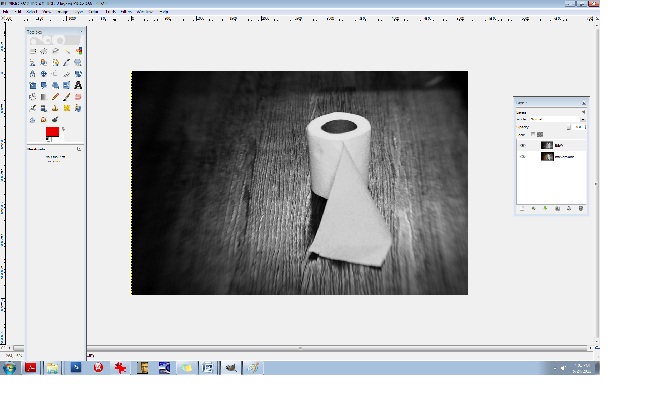
Click on your COLORS tab at the top and select DESATURATE. A small box will appear allowing you to choose from one of 3 areas: lightness, luminosity, and average. Select AVERAGE if you’re not sure which one to go with, but again, because every photo is different and every photo contains different values and ranges, some photos would be best suited for “luminosity” and so on so be sure to test all three for every image and choose the best one. (If you’re still unsure what to go with, choose AVERAGE.)
You’ll notice that we have a good range of tones here from the deepest of black to the brightest of white: this is what makes a good black and white photo. Rename the top layer to “B&W”. You should have the coloured image on the bottom and the B&W one on the top. Now, duplicate the B&W layer. You can rename it B&W2.
Let’s add a texture. (Adding a texture isn’t necessary at all, and it can be very tricky at first, but it compliments many photos, especially portraits, abandoned houses and such.) I like to add a texture or several sometimes because it too adds depth to your photo. I like things that look like hair or old film scratches- it gives my images a dirty, ugly-ish appearance and that’s exactly what I like.
So let’s add a dusty old film-scratch texture to this. Here’s what the texture looks like by itself:
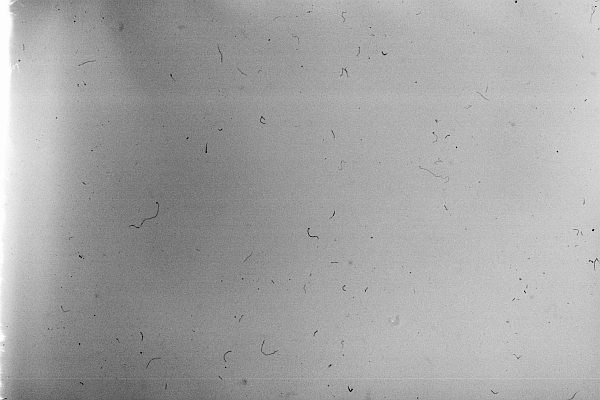
It’s one of my favourites.
When adding a texture to a photograph, it’s very important to make sure that your sizes match up. Check to see what size your image is in GIMP. You can do this by clicking on the IMAGE tab at the top and then select SCALE IMAGE. Notice the sizes there. Be sure that it’s set to PIXELS (the box on the right) and that the width and height are written down (or memorized). Those are the exact measurements that you’ll need to resize your texture to. I recommend using IRFANVIEW as a basic photo viewer, it also reads RAW files so that’s perfect. (I’ve used IRFANVIEW for 8 or so years now and it’s one of my most used tools.) You can get it here:
Download and install that. Once you’ve opened up your pic in IRFANVIEW, resize it to your proper width and height, and then IN IRFANVIEW- select EDIT/COPY. Now we’re ready to paste the texture into GIMP. After copying the texture, go to GIMP and select EDIT/PASTE.
Once the textured layer has been pasted into GIMP, you’ll notice on the right side in your LAYERS box that the top layer has been added. It’s what is now called a “floating channel”. You’ll need to stabilize it like the rest of the layers and it’s very simple to do. Right click the (top) floating channel (your texture layer) and click on ANCHOR LAYER.
Now you should see 3 stabilized layers there in your box. The texture in the top layer, the B&W image in the middle, and the coloured BG/background image in the bottom. We no longer need the coloured image in the bottom channel/layer so you can go ahead and click the eye, switching it over to invisibility if you like, or, you can leave it as is- it won’t hurt anything.
Now it’s time to learn about BLENDING MODES. In the LAYERS box you’ll notice the word MODE above the OPACITY slider. This is the area that gives your layers different effects. The blending modes I use most often are: overlay, multiply, screen, and soft light. There are lots of useful blending modes here though.
Be sure that you’re working in the top layer of the LAYER box (should be named B&W2 copy I think) and take the OPACITY down to about 63.4%. Go to your blending mode area which is MODE (again, it can be found above your OPACITY slider in your LAYER box) and set the mode to SCREEN. This is a bit of a light, silkscreen and gives your images a soft, smoky look. Afterwards, go ahead and flatten the image, again, you can find this area at IMAGE/FLATTEN IMAGE at the top tabs, and then immediately DUPLICATE the layer. It will then look like this:
Next, let’s run it through the LEVELS again to increase the blacks/SHADOWS. I often repeat my processes two and three times throughout one photo edit. Increasing the shadows at this point will give the blacks a smeared/chalky chemical look. Let’s try it:
50/80/46
INPUT LEVELS/3 sliders:
Shadows (1st slider all the way to the left)/ middle slider- midtones- .80/3rd slider all the way to the right (Highlights)- 245. Now, DUPLICATE the top layer again, and let’s hit the LEVELS one more time.
Set them at or around these levels:
INPUT LEVELS:
Shadows/1st slider all the way to the left- 29
Midpoint/middle slider- 1.34
Highlights/3rd slider all the way to the right- 255
Notice the darker “burned” looking areas in the shadows now. It will look like this:
Now I’m going to teach you another useful trick. It’s the CURVES area and it will give us master control over our colours and hues. Go here: COLORS/CURVES from the tabs at the top. You’ll see a CHANNEL dropdown menu box. Inside you will find the RED, GREEN, and the BLUE channels. We’re going to edit each of these three channels individually. Think of your primary colours and the various colours you can create by mixing them. Let’s make a base/foundational colour of bluegreen/yellow. Select your BLUE channel, and then make a backwards or inverted “S”, like this:

Don’t go over the top or it’ll be overkill. Remember to do all things in moderation. Now, let’s kick up the reds. Select the RED channel from the same area (dropdown menu):
Let’s do something a little different here. Experiment. You don’t have to do the exact same thing- find your distinct style here and work with it.
Let’s experiment with the GREEN channel, found in the same area:
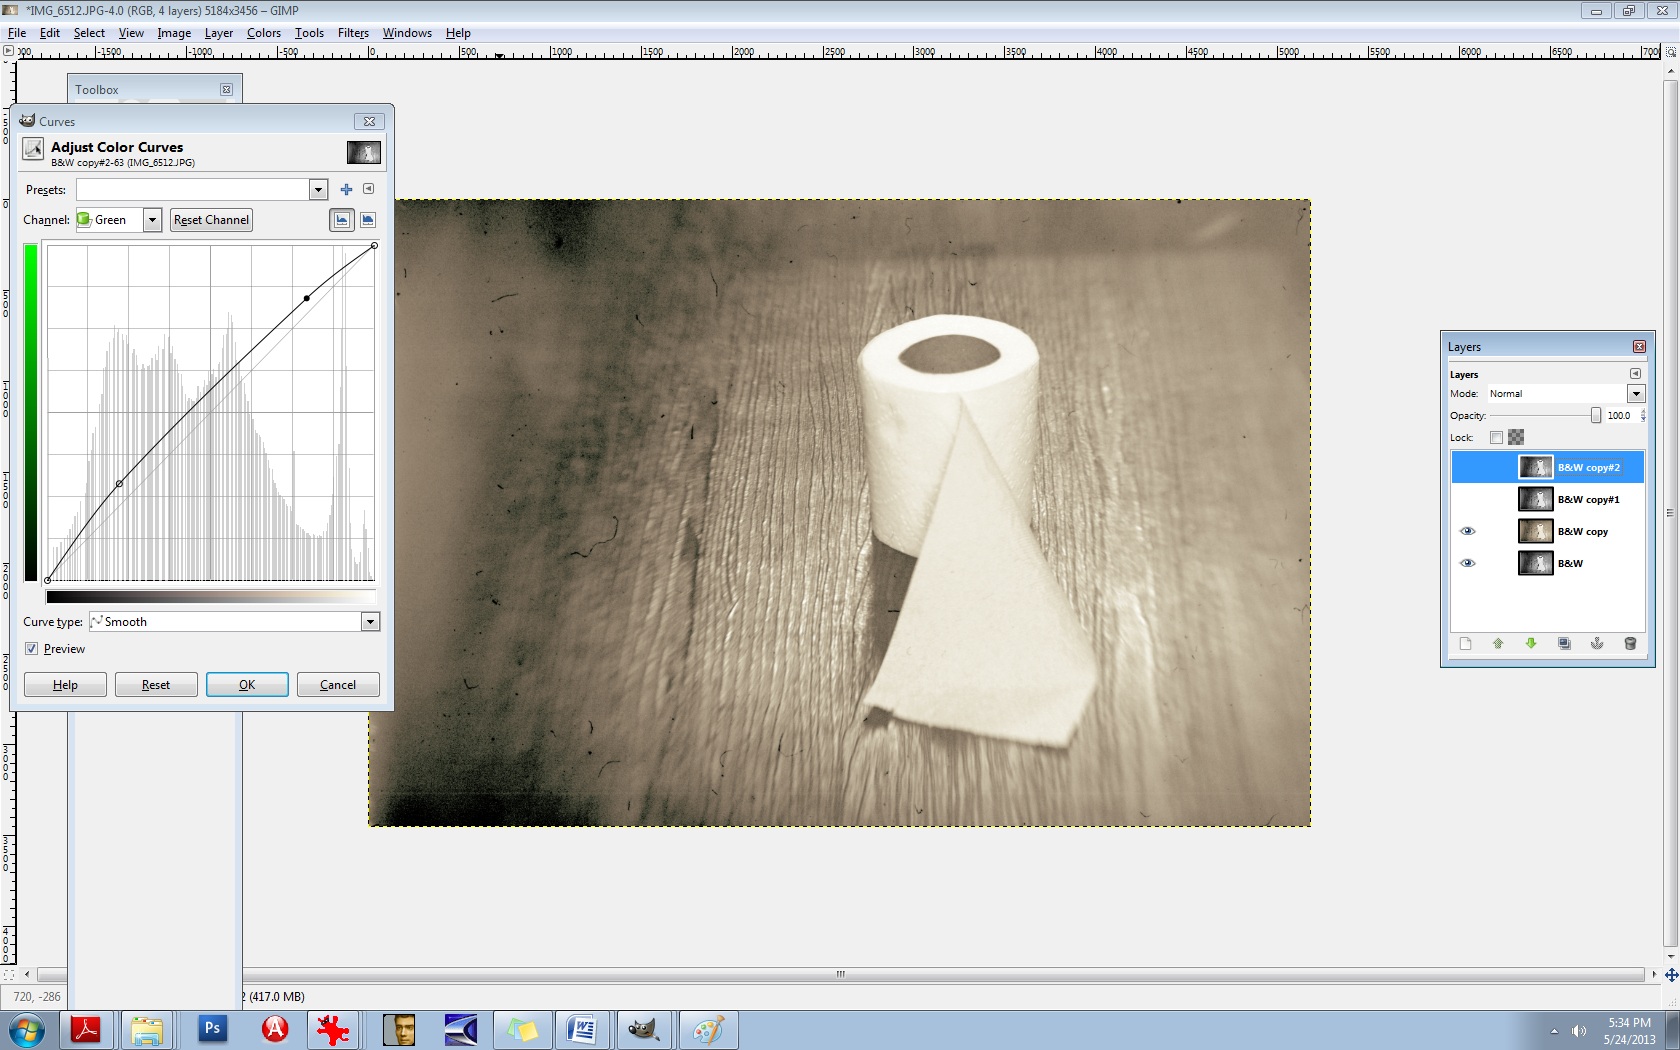
There’s no right or wrong way to do this. Do what makes you happy.
Now, merge the two layers IMAGE/FLATTEN IMAGE and then DUPLICATE the layer once again.
Now you’ll use the same thing: CURVES to adjust your overall lighting. Select COLORS/CURVES. In the CHANNELS box there- the drop-down menu, it’s preset to VALUES. Leave that as is. The diagonal line that you see is the line you’ll be using. Pull the bottom left part of the line straight down to increase your shadows/blacks. As seen here:

It’s still a bit too red for my liking, so let’s run it through the colour balance again to decrease the reds.
Go to COLORS/COLOR BALANCE from the tab at the top and select your MIDTONES channel. Move the slider toward the CYAN -14. Leave the middle slider as is, but set the bottom slider to -1 in the direction of the YELLOW. (In other words, TOWARDS the YELLOW.)
It should now look like this:

It’s a mixture of yellow, red, cyan, magenta, green, and blue but the dominant colours are yellow and green. You’ll notice that it’s not one “flat colour” or tone. There’s more depth here because of the broan ranges in colours. Let’s do one final thing to it to give it a bit of a smoky vignette around the edges. Select your BURN tool. In your TOOLBOX area it’s the tool that is at the bottom, just aboce your colour palette boxes. Move your cursor over it and it’ll read: DODGE/BURN tool. (The DODGE lightens it the BURN darkens it.) We’ll need a bigger brush than the ones offered so let’s create a larger one.
Select your BRUSH tool.
At the very bottom of the pop-up box that displays your brush selection, find the bottom right brush icon and select it. You’ll need to click on the actual CIRCLE brush picture in your brush area to activate it first. That can be found just underneath the OPACITY slider and above the SCALE slider. Once the popup box opens up, you’ll see the needed brush icon in the bottom right corner. If you move your cursor over it, it should read: Open the brush selection dialog
Now at the bottom of THAT area, you will find a NEW BRUSH icon. Click on that. Increase the radius to your desired amount and rename the brush something like LARGE. It will then be added to your brush collection. If you do this, it will come in handy tremendously. You’ll need larger brushes for partial erasing, burning, etc.
Now let’s go back to the burn tool and select your large brush. You’ll need to decrease its size right off the bat, significantly. I set mine to .74% SCALE and 28% OPACITY. Your goal will be to burn the very edges of it neatly, not add a big, puffy smears.
After it’s finished, it should look something like this:

Last but not least, we need to add a bit of a guassian blur to it and then sharpen it. The blur gives it bit more of a vintage finish and we’ll slightly sharpen the focal point afterwards. Let’s go ahead and merge the layers again, IMAGE/FLATTEN IMAGE. (From the tabs at the top.)
DUPLICATE the layer, of course.
Then you’ll choose (from the tabs at the top) FILTERS/BLUR/GUASSIAN BLUR. You’ll see a BLUR RADIUS area which will allow you to set your horizontal and vertical blur radius. Select 2 for both. Click OK.
Next, you’ll need to select (from the tabs at the top) FILTERS/ENHANCE/UNSHARP MASK.
Set the amounts for the following:
RADIUS: 6.4
AMOUNTS: 5.0
THRESHOLD: 0
Over time, you’ll grow more aware of what radius you’ll need for each image.
Now we’re going to layer this underneath our blurred layer. First, let’s name these layers accordingly so we don’t confuse the two. First, be sure to duplicate the bottom layer, always. Anytime you make significant changes to your layer, it’s good practice to duplicate the BG or base layer so you can go back to it if you mess up. So, duplicate that bottom layer. Toggle the EYE icon to invisibility (again, on the bottom BG/layer).
Now, rename the top layer to SHARP and the middle layer to BLUR. The middle layer should be the Guassian Blur layer.
Now you’re going to learn how to erase. First, let’s switch the layers. We want the blurred layer on top and the sharp layer underneath it. You can do this easily by pushing the BLUR layer right up to the top.
We’re all set to erase. Go to your eraser tool which you’ll find in the TOOLBOX area. Select your LARGE brush that you’ve just created. Our goal here is to isolate the focal point, which is the center of the toilet paper roll in this case. We’re needing to erase the blur from the top layer so the sharpened bit can bleed through from the layer underneath. This is one of my most used techniques in editing and I use it with lighting, tones, colours, practically everything. You’ll be able to “paint things” into your photos with your eraser brush this way. I can’t stress the importance of doing this for added depth in an image.
Let’s set our brush to .96% SCALE and about 24% or so for the OPACITY.
Now because we’re going to be erasing FROM the BLUR layer, we’ll need to right click on that layer and select “Add alpha channel”. You’ll need to do this for every layer you’re needing to erase onto. (Only the BLUR layer in this case.)
So let’s erase just around the toilet paper roll itself so that the sharpness will be revealed underneath. If you find that you’re still needing more sharpness, increase your eraser brush’s OPACITY to 60% or so.
I think we’re just about finished here. You can use these steps to create moody, dramatic, “haunting” images or chemically processed, burned “ugly” type works. They’re not for everyone, but they’re my favourite. Here is a comparative before and after:
I strongly encourage you to experiment with these steps. Again, there are no right or wrong ways to do them and really, every person is different and we all like different things. In time and through trial and error mostly, you’ll come to find your own distinct style. It took me a good 7+ years to discover most of these things. (Lots of tears, frustration, and aggravation.) I know this seems like a lot of work, but this is actually a “quick edit”. It can become a complex procedure when 5+ textures are involved. All of this is a lot of fun though. I hope I was able to help you some.
xo
-Birgitta
Early Morning Speakeasy

“Third Base” biker bar- early Sunday morning drive-by/50 MM natural lighting/manual
There’s something about typing late at night that’s so very gratifying. Maybe it’s the “me time”, I don’t know. Josh is sitting beside me and everything in life has fallen back into place. It’s funny how that goes; all of the “normal everyday things” that one simply expects to be there over time are there, and they’re very small things not even worth mentioning. But take those little “connectors” away- those small unmentionables and it shakes the very foundation of all that is solid in your life. This proves to me that it IS the little things that are most important to me. When they’re gone- everything changes down to the very way you perceive the world to be. When Josh and I are tight, as we are now- the world is “doable”. I’m careful to give him his space and am even suggesting he get a shed so he can have a bit of a man-cave going on. (Guys need a “safe place” to go where there are no women. It’s funny to think about, but it’s so very true. I support him in those endeavors fully.)
The construction trailer outside didn’t work out so well. The new management approached us and gave us a 2 hour warning to move it or lose it. They had already called the police and a tow truck. We were in a bit of a jam, but that’s when I’m at my best, not surprisingly. Maybe it’s all of those McGuyver episodes (or the hundreds of adventure games I’ve played over the years) but I like to get creative and resourceful with practically nothing. We called the Uhaul facility- they had no trucks with a hitch at the moment. After several other phone calls, we were able to find a guy that hauled it away to storage at the drop of a dime. Josh would have lost his trailer for good- it would have just been too expensive to try and retrieve it. Darn it. That means he’ll have to actually stay INSIDE here with me. (I’ll try to not be disappointed.)
I wonder what Josh thinks about me sitting here typing all of our business to the world. 🙂 He’s a good sport.
We have to be up at 8 in the morning- there just aren’t enough hours in the day! Josh is getting ready to start his semester also- I love it when we’re both in school at the same time. He’s working on General Studies for now but he’s considering moving in the direction of Physics. (He and his sister are both terribly smart.)
I have a Health Psychology assignment to do first thing when I get up and after that, a Public Speaking assignment + 25 more pre-calculus problems and that’s all before 10:00 a.m.! Life is a blur.
But at least I’m using exclamation points again so hey- it’s not all bad.
🙂
And smiley faces.
xo
Intermission
Taking a break from the schoolwork.
Jeffersonville Marina- early this morning in the fog.
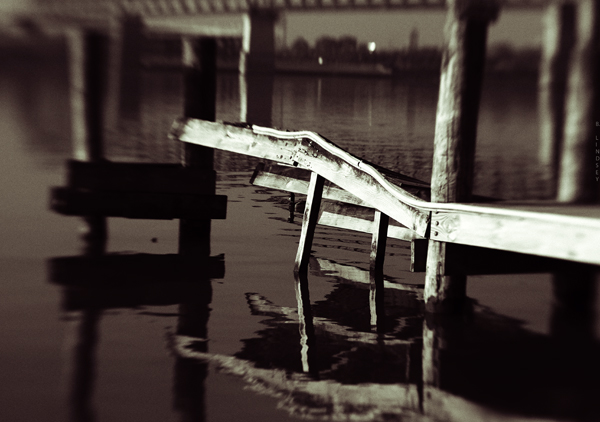
Lensbaby Composer/Double Glass/ f/4/ISO 100
Up with the Chickens
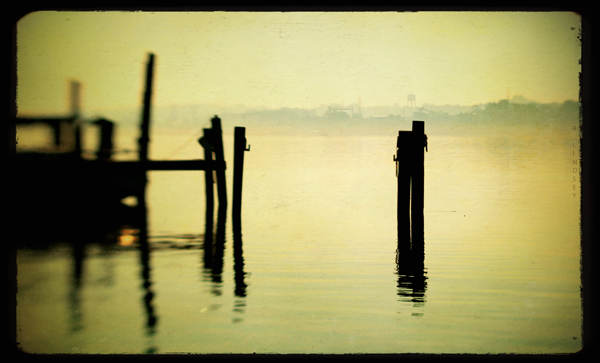
Ohio River/foggy morning/Lensbaby Composer/Double Glass f/4- natural lighting/5.19.13
I awoke this morning to find our home enshrouded in thick fog. How could I not go out and grab a few shots? I drove down to the local marina with a fresh cup of coffee. I have plans today to do one lesson in each course: Public Speaking, Earth Science, and Health Psychology (no small feat), but when I put my mind to something, I don’t let go.
Mornings like these are my favourites: the world is so still- everybody’s sleeping and completely unaware of the fog. For the past several days, I’ve been getting up early and hitting my PC and BS- that’s not short for computer and “BS” – it’s short for “prayer closet and Bible study”. When I start my days with these things and in this order, everything falls into the right places in my day. My mind is renewed, as is my faith, strength, and hope- challenges become “doable” and I have a promise of success already- I just need to do the work.
When I was praying this morning, I felt the Lord wrap his arms around me and give me a big hug. I know that I’m loved, terrifically; I don’t worry about things.
So I’m off to put a huge dent in my schoolwork.
It’s going to be a beautiful day. :0)
Jeremiah 29:11
For I know the thoughts that I think toward you, saith the LORD, thoughts of peace, and not of evil, to give you an expected end.
Tibbers: Our Newest Family Addition
Bob’s friend, Justin, came to stay the other night and brought over his little friend, Tibbers. (Aka Fuzzy Lumpkins, and Esper.) He’s only three weeks old and was abandoned in Alabama. Justin’s mom brought him back with her and now he belongs to us.
Josh fed him this morning from a plastic bag with a tiny hole poked in it then gave him a bath. (I’m convinced he’s the cutest kitty in the world.)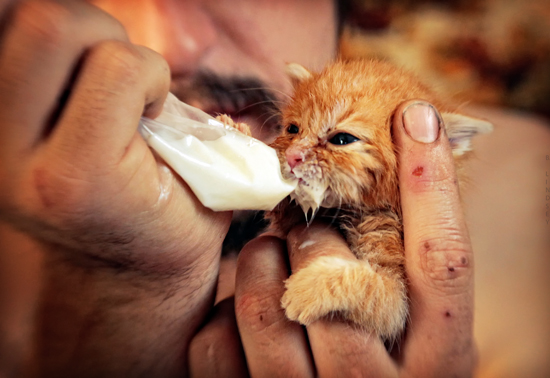 Lensbaby Composer/ Double Glass/ f/4- ISO 800/natural lighting
Insomnia
I can’t believe I’m still up at 1:46 a.m.
The house is pretty quiet; Brian Bob is hanging out in his room with is friends, Brianna is sleeping. Josh is in the living room occupying himself and I’m getting ready to fall out of my chair. There is no way I’m getting up at 6 in the morning.
We went down to the river today so I could grab some coloured water shots with my Lensbaby. Try as I might, I can’t get away from shooting in monochrome. The pics that I do shoot in colour don’t stay coloured for long. Everything is prettier to me in black and white (and duotoned). I’m deviating back to my old ways of darker moods, heavier shadows, and dramatic lighting but I love it.
Bob and Josh are chopping up watermelon now. Today would have been my Dad’s birthday. (Technically, it still is, though he is in heaven.) I’m seriously downplaying the craziness that has become my life lately. My mom was hospitalized- near stroke- really, the list is way too long to name. If I were to write about every crazy (weird, sad, bad) thing that happens to me, I swear people would think I’m making it up. Nobody goes through this much crap in one lifetime!
Yes, somebody does.
I know I’m not the only one.
“I think I’m going to do it,” Brianna said to me earlier.
“Do what?”
“Kill myself.”
“Why do you talk like that? What’s wrong with you?”
[She went on to explain that Anthem Bluecross Blue Shield had interrogated her on the phone and I suddenly understood why she felt that way.]
“Why don’t you grow some nads and take it like the rest of us?”
This is our typical mother and daughter bonding. She tells me how bad life is, I tell her that it only gets worse. We have grown on each other over the years, she and I, like an old married couple.
“Brianna, you’re an old curmudgeon and you’re only 18,” I say.
She looks at me as if I’m a robot. She looks as if she’s a robot. She doesn’t blink or show any emotion. I laugh.
“Give it another twenty years, Sissy,” I say to her. “The party’s just getting started.”
Bob is dancing and humming as he eats his watermelon. He shifts his feet sideways almost mechanically. It’s 2:04. Time to hit the hay and do it all over again tomorrow.
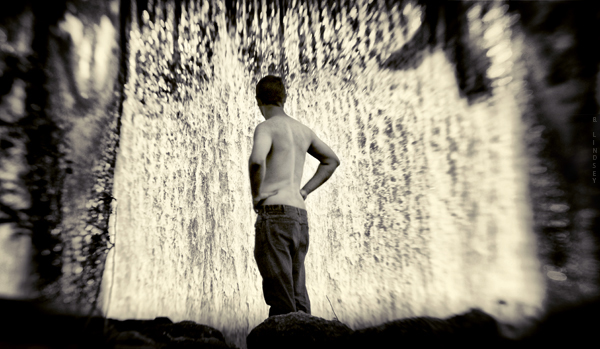
Lensbaby Composer/Falls of the Ohio
f/4-ISO 400
Josh, gazing at the dam


S P L A S H
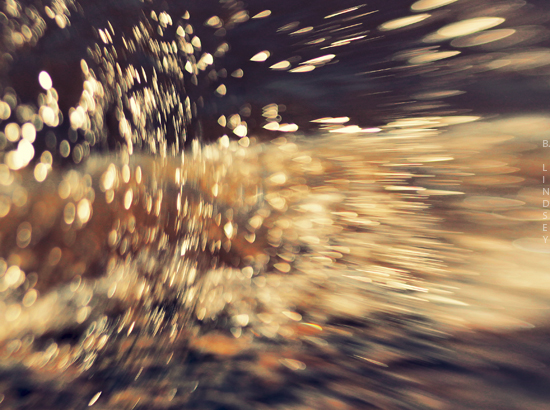
Lensbaby Composer/Double Glass
f/2.8 -natural lighting/ISO 100
sh. sp. – 1/4000/Falls of the Ohio
5.15.13
I may or may not be showing several of my water pieces in a “water exhibit” soon. (More on that later.) For now, it’s hush-hush.
I went out today down to the Falls of the Ohio (which I actually named “Fossil Rock” when I was a child, 30+ years ago) and grabbed some water shots with the Lensbaby. Although I’m not exactly a novice with this particular lens, I’d be a fool to be so comfortable to think that I don’t have much room to improve. And, truth be told, the more I learn in photography, the more I feel that I need to learn. I’m always restless and, artistically, never satisfied- always pushing to grow and learn new things. Years ago, I had considered going to art school. I’m glad I chose to study Behavioral Sciences instead. With art (and photography in particular), the world is my teacher, the camera is my canvas, and lighting is my brush.
Josh and I are headed back out to the dam area. The (possible) exhibit allows only 3 pieces to show. It’s a juried exhibition- I’m excited. (But again, more on that later. It’s not quite “in the bag”.) I can rap off 500 shots in under an hour, and I do that frequently. Selecting only three pieces from a day’s shoot of thousands of pics is like trying to find a flea on a mountain.
I’ve also been invited to show several pieces in a Berlin exhibition. (Yeah- that Berlin!)
Again, it’s a juried exhibition and I want to do it, but I have to be selected first: it’s a bit if a waiting game. I’m still pretty behind in some of my classes and I’ll really need to put my nose to the grind because the exhibition deadlines are within the next week. Time to set my alarm to 6:00 a.m. every morning!
Off and running…
Sanity Restored
It’s 4:52 a.m. and I’m typing very quietly so I don’t wake Josh. The past 24 hours have been astronomically crazy. I can’t get into the intricate details because a lot of it has to do with his family members, and for confidentiality sake, I can’t divulge that information.
But I can say that the police showed up at my door, having received a report that Josh was a “missing person” (yeah, from me too lately!) and I discovered that it was a concerned relative who hadn’t heard from him in a while that had reported him. Things are straightened out now, but boy-wasn’t that fun?
And on that note, I’m so very happy today. Josh and I have restored our closeness and our bond. I have a big, goofy grin on my face- I have my BFF back! I was a complete and utter mess without him. When relationships break down, it’s common to paint oneself in a positive light and make the other person out to be the villain. I did the same thing at first- I wanted to blame him for everything that had gone wrong. It took many days of agony, silence, tears, and absolute heartbreak to see how wrong I was in my own faults and failures. I was angry and always picking at him. I treated him so unfairly (I hear him snoring so I can type louder) really, I did. No man can live under a woman’s tyrannical thumb: it had become unbearable between us. The split did us both some good. He had moved in with friends and on the positive side, had started going to church and stuff. On the negative side, he was being monitored heavily by his friend’s wife who was a boarding type of landlord who controlled what he watched on TV even down to how he dressed- um, that’s taking “tyrannical” to a whole ‘nother level and in the end, he felt as if he were a foster kid all over again. She thought she was helping him really, but he’s had enough of people in his life telling him what he does and doesn’t need to do.
I want him to have his own space and so we’ll be setting up a small construction trailer on the property here so he can have his own area- I feel strongly that he needs that- apart from me even- his own “home” with a door that he can lock and have his privacy. He’s never had that! He’s always lived with people and been under their rules, including me, and I’ve always been very protective of him in his life- he’s been through the wringer- so it’s high time he have his own place to call home in this world. I’m happy for him. :0) He’s happy too.
Neither of us want to jump right back into the relationship we were in, because it was a damaged and broken relationship. It does neither party any good when you hook back up and “pick up where you left off”- especially if that was a bad place. But Josh and I have the unique ability to shape ourselves around each others’ feelings, needs, and sensitivities and above all- remain friends, no matter what. So, if we have a bit of a breakdown in our friendship/relationship, when we do reunite, it’s with a whole new respect and appreciation for one another.
It’s been a long day and I’m going to hit the hay. We have to move much of his stuff to his new place and I’m wiped out. I love this picture of Josh that I took out at Pounds Hollow Lake in Southern Illinois from our recent camping trip. Seldom have I seen him look so naturally happy such as he was here. It’s one of my favourite pics of him. xo
 Josh/50 MM/Southern Illinois/Pounds Hollow/Rim Rock Trail/Camping trip
Home Depot and the Illuminati

Brianna/50 MM 1.8 II/natural lighting/manual
“You’re seriously not going to go out there like that, right?” I asked my daughter, Brianna.
“Of course,” she said.
“Um…with that…Illuminati symbol? Seriously?”
Oh boy.
She smiled. I laughed. And then I left her alone.
This is Southern Indiana; it may as well be the deep South. Rednecks and hillbillies are thick around here. I quickly put things into proper perspective: she has every right to wear whatever she wants on her face, head, or any other body part. The fact that I disagree is really not the point: I need to respect her choices.
So we headed out to the Home Depot, and short of being lynched, publicly, it went well! There are lots of pot-bellied guys in suspenders there- “good ole boys” who like traditional things and people that just don’t push envelopes or stretch boundaries. Ha. My little family is exceptionally good at that and I’m so proud of my kids.
The looks she got by “the good ole boys” at the Home Depot were shocking (and, hilarious). Brianna walked straight forward with a dedicated gait and didn’t flinch. She didn’t look to see what others thought or if they even looked at her. I gained a new respect for her that day. I still don’t like the Illumnati symbol (at all) but certainly appreciate a person who stands his or her ground and challenges others to bend their perspectives- to break out of their stagnant mindsets and breathe new air- even if that air is foreign and seemingly “threatening”.
I remember well what one of my best friends (of 8 or so years) said to me once over the IM. I’m a Christian- he’s an Athiest- and we were alright to “go there” with each other. Not always- but we didn’t shy away from the subject ever. We liked to know what made the other tick and why we chose to believe what we did, so we often prodded and poked, respectfully.
“Well, you, being an unbeliever…da da da…” I said, foolishly.
“I’m not an unbeliever,” he said. “I just don’t believe the same things you do.”
To this day, that’s one of the most riveting things anybody has ever said to me. Profound even. For six years or so, he and I were so very close. I think of him often and love him dearly. He remains an Athiest and I remain a Christian- but we had a unique understanding and respect for one another. He remains one of my favourite people ever.
It’s too late to be rambling on about the Illuminati and Home Depot and rednecks and stuff. I have to be up early in the morning. I need to go do loads of schoolwork watch Dual Survivor while I eat roasted chicken.
Ta ra.
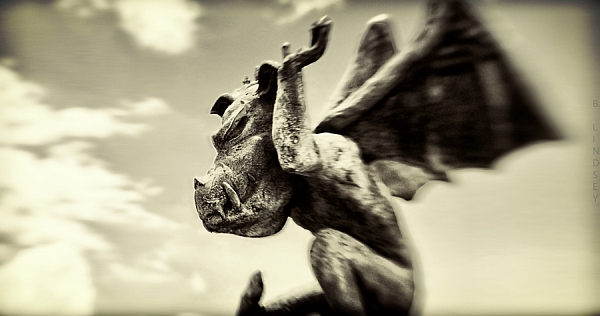
Gargoyles and Other Distractors
I grew tired of being afraid of the gargoyles on Spring street. Maybe “afraid” isn’t the right word; intimidated is closer to how they make me feel. I’ve seen those gargoyles there (at Industrial Nightmare– a haunted house attraction) for the better part of a decade and I’ve looked away every time I see them. They’re hideous. Lately, because I’ve been a bleeding wound from the breakdown of my relationship with J- it’s made everything seem worse than it actually is. Red lights seem longer, curious and inquisitive glances seem harsh and judgmental, time drags on painfully.
As I was driving by today, I saw the gargoyles. I practiced exposure therapy on myself- and it worked! I got out of my car, camera in hand (Lensbaby attached), put on my hazard lights, got out of my car and walked out into the street (yes, actually in the street) and stood below the gargoyle. I studied it briefly then fired off a round of shots. (I reasoned with myself: I’m not afraid to go into abandoned houses, quite the contrary- I love the “ache” that fills the gutted-out space and the stories they sometimes tell. I feel right at home in an abandoned house so there’s no reason why a gargoyle should intimidate me.)
Perhaps the truth is that I see a bit of my own nature in this creature:
When I hurt like I’ve hurt this past month without Josh- the world seems colder. I was alright to simply die inside and I really didn’t care much any more. Love is a funny thing: with a bit of it tucked safely in your pocket, you can take on the world. Without it- it’s a chore to breathe.
Josh came by today. We went for a walk across the creek and up over the train tracks. I was so happy to see him! All of the blame and accusations that have been gnawing out my heart melted away and I became very aware of my own fragility: I had taken him for granted and it really is that simple. This is something that can only be realized after the fact; when all of the chaos has died down and words have ceased and there’s only the echo of your thoughts to contend with.
I came across this picture today:

Happiness was so easy back then! Was that really only eight months ago?
Time can seem so cruel.
I’ve been lost in a sea of pain, but there’s a new layer to me that I felt earlier, as I was folding the clothes: a quiet strength that I never knew I possessed. My strength has always been as loud as thunder- very present and very obvious. This came in a whisper and it said, “This is the way things are now. Pick yourself up and carry on.”
“Your absence is so loud,” I said to Josh.
He held me for a moment. It was enough.

Lensbaby Composer/Double Glass Ops./shot in monochrome/5.8.13/natural lighting/manual- taken on my walk along the creek
Silent Days

50 MM 1.8 II/natural lighting/manual/shot in monochrome
Southern Illinois
I’m so tired of being the only one fighting for this.
And I’m so tired of being thrown away every time my BFF wants to get high. He never comes over on his own. Why would he want to come and see me or hang out with me? I don’t “get high”.
Knowing that I lost my man to porn (again) was a wicked dose of salt right to the eye.
I dealt with it the best that I could (and am quite certain that I haven’t even really begun to deal with it- it’s just way too painful), but I’m no match for his “weed buddies”. I hate losing. But even more, I hate that he’s not fighting for our friendship. At all.
He’d rather be high and “hanging out with the boys”. How juvenile.
It bites the big one.
I should probably get it over with and shoot this horse.
What am I even holding on to at this point?
Maybe I need a new BFF.
Black and White
I’m thinking about setting my camera to monochrome and not shooting in colour (or allowing myself to) for one whole year. I know it sounds crazy but that’s the kind of thing I like to do. When I look out into the world, I see in black and white. I see lighting mostly- shadows and ranges of exposure- tonal ranges. I can stare off in a room full of people and be in my own little world (I’m sure it looks like I’m deep in thought) but really, I’m converting a branch, a table, a moving mouth into monochrome and watching the shadows and lighting change places in my mind.
This is what my creative eye is doing no matter where I go or who I’m with and I rarely deviate. When I went to Southern Illinois with Josh, he wanted to fish, so he fished; but I wanted nothing more than to run up into the hills with my camera. Blossoms were opening up everywhere and colour was shooting to life all around me but the most beautiful thing I saw was a stark branch, unadorned and unassuming.
I painted it black and white in my mind and it was so very beautiful. I gave it a pretty pink coat in Photoshop, but I shot it in monochrome in natural lighting- all manual, naturally.
I call it simply:
Blush
 I love the dancing bokeh in the background.
Specs: 50 MM 1.8 II/manual focus/manual exposure/natural lighting
Shot in monochrome/Canon Rebel T3i/Sh. sp.: 1/800th sec
F/ 1.8/ISO 100
I was inspired by the cranberry hue after seeing my friend, Ingz, from Redbubble (THE most amazing fine art site in the world- don’t waste your time at Fine Art America/FAA) do the same in one of her pieces. She’s an amazing artist- so clean and elegant. I’m expecting some new equiptment soon- particularly another Lensbaby and this time, it’s coming with the pinhole/zone plate. I could just cry. :0) (Thanks again for all of your prayers in that department, Soul Walker. XO)
Maybe I’ll accept my own monochrome challenge.
(We’ll see.)


