Pressure Cooker Squared
I’ve got until Sunday to cover 400 pages- midterms. [Insert scream here!]
Midterms (and finals) are always so much freaking pressure! I’m still at a B+ in Behavioral Neuroscience and a strong A in Cognitive Psychology, but any ole way you slice it- midterms are crazy. I find myself using straight up avoidance (which is actually worse than denial, because at least with denial, you’re not always aware that you’re in denial, but with avoidance, it’s sort of like knowing you’re in denial and choosing to do so anyway- and yes, I’m aware that I’m starting to sound like a psychologist!) and so it’s Friday night and I’m down to the wire.
What am I doing? Installing Still Life II. I actually get to be the detective and the abducted person who’s trapped in the psycho serial killer’s booby trap-laden house (think : “Saw”).
Avoidance. Utter, blatant avoidance.
But fun! 🙂
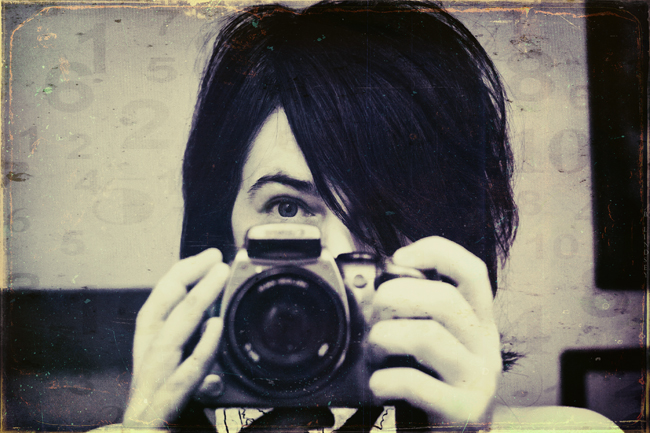
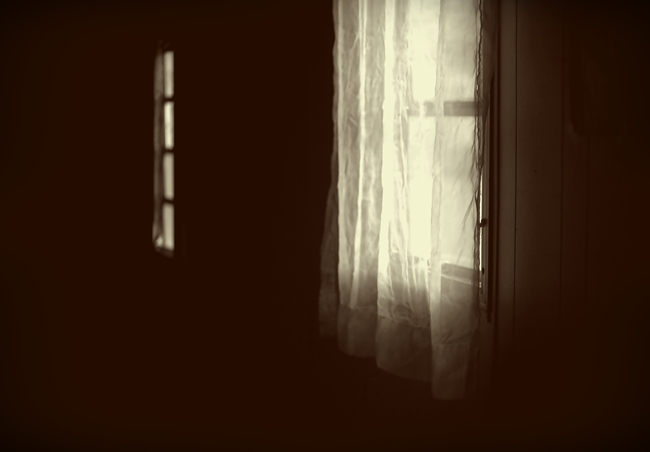
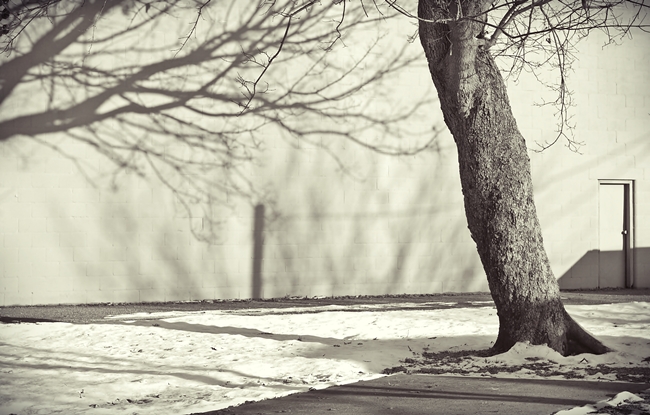
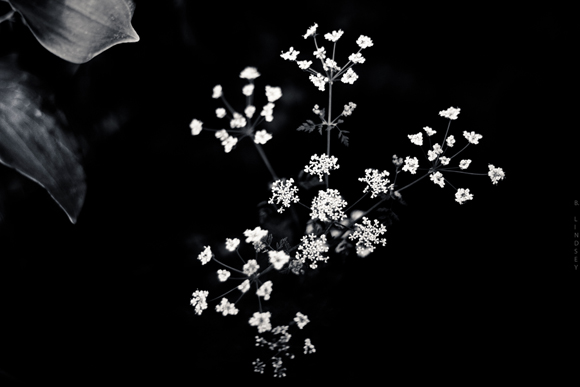
And this is for you, Gav. I know you’ve been down lately, and you’re not feeling much inspired, but I want you to know just how much you inspire me. I have so much respect for you because over the past 8 years or so that I’ve known you (originally from Redbubble) but here too these past few years, you go out – day after day- and shoot nothing but black and white/monochrome. Street scenes, people- life. And, you have a prominent talent with shadows and lighting- which I love. I’ve only shared this with one other person, but I’ve decided to devote an entire year- all of 2015- to solely black and white/monochromatic photography. No colour allowed! For an entire year. it’s going to be great. 🙂 So, while you feel “blah” lately, please know that your work and talent continues to inspire others. This is for you:
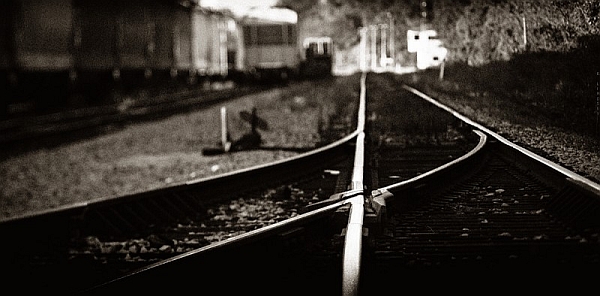
Semi-pano/old military factory in my town- Carl Zeiss Jena Flektogon 35/2.5 film- FRIGID COLD- love ya, buddy! x p.s. Congratz on your show/exhibition last month!

Sabbatical
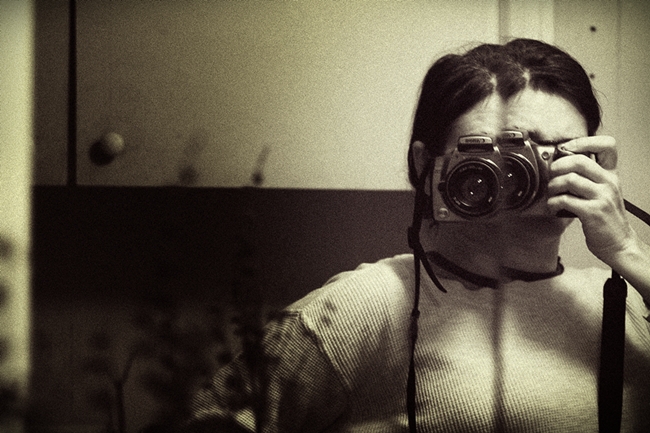
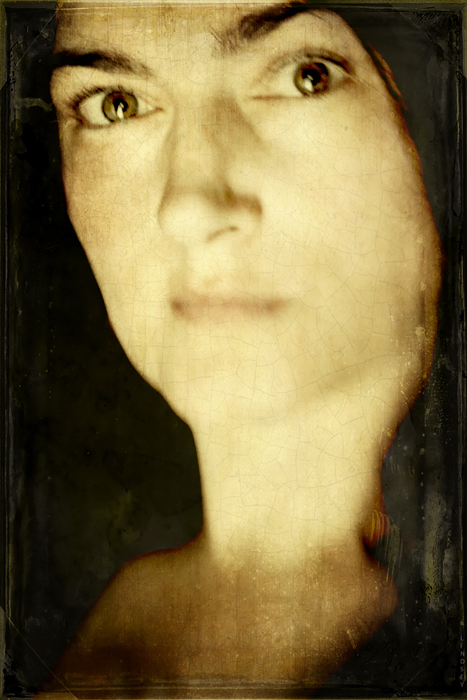
 self portrait-natural lighting/manual-Helios 44-2 film/taken today
I don’t know how much longer I can do this school thing. Many of my friends are now applying for residencies- Bell, a brilliant writer has just applied to a writer’s residency in a remote fishing village in the Arctic Circle and another friend just got back from her residency in a remote rural area in Southern Iceland. I could probably list 50 others (no, seriously) right off the top of my head who are flying here and there and working hard on their exhibitions. They’re truly amaaaaaazing people and I’m really getting to the point to where I miss the crap out of them! It’s more than that. When you form a bond with a tight group of artists- for years- you come to know each other so well. And, you become a cycle of flowing water, each watering the other and eventually, you’re not even “you” any more but hundreds of other people- all reflecting one another.
Because of the hardships that have smacked me down over the past few months, I’ve had to put off my schoolwork until the last minute. I simply couldn’t do anything about it. Now, I’m facing 30 assignments in two combined classes and my deadline is March 7th. Am I screwed, or what?!
I have the resources to take a year off. I won’t have any extra money, but I would be able to minimally pay my bills and rent, buy food, but not much more. I’m not ready to jump into a “career”, socially speaking, not until I finish school, and so I’ve been in this tailspin for quite some time. My complaints are still the same. I want to do so many things with my art and music: I simply can’t as long as I’m in school.
And school is choking the living daylight out of me. Sure, I’m accomplishing small goals, always. But my bigger ones are drying up, such as, making a music CD, doing more school readings with my book- guh. I just don’t know how much longer I can do this.
Tonight, I’m supposed to work on my assignments, but I have to hook up with my art peeps and reconnect.
I can’t believe it’s March and there’s this much snow on the ground.
My red wine awaits. I have to take a freaking break before I blow a gasket.
I’ll be back…
…eventually.
Recent Sale
Recently, I sold a print on Redbubble (a pic of my former pet: Sketch titled Black Beauty) and the mystery buyer chose to remain anonymous. If you (the buyer) happen upon my blog, thank you so much for the purchase! It really made my day. :0)
I hope you enjoy our Sketch as much as my children and I have.
Thanks again!
Black Beauty
 50 MM 1.8 II/manual exposure/natural lighting/Canon Rebel
Let’s Talk about Sexual Abuse and “Mental Illness”

There are two words that bother me greatly when I see, hear, or read them. They are: “Mental Illness”. Why does this wildly popular and acceptable term bother me so much? I’ll elaborate.
Quite a few of my friends are “mentally ill” at their own admittance, and those that aren’t, continue to use the phrase easily and without conviction. It’s just what people are known to be that have “mental problems”, right?
But who doesn’t have “mental problems”? Who hasn’t at some point broken down and cried? Who hasn’t felt afflicted spiritually, emotionally, psychologically, financially, health-wise or otherwise? How did it affect you as person? Did you feel defeated? Did you feel like giving up? Did you fret? Worry? Call people? Overeat? Not leave your house for the day? The week? Pace your floors? Cuss? Scream? Throw something? Drink? Drink more? (See where this is going?)
How do we differentiate between a person who is exhibiting (fatigue, duress, insomnia, depression and other) physiological manifestations -very natural responses to his or her sexual abuse or other traumas- combined with their chaotic environments, and a person who is exhibiting these signs when everything is hunky-dory?
One would be classified as appropriate behaviors given the circumstances, and the other would be classified as exhibiting psychological disorders. Both examples describe the same behaviors! But the environmental norms surrounding them separate the two.

If a person has been sexually abused and placed in a normal environment with siblings and other happy folks who have a swell life, there is no way the sexually abused person is going to behave in an expected manner. Who would behave at optimal performance in school, church, family gatherings, etc. after being sexually abused and having to “guard it” like Fort Knox gold? A person who tries to keep it together year after year will eventually break down while trying to process massive amounts of: guilt, anxiety, shame, anger, rage, confusion, blame, self-loathing, envy- the list is very long.
Given the circumstances, it’s actually very normal behavior to exhibit signs of distress, anxiety, anger, OCD-like tendencies, insomnia, night terrors, and other maladaptive behaviors that are associated with trauma. People who have not suffered these traumas do not understand and it is extremely unsettling for them that they do not have answers that they can file away, shelve, and dress up with a tidy bow so that it’s sorted out in their heads.
But there needs to be an understanding in this area that these odd behaviors are very normal for sexual abuse survivors. What wouldn’t be normal is having suffered sexual abuse (especially as a child) and then sailing through life with little or no behavioral quirks. I dislike the word disorder because I challenge anybody to say that surviving sexual abuse is a disorder.
It is a triumph. Sexual abuse is a violation like no other and people give medals to those in wars who have been violated less and call them heroes. Sexual abuse survivors fight in the battlefields of life, and there’s no hero’s welcome. There’s no parade. No medals. We have to be our own heroes and rescue ourselves from the collective trenches of societal stigma and hate bombs that others throw at us and that we throw at ourselves.
Being a sexual abuse survivor is like being locked in a dark, dirty cell and given 5,000 keys: Only one will unlock the door, and you have one hour to find the right one, or you could die! Doom. Doom doom doom! And lots of crying, worry, and fears that you will never find the right key in time.
But again, I reiterate that these horrible feelings are absolutely normal given the circumstances. We need to carefully select the words and labels we assign to people who have suffered such traumas. What if they believe you?!

God forbid I ever believe any labels that have been placed upon me in life. I would be the biggest mess in the world. But I have assigned healthier labels for myself: loving, compassionate, real, honest, valuable, happy. After all, I am the one who has to live with myself and why would I want to live with a pessimist?
The term mental illness came about in the 1800’s after various psychological perspectives disagreed on what actually defined a person to be mentally ill. Some believed that it was evil spirits. Some believed it was “psychogenic”, or psychologically induced, and others believed that it was somatogenic, or “of a biophysiological nature” (that’s a fancy way of saying “relating to your body” rather than your mental processes).
They locked “mentally ill” people up on psych wards and in chains where they were beaten and starved, or placed in a metal contraption that rendered them motionless for hours and days at a time. When the patients in these asylums exhibited paranoia, fear, depression, sleeplessness, excessive anxiety and other abuse-related behaviors (as a direct result of the abuse), their friends and families sadly accepted what the doctors had prescribed them all: mental illness.
Many of these patients were exhibiting very normal responses to being held against their wills and physically and psychologically abused. People were quick to swallow the ideology of “mental illness” because it satisfied their need to classify and understand what was happening to their family member.
In other words, people created the term “mental illness” to be able to better control individuals, societies, groups, and religious wars were often the fuel that kept these controversial fires burning. With the classification of mental illness, the acts of physical and emotional abuse on those who broke society’s norms were not only unpunishable; but sanctioned, approved, and rewarded!
Just as toxic as any sexual abuse is the belief by the victim that he or she is mentally ill, because somebody said so. This is such a powerful weapon of self-destruction, and only the act of sexual abuse itself is stronger.
We need to start tossing out terms like “mental illness”: those two words alone are TOXIC. I will never accept terms like “mental illness” and “psychological disorder”. Those are conceptual words made up by people who do not understand what it is like to live in a world with wild, technicolor vision. How about that?

How about, “I have a family member or friend who has really been through it, but they have still been able to [insert accomplishments here] despite their setbacks.”
It’s all about perception and presentation, and I think we owe one another a sum of decency as to how we present each other.
I wrote this post so that other sexual abuse survivors might gather strength and comfort. Know that there are others who have suffered the same things in life, but refuse to be labeled! You are who and what you believe you are.
You have to believe yourself into something positive, constructive, hopeful– and be fearless in your conquests! Be bold in who you are, and acknowledge that you are a survivor rather than a victim. And when you learn that, teach others that too. Choose positivity rather than negativity.
Those 5,000 keys?
They all open the door.

Bimonthly Selfie
 Selfie-Shot in kitchen window lighting/1.17.14- Helios 44-2 film lens/Digital Rebel/manual
Lighting is your friend, ladies!
Seeing how I’ve been getting all this extra attention lately, I thought it a good time to make a post about how to take a good selfie (technically speaking). Anybody that knows me truly knows that:
a.) I don’t take myself too seriously. Ever.
b.) I look 20 years younger than I actually am, thanks to Photoshop. (I’m 44.)
c.) I don’t shave my legs and I really don’t care. (But that’s beside the point.)
Normally, I stay oblivious to my “audience” and rarely write for others. Not that I have anything against that, I’m particularly too lazy to keep up with all of the hooplah and riffraff. But tonight, I decided to address selfies and lighting and that sort of thing, because, who doesn’t have a few bad selfies lying around? (I have hundreds.) Not that I’m a narcissist, I’m a photographer: there’s a difference. (Not really.) But if you have a guy-friend that pilfers through your hard drive like I used to do with my ex’s, then you can just tell him “you’re a photographer” and he won’t think twice about it.
I have a bit of a cheap wine hangunder at the moment, so I’ll keep this list short and sweet. I know there are all sorts of one-click filters out there to make you look all selfielicious and everything, but if you stick to these pointers, I promise you, you’ll cut a few corners, save time, and look a heck of a lot better.
- Go into the light!
Find a “window light” source. It doesn’t have to be fancy; everything I do is cheap and at a fraction of the cost that others spend. Natural window lighting is the best light in the world for selfies- I promise! Don’t use midday lighting: it’s harsh and will either blast your pupils, simulating an unflattering meth-addiction, or it’ll highlight your shadows and age you instead. (You don’t want that.) The best time for good-selfie lighting is early morning to midday (just before noon), and late afternoon to early evening. Also, apart from professional and expensive lighting, nothing puts beautiful catchlights in your eyes like a window. (See pic above.) - Embrace your flaws
As you can see in my selfie, I’m make-up free and alright with showing a few lines and pores. It’s natural. Guys want to sleep with Barbie but they really don’t want to take her to lunch. Don’t be a Barbie. - Look like you’re going to kick somebody’s ass
This is my go-to look that works for most pictures. It’s alright to smile! But this is always good to fall back on and believe me, you’re going to need to fall back on this at some point. - Stretch your face muscles before a shoot. Mimic the word “WOW” in excess, raising your eyebrows simultaneously; it’s a little weird at first, but it loosens up the expression and circulates the blood. Do this about 50 times, and really, it’s good do get in the habit of doing this daily because it tightens up the facial muscles. (I’ve done it for years.) After you’re finished, your face will relax into a “default” comfortable expression. If that doesn’t work, look like you’re going to kick somebody’s ass.
- Keep the camera slightly above your head, point your chin down a hair, and lock your eyes into place.
There’s nothing worse that enlarged nostrils, double chins, and bad angles. Keeping the camera above your head slightly (preferably at 3/4ths of an angle) will flatter your angles.
There you have it.
You’re welcome!
The Great Internet Apocalypse
I’m sitting at McDonald’s with an overheating car and Peppermint Mocha, and, free internet. God Bless Micky Dees!
The inevitable has happened: my internet, cable and phone has been axed. My bill is $426, which I’ll pay in January- there were just too many things piling up at once, particularly the car, which has been overheating for several weeks now. Let me tell you, you really haven’t lived yet until your car, internet, cable, Netflix, and phone all go down at the same time.
The upside is, my house is spotless, and I’ve lost several pounds from cleaning and caring for 4 cats and a dog.
To all of you guys who have written, emailed (sent smoke signals, etc.) please know that I’ll return your emails as soon as I’m back up and online. (Two more weeks.) Bipolar Barbie, I’ll return your 6 emails then. I promise! ;0)
In other news, I’m absolutely ecstatic to be a single woman again. I just realized today that I’m fairly smoking hot at 44 still.
Taken today/12.16.13- Helios film lens
My butt is the size of Montana, which explains why I “look thin” yet weigh 160 lbs. I’m pretty sure about 25 lbs. is the junk going on back there; not that I have any plans on doing anything with it other than carting it around to do more laundry, shopping, and kitty poo duty.
Just finished reading Nikki Sixx’s The Heroin Diaries. Wow, he was total trash back in the 80’s! (I may have been as well…the whole world was stoned throughout the hair band days, including me. Or is that hair band daze?)
As much as I’d love to hang out here at McDonald’s discussing my rear , house chores and Nikki Sixx, I should probably get going as I’m on a tight schedule! Merry Christmas to all of you guys! I’ll pop in in a few more days for another sprint through blog-land.
Oh, and I made a sale at Redbubble. To the mystery buyer of my print The Longest Dream, thank you so much! I do hope you enjoy it, and if you bought it as a Christmas gift for someone else, I hope they enjoy it as much as I enjoyed shooting it. (Shot in the rain at Perrin Park on a cold winter’s day.)
Email from today:
You’ve Made A Sale – 3045208
- Redbubble
- Dec 15 at 5:48 PM
- To
-
- rushingthunder@yahoo.com
Hi Ḃḭṙḡḭṫṫä,
You’ve just made a sale on Redbubble! Your work was so brilliant that someone showed their appreciation with their wallet. Unfortunately we have to mark this event with a very boring email but it is full of Useful Facts (TM) about the sale.
‘But when will I get this money?’ we hear you cry, and rightfully so. Well you can find out here: http://support.redbubble.com/faqs/top20/when-do-i-get-paid
Thanks for being who you are and doing what you do, we love having you around Redbubble.
Mr Baxter – Chief Officer of Sending You Good News
———————————————————————
1x Canvas Print of “”The Longest Dream””
Size: Large (24.0″ x 4.6″)
Your Margin: US$57.00
———————————————————————
The sale details:
Retail Price: US$157.00
Manufacturing fee: US$100.00
Total Margin: US$57.00
You’ll receive: US$57.00
———————————————————————


White Linen
For Shreya. xo
One of my short stories from several years ago.
White Linen
Her fingers felt like two hot stones that had soaked up the angry sun. The sweat was gathering on her back and Ellie knew that she was racing against the clock. She’d been out there for two hours now; digging, planting, and turning over the dry, crusted earth. She wiped her brow, smearing dirt on her face; mixing it with the sweat that ran down into her ear. There wasn’t even a hint of a breeze.
“Good thing too,” she thought.
A gentle breeze would only have lulled her into the hope of being comfortable. She wasn’t much of a gardener, but her mother (and her mother’s mother) had toiled away in the burning sun, just as Ellie was doing now, and so she felt it was her womanly duties, if nothing else, to keep the grounds. It was her heritage. Her land now. Her large fingers tore at the soil and she carefully placed each small stone that introduced itself, into neat little piles. The smile that was beginning to form at the corners of her mouth, was evidence that she was quite pleased with herself. She squinted and stared up into the sun. The lemon-yellow glow, radiated out from the heavens, wrapping itself around her very heart it seemed. Panting, she let her eyes drift across the canvas of the sky, and thought of the tangy lemons in her basket over the stove. She would take a few, squeeze them tightly into a pitcher (after cutting each in half), careful not to let the seeds fall in. She’d add a few cups of sugar (she could practically taste it now), rushing to the pit of her stomach as if it too were trying to get away from the burning heat.
Ellie wiped her hand on her brown, faded dress. You know the one. A rip there at the hem from rushing through life, month after month; chores and endless lists to check off. A button- missing in the back- directly across from her burdened waist; proof that she’d rewarded herself bountifully after each carefully planned meal. The floral pattern had been beaten away by the unforgiving sun, year after year of hanging out those old stained linens. Why, they must be forty years old by now! Ellie wasn’t aware that she’d drifted off again; her eyes fixed to those linens as if it were the sheets themselves that took her back to her Jonah, and the sound of his harmonica…and her laughter. But Jonah was gone and so were the years.
She wiped her eyes, again streaking dirt across her lid. Her parched mouth brought Ellie’s eyes away from the sheets and back to her tired old hands. Lemonade. Ellie put her packages of seeds next to the neatly stacked stones, and tried to rise. It felt as if the sun had exploded in her chest; her breathing, coming in heavy gasps, and she fell to the ground, scattering the stones as she went. Ellie closed her eyes, for the sun was blinding, and she pulled at the grass, reaching for something (for what, she did not know) something to feel connected to. Even with her eyes closed, she felt the shadow move over her face. Ellie opened her eyes. The sun was hiding behind the peculiar man, causing a cool shade to fall on her. For that, she was grateful. The ripping pain in her chest, seemed to have vanished, and Ellie was wondering who the stranger was that stood before her.
”Can I help you Ma’am?” he asked kindly.
Ellie shook her head, as if to say no, but then nodded her head in confusion. The glow of the sun seemed to make him glow as if he too, were indeed part of the sun.
”Y-yes…thank you….sir….,” she answered; her voice trailing off, barely above a whisper. She looked up and into his eyes. How could it be? Her Jonah was gone, and he looked nothing like him, but his eyes…she could almost be certain they were Jonah’s. Yes. She was absolutely certain that she’d seen them before. She reached up, placing her hand into his waiting one. The man pulled her up; smiling and nodding gently as he did and Ellie let out a breath of summer air, returning his smile, and gently squeezed his hand. The sight of her linens, dancing happily in the breeze, caught her eye. The gentle wind kissed her hair, refreshing her for the first time in months. She could hear the faint trail of a harmonica playing, as many do in the country, and still holding the man’s hand, Ellie looked around to take stock in all that she had to be thankful for. This is the house that sheltered her through the many seasons of her life. The garden there, was her daily companion; patiently teaching her how to grow.
”Are you ready?” asked the man.
Ellie paused, and looked back at the scattered stones. Lying next to them was the body of Ellie Parkins. Ellie saw herself, but felt as if she were looking at a stranger. Dirt streaked her forehead, and a faint smile was still painted on her mouth. Hanging on the clothesline, were those white linens, which also seemed to glow with the strength of the sun shining through them. Ellie looked up at the man, and with one last sigh, she pursed her mouth together and nodding at her new friend, walked toward the shining sun…
Speak to Me, Lord
It’s 2:52 am: I’m getting to bed early tonight.
Somebody’s been misbehaving again, and it isn’t me. I won’y mention any names, but I’ve gone and gotten my heart broken again. Damn. We were doing so well too…
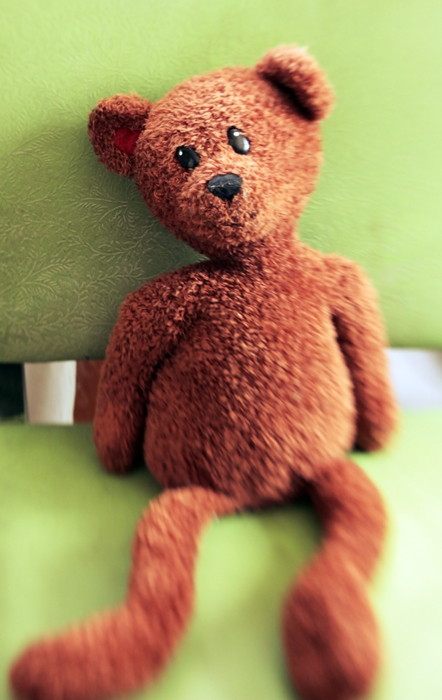
I’ve moved into Brian’s old room; it’s comforting seeing his graffiti on the walls, I’m sleeping with his big, squishy teddy bear. I can admit to that. :0) I’ve been crying my eyes out for two days and haven’t eaten for 2 & 1/2. I’ll eat when the tears stop flowing. In all of this pain, I know God has lessons for me to learn. Pain is one of the best tools God has. My heart right now, can be compared to the earth, and when the ground is broken up, it seems destructive and things are ripped apart on a microscopic level. It’s dark…it’s cold…the seed that’s been in the ground for days begins to shake- there’s a revolt, and a miniature earthquake. After much pressure and tumult, that seed busts open, and new life springs forth. After a while, the roots seek out the deep and they thirst for water. This is my heart right now. I know there are seeds of love that are bursting forth, but in order for that to even take place, I have to deal with the cold, dark, isolation and the tightly squeezing pressures around me. I remember that these situations bring new life, but I must suffer the pain first. For whatever reason, it’s for my growth.
I was able to get the sunrise that I was after. I hadn’t taken a sunrise shot in years and it certainly paid off.I was admiring the abstract composition of the distorted lines interweaving themselves in and around the dock, when I turned around to take one final glance behind me [insert Hallelujah chorus here] BAM.
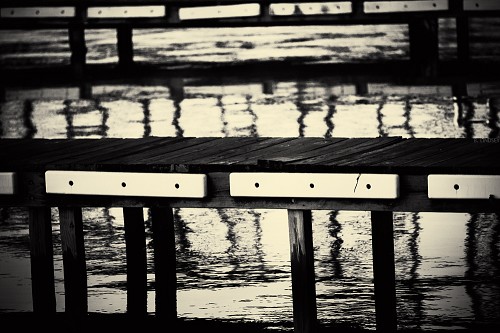
Abstract waterscape by the docs
Super Tak 135/3/5/manual
The In Between
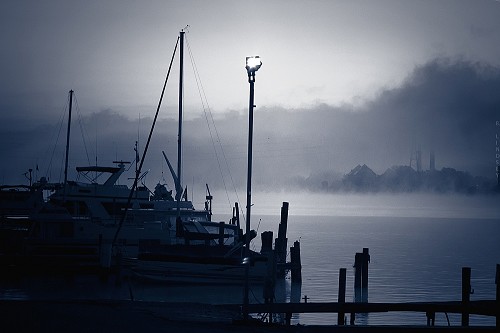
The purples, and blues and pinks faded away and was quickly replaced by a small, white. orb that was surrounded by the most beautiful shades of yellow, gold, and orange I’d ever seen. To make it even more epic, it all happened while the church bells down the street began ringing, as if on cue, to accompany the sun up from his bed. It was spectacular.
I couldn’t help thinking, ‘Speak to me, Lord’.
And He did.

EOS REBE/SMC Super Takumar 135/3/5/natural lighting/manual
Super Tak: Film Lenses on Digital Cameras
It’s 5:17 a.m. and I cannot sleep. I’m sitting on the bathroom floor with my laptop deciding what I want to do next. It’s been a long time since I snuck off to another room while Josh slept! Alas, I cannot sleep. I’m actually waiting for the break of dawn so I can go on a sunrise photoshoot. It’s freezing outside! But that’s alright. I like the cold.
I’m missing Brian so much. He’s rarely here any more. I’m very happy for him though; I’m fairly certain he’s happy, and as long as he is, that’s all that matters. I’m confident that all of my children know this about me: I support them in everything they do- 100%.
I’ve decided that I want to start shooting with film lenses. Digital just doesn’t do it for me…at all. it’s too clear, focused- intentional. It cleans up all of the imperfections right away and leaves little to the imagination. I really don ‘t like it. So I picked up my first film lens (apart from two cheapies in the pawn shop), which is the SMC (super multi coated) Takumar 135/3.5. I must credit my British friend, Mark for this idea: he sent me a few pics a year ago and they blew my mind. He was using film lenses on a digital camera. Huh?! Yeah. You just have to know which adapters to get, so after a bit of research, I found the adapter for my Canon body: the M42. My Tak (or, “Super Tak” as it’s known as) came in 2 days ago, but my adapter came in today. (I could cry!) This is probably why I can’t sleep. The quality of this lens is jaw-dropping. The colours are so fantastic that I’m breaking my own self contract and will be shooting in colour- and lots of it. How could I not?
Here are a few sample images from the Super Tak:


 I am completely in love with this lens! But it gets even better. I have two more that will be arriving in the upcoming week- they’re film lenses as well. I’ve decided that I’ll never shoot digital (lenses, anyway) again- only film from here on out. I love the texture and film grain that the older lenses provide. The two new lenses will be: Carl Zeiss (YES!!) 35/ 2.8 and the Helios 44M-4 58 MM f/2. They’re flying in from several different countries and I’m so excited………..!
More on this later. I have a sunrise to shoot.
Academic update:
It’s midterm, and here are my grades in the following classes:
Criminology: A
Lifetime Fitness and Wellness: A
Spanish II: A
Therapeutic Interventions with Substance Abusers II: A
Booyah!
Pancake Geography
So I’ve been sitting here doing homework for the past (30 hours with a sleep break) few hours, and have decided to do the self-challenge that I’ve wanted to do for years: I’m going to leave my camera in monochrome for a whole year. After my next birthday, I’ll take my first coloured photograph. The majority of everything looks better to me in black and white anyway, and when I compose a shot in monochrome- as opposed to colour- it always tells a story.
I can twist the lighting any way I want and distort and change my image: pancakes become mountains- the syrrup the sea- and the edge of the syrup-filled pancake looks like a gashed-open knee. I love the way the light fades off into the syrrupy-darkness.
Clearly, I’ve done too much schoolwork and am creating little worlds now in my plate of food.
Back to the schoolwork.
[groan]
Newsflash: Blood Pressure People
“Why does this bathroom smell like pee?” says Josh. Well I don’t know Josh. Why would a bathroom smell like pee?
I’m obviously in one of my sardonic moods. Perhaps I’m tired of lying on the living room floor, bleeding profusely. Silly me, I didn’t factor in that Black Seed Oil actually accelerates blood circulation. Black Seed Oil is a essentially a panacea that is extracted from black cumin. It’s said to “cure everything but death”. (And PMS.) Because well, I’m still a &^%$#!
But as the saying goes, “this too shall pass.” Except I don’t think it will because I’ve noticed that I’ve been a &^%$# for quite some time now. I’m hoping this goes away after I graduate.
In other parts of the world, apparently, “simming in sea” is good for “blood pressure people”. I’m guessing it’s also good for “blood sugar people” and “heart and lung people”. I honestly don’t know how people find my blog sometimes but I swear, one day, I’m going to put together a post strictly on key word searches.

At least I’m not like “Bitter Ben” who is always bitter about everything. (You’re my here, Bitter Ben.)
I’ve managed to wipe out 3 major Lifetime Fitness and Wellness assignments (PMS-style- flat on my back) as well as a 5 page Criminology report, a Discussion Board posting and am getting ready to dive in to my Therapeutic Intervention with Substance Abusers II report. I’ve discovered that wine makes all of this better. Especially the last one. (Catawba Rose, to be precise.) We had a bottle left over from our trip and well, we’re just not going to let that sit around in the fridge with all this homework going on.
Josh is in the kitchen, knocking out a web page design assignment and I’m getting ready to study for my 4 chapter Criminology test that I must take tonight- after-
“HOW MUCH WINE DO WE HAVE LEFT?”
“Probably another cup,” Josh replies.
– after another cup perhaps. Brian Bob has been gone for weeks now. 😦 He pops in from time to time to re-up on smokes, money, food, and then he’s out again. I miss him so much! He’s my only son- the big seventeen. I remember being his age though. I wanted to be with my boyfriend- what 17 year old girl just wants to hang out with her Dad?! So, Dad let me go. I moved in with my boyfriend’s family early on. I didn’t think about how my Dad would feel- not really. And now I do, with a bittersweet smile and tears in my eyes. Life has come a full circle. Bob is spending most of his time with his girlfriend, Amanda, and I am happy for him, and her too. Doesn’t life have a funny way of catching up with you?
Brian Bob and his little lady (So busted- behind the bushes).

Final Grade- Health PSYCH
Email from instructor:
Thank you for the comments. It has been a pleasure to oversee your excellent work. Your final grade for the Health Psychology class is 92% which is an “A”. I wish you success in your future academic pursuits and career choice. Stay well!

1 down- 3 to go!
High Notes
I’m headed out into the rain for an impromptu photo shoot. I’ll be going to Bernheim Forest- beautiful place. I’m not satisfied with the shadows vs. highlights in my pics- I think I need to drop my AP and increase my ISO- I want heavy blacks. Yeah, these are the things that I ponder much of the time. :0)
I received a super special email from my Health Psychology instructor; it made me cry. It said:
For assignment three;
Your work continues to be excellent. Your answers to each item were complete, supported, reasonable, and demonstrated understanding of the key concepts. It appears your absorption of the health related information will not only help you but, as an example and source of information, those whom you affect personally and/or in your career. It is a pleasure to have such a capable student.
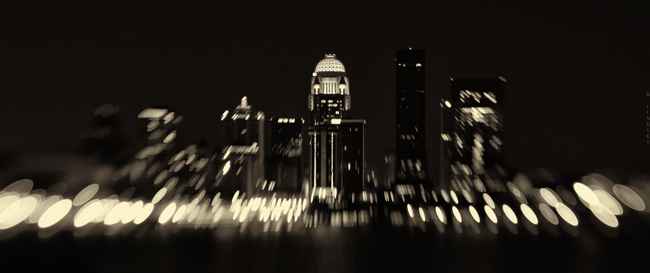
Homeless man wanders off with Josh’s change, and his booze.
Louisville, KY- 50 MM/natural lighting/manual
The Fine Art of Picking up Strange Black Men
I remember driving in Lousiville, Ky one night. It was summer, loud, stereos were bumping- it was a Saturday night and I was out and about in the bad side of town trying to track down my BFF at the time, Olivia; a large black woman with a brood of kids and grandchildren she’d raised. Olivia is pure gold in my eyes. We met in a homeless shelter. I had been standing along the wall “people watching” and suddenly, a burst of music rolled into the room: Olivia was laughing and dancing and spinning around- completely entertained- with a boom box on her shoulder. She was larger than life! I smiled and knew I had to meet her.
We talked after some time and realized we immediately liked each other. We spent the next few weeks hanging out together and passing time- smoking weed out back with many of the residents there. One day, I returned to the shelter and Olivia was gone. They told me she’d gotten her own place. So is the life at a homeless shelter; people come and go- you have to get used to that. Some you see later, some you never see again. It teaches you to love people hard while you have them and let go quickly. That was worked into me many years ago.
As life would have it, I ended up moving into her neighborhood just a few weeks later. For the next three years we were virtually inseparable. She helped me through some very dark times and I gleaned so many good things from her. I have a very special love for that woman. And a high respect.
After some time, we both moved out and we lost contact with each other. I had made up my mind on that particular Saturday night that I would track her down. Very much like a gypsy or nomad, I’ve traveled as a wanderer in this world. Nothing has held me back. Being poor certainly hasn’t. If anything, it’s been a catalyst.
But on that night, I set out in my car purposefully driving to the bad end of town. I knew Olivia had moved to the next state over in Kentucky, so I cross the bridge and drove into downtown Louisville. It was a hot, muggy night.
As I headed deeper into the back parts of the city, I popped open an beer, lit up a smoke and turned up the radio. (Back in those days, it was standard to find me driving with a beer nestled in between my legs- a joint or two always close by. A lot has changed since then!)
People stood out on the corners, openly dealing drugs. They knew others knew what they were doing- didn’t care. Cops rarely bothered the little fish anyway. As I was pulling up to a red light, I saw a black guy standing on the corner. I don’t know what grabbed me about him, but something did. Let’s say, it was destiny.
“Hey, you need a ride, man?” I asked him.
“Yeah, yeah…” he said and he hopped in the car.
Now this isn’t the wisest of things to do, no doubt- pick up a black guy I don’t know in the bad part of town. But at that time, I really didn’t care. I was governed by my instincts and driven with a purpose. I had no idea what my purpose was half the time, but I new that I needed to do what I was doing and that’s all I knew.
“Where ya going to, man?”
“My mother’s house,” he said.
We chitchatted briefly and he told me his story. He had been excommunicated from his family some years before. They had given up on him and pretty much cast him out. I felt really bad for the guy. He went on to tell me that he had only just decided to go and see his mother on that very night, and was in fact pondering the decision when I picked him up. I felt honoured that he would include me in that. Totally.
We bonded immediately. I may have even smoked a joint with him. It’s no big secret that I was a total stoner back then. I smoked 1 to 3 joints every day for 18 years. As a matter of fact, “stoner” is putting it mildly. My Dad had the best stuff for miles and everybody knew it. He was known for that and so I never lacked for good weed. It’s no wonder I ended up being an artist in life. Weed does that. I know everybody thinks it’s so “bad” and it’s a gateway drug and all kinds of other things that they’ve been taught to believe, but I will always be an advocate for marijuana and a person’s right to smoke it. I just don’t smoke it myself anymore and haven’t for years but I’m strongly for it, if the person and the circumstances are agreeable- let’s put it that way.
Moving right along, we eventually made it to his mother’s house. I thought we would say our goodbyes right there but he invited me to come along. Wow. He hasn’t seen his mom in years, and is hoping to be reintegrated back into the family unit and now he’s going to bring a stoned white girl with him who picked him up on the corner. Ok!
We stood outside on the porch and I stole a few glances in his direction. Even stoned, I could see a lot. He was hopeful and meek. I really like that guy. That took guts.
The door opened and a small woman stood before us, small in stature but full of expression and total shock. My mind plays it as if it’s in slow motion- her mouth, open with shock- she was yelling and mumbling and screaming to somebody else that their man had come back. I don’t remember his name now. It was 18 years ago.
She ushered us inside and we followed her to a back room where a woman lay in bed. I sat down quietly on the side of a chair and tried to disappear. I could hardly believe I was there and I felt a bit like I was in a movie. The woman in bed was his mother, who immediately cried upon seeing her son. They embraced and he crawled right up next to her and they just held each other and cried together.
I have absolutely no idea how we got on the subject but they found out that I sang and was a songwriter. What happened next can only be described as something so bizarre that it now seems more like a dream than a memory, but I sang. I sang A Capella, a song that I had written, a song about Jesus. Four strangers sat in the room there- eyes fixed on me- in a semi-petrified state, mouths slightly open. They felt honoured that I would sing for them. I was honoured that they let me.
I sang from my heart and sang especially for that mother and son. It was one of those rare moments in life that you know has been brought together- orchestrated by God even- that will never happen again: A true once in a lifetime moment.
The mother cried again and thanked me repeatedly for bringing back her son. I was especially emotional because at that time, I was separated from my own two children who the system had taken from me years before. It brought me great comfort that I could reunite a mom with her son like that, and I cried too.
I hugged them all and made my way back to my car alone. I smiled all the way home.
“You’re awesome, God,” I said, smiling, tears still in my eyes.
He smiled too.
Prelude to a Photo Walk
I’m supposed to be house cleaning. I cut a deal with Josh- he would clean the back part of the house and I’ll clean the kitchen, etc. He’s living up to his half- no wait- I hear metal clinking outside around his moped area. Hmm…I may have been outfoxed.
We’re going to go on a photo walk today in downtown Old Louisville (Kentucky), home of the Kentucky Derby. It’s an interesting place- a mixing pot. Old, young, poor, wealthy, strange artists (my favourite kinds of people ever), and an array of collective and colourful personalities. We’re going to park in Indiana and walk over the bridge, into Kentucky, have a beer, grab a bite- shoot some people.
With the camera, of course. 🙂
Damn. I’m really going to have to stop with the smilies. It’s ruining my tougher than nails image.
Anywho, we’re lounging about cleaning the house at the moment. Josh starts school soon too. Back when he was here before and we were having major problems, I sort of…smashed his computer. It’s shameful, I know. I was raging at the time and livid about what he was doing online. (As if smashing the computer would help.)
Now, he’s starting school and desperately needs a computer. Although we’ve settled our financial differences and have squared things up, he’s still without a computer so, I did what I had to do and sold my Lensbaby. Ouch. That hurts just typing that. I also sold my swap kit- which was an additional 4 lens set. There’s just no way I could feel good about having my luxurious toys while he suffered. So, I don’t regret it at all- it was the right thing to do. I still have my 18 MP. DSLR and my 50 MM 1.8 (my personal fave). It’s enough.
I feel good knowing that I’ve made retribution and have given Josh enough money to be able to get his computer and book access code. I think I’ve learned a pretty good lesson in all of this. Leave the man alone! Let him breathe and be a person apart from me, even if that means doing something that I deem “bad”. For me, that’s huge.
We went out for drive yesterday to Lexington, Indiana and had a really good time. We took a turn down a long country road and followed a sign that announced “fresh strawberries”. It was like a wild Utopia. The clouds were semi-overcast and casting a cool, grey glow over everything. Almost like golden hour lighting- that pre-storm lighting, which to me is the best ever, and the best for HDRs.
Large thistles grew out of thick stalks in the ground on either side of the road. Although they were deep purple and quite beautiful, I found them even lovelier in black and white:
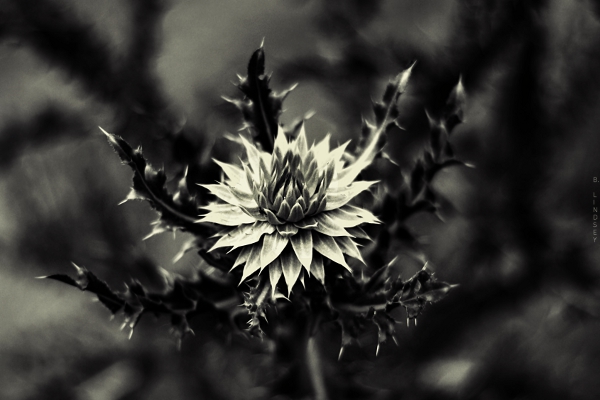 50 MM/shot in monochrome/manual/RAW
I have an abundance of shots taken from yesterday but haven’t had time to get to them. I’ve discovered the beauty of shooting in RAW again. Makes a big difference with image quality.
Josh just pulled up on his sugar-cycle. (I’ve renamed his moped- he does store runs late at night because we’re sugar freaks and consume large amounts of candy while watching Locked Up Abroad late into the night like we did last night.)
And now I have to get back to cleaning. We’re off on a photo walk soon and my regret is that I don’t have a super-wide to shoot with. All of those old architectural jewels in downtown Louisville and I only have my 50 MM. UGH. (Must get a 10-20 soon.)

50 MM/shot in monochrome/manual
(The strawberries were delicious, by the way.)
Absolute Value is Always Positive

Absolute value is always positive. (Nice to know.)
It’s been almost 100 degrees every day in this place: the sun is screaming hot and the air is stifling. We lay around like rags covering the furniture. We have an AC but we need three. Tomorrow we’ll get a couple more.
It’s 1:34 a.m. and it’s deliciously cool in here at the moment. Josh and I are considering exchanging our days and nights so we can work in the cool hours and sleep in the heat. It’s likely.
To recap for the day, we took a mile walk at the park after eating chicken salad sandwiches. The mile walk is a fair trade for a frozen pumpkin yogurt in a large waffle cone. Not that I have to, mind you. I still have a kicking little figure (even at 43) and although I rarely exercise, I do take very good care of my cells, particularly from the inside out. I’ve learned that if your cells are healthy, the rest of you follows. People are quite hung up on “the big picture” with their bodies- over all weight, etc. and I really think the answer to good body maintenance is in blood cleansing, colon cleansing, and proper oxidation. (Because well…proper oxidation does cleanse the blood.)
I really can’t get started on colon cleansing at 1:40 in the morning. Don’t I have better things to write about?
Which brings me right back to absolute value.
I’ve manages to bring my grade up a whole notch in pre-calculus. Just that word “precalculus” used to scare the crap out of me. Who knew that I’m actually pretty good at it? Go figure. I love it, and, I find it very easy to understand. (Hence my notes above.) Let’s see…let’s see…I scored a 50 out of 50 on a monster assignment in Health Psychology- didn’t see that one coming.
Josh is fiddling around with his gadgets and electronics- he continues to amaze me with his inventions. He’s always building something. I hear him now singing and playing his guitar. He’s happy. So am I. :0)
My head is throbbing and I’m sure I should go to bed but I have some reading to do in Public Speaking. Bob is out with friends, and Meatball has come home again! I may have forgotten to mention that Meatball (our 17 lb. cat) went missing several days ago. Alas, Josh rescued him earlier today. Josh is picking away “hillbilly style” now and having a downright foot-stomping jamboree in the other room.
“Wow, you sound really good,” I said to him.
“I sound like Hank Williams, don’t I?” He asked me.
“No,” I said. “You sound like Josh trying to sound like Hank Williams.”
There’s a celebratory vibe hanging in the air now. It’s 1:51.
I think we’re celebrating the cool night air! We know we’re going to be comfortable for at least 6 more hours. I’ve just realized that I haven’t had a migraine in quite some time.
Speaking of which, it’s time to hit the books.
Stress Management
Take picture. Edit photo.
It always works for me.
 Selfie. Taken this morning. Lensbaby Composer/Double Glass/f/ 5.6
[20+ layers in GIMP]
Lensbaby Composer (Plastic Optic)
I may or may not go out today and experiment with my new Lensbaby lens: the plastic optic from the Swap Kit. It’s so darn hot.
I took this SOOTC/straight out of the camera pic using the plastic optic:
I like the soft focus haze it puts over everything: in the right setting, this would be perfect. Of course, it wouldn’t work for everything. A street scene or a detail-oriented shot such as facial features wouldn’t be ideal for this lens, but a forest shot, any flower shot, or landscape (barn, abandoned house, etc.) it would be great.
I’m still stuck on the Double Glass optic- I love the focal control it gives you while allowing the warped blur in the rest of the frame.
I’m looking at another solid day of schoolwork. All of these toys and no time to play!
Photo Walk [For Y]
Sometimes, when I don’t have the words of comfort that I’m looking for, I take pictures instead. This is for you, Y, and your friend. I wanted to take pictures of flowers for you, and I changed my mind at the last minute. I took a few pics of the riverside instead.
I hope you like them. xo

Unknown couple, sharing an intimate moment
Lensbaby Composer/Double Glass/f/2.8

Josh existing my mother’s house after dropping off his homemade burgers
Lensbaby Composer/Double Glass/f/2.8
 A drinking crowd gathers outside of Third Base tavern.
Lensbaby Composer Pro/Double Glass/ f/2.8

Second Street bridge- joining Indiana and Kentucky
Lensbaby Composer/Double Glass/f/2.8
 Brianna sleeps on a picnic table by the riverside
Lensbaby Composer/Double Glass/f/2.8
“The most painful goodbyes are the ones that are never said and never explained …”
-Anonymous
Photography Basics and Layering with Textures
So Jen, I realize that if I’m waiting for a chance to “open up” for me to not be so busy, I’ll be waiting for a very long time. I’ve decided to sacrifice a bit of my schoolwork to share with you some of the photography tips and tricks that I’ve developed over the past decade. I’m going to demonstrate the four main areas of a photograph that are the most important to me:
- Composition
- Lighting and exposure
- Mood
- Rule of thirds
These are four areas that must be present in most of my photos and if they aren’t, then I supplement one of the other areas with an extra amount. Such as, if the lighting isn’t the best, kick up the mood. (Etc.) This is a good short list to stick with and think about these things always when taking your photo. Because of the ability to simply slap a filter on a photo in post processing (Iphone apps, Photoshop, Gimp, Picmonkey, etc.) it’s all too easy to fall into the “lazy photographer” trap and think, “Eh…I’ll fix it in Photoshop.” But again, this makes for bad pictures that are heavily “shopped”. I’m going to teach you a few in-camera basics that will give you a good solid pic to start out with. That way, when you dress it up, it’ll be that much better (not that much worse). What I’m going to teach you is going to seem like a lot of hard work! That’s because it is. Everything I do is manually done in “layers” – sometimes one photo can have 20+ different layers blended together. If you learn how to do these things though, instead of just “slapping a filter on it”, you’ll have your own style that is tailor made and it will be very difficult to replicate. Editing is very much like gourmet cooking. We photographers all have our own “recipes” and we guard them closely! I’m going to give you all of the ingredients for you to create your own style. And, if you have your own style- you’ll stand out from your peers in this area. Compare every photograph you take with a painting. The SOOTC / straight out of the camera pic is the canvas. We’re going to use our photo editor to “paint it”.
First, here’s a small list of abbreviations that you’ll need to learn:
SOOTC: straight out of the camera
AP: aperture
Sh. Sp.: shutter speed
WB: white balance
PS: Photoshop
“Shopping”: Photoshopping
BG: background
FG: foreground
B&W: black and white
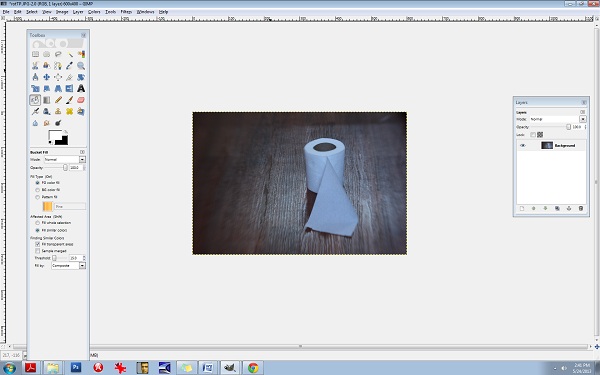
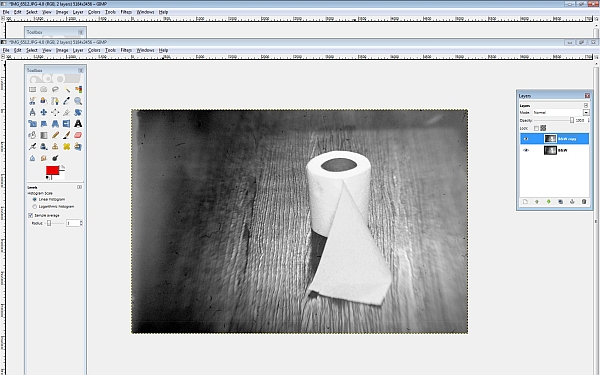
Let’s start with toilet paper.
I took this shot a moment ago on my bathroom floor. I like using toilet paper because it’s simple.
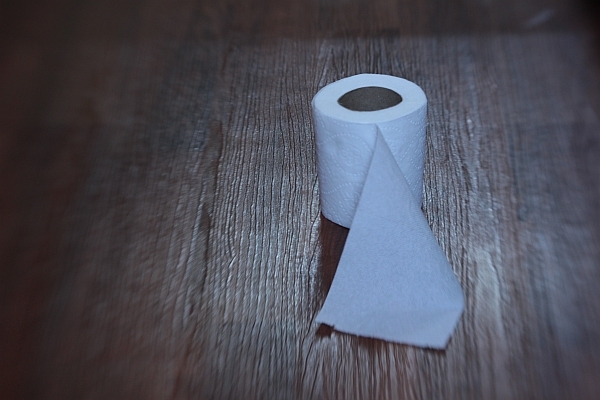
This is a SOOTC shot, or, “straight out of the camera”. I like using the Lensbaby Composer lens because as you can see, it naturally blurs the edges of the frame. This particular kind of lens is great for moody, dramatic images (my trademark style) and especially vintage pieces. Here are the specs for this shot:
Lens used: Lensbaby Composer
Aperture: f/4
ISO: 400
Shutter speed: 1/15 sec.
I know you’re using a point and shoot and that’s ok; it’ll do just fine for this.
The first thing to do, always, with a shot is correct the WB/white balance if necessary, and much of the time, it’s necessary. You can see that the toilet paper is a little blue looking. It’s a good thing to make sure your WB/ white balance is preselected on your camera (this is the shady, cloudy, night shot area). If I would have paid attention beforehand, I would have selected “cloudy”, alas, half the time I don’t. For the record, it’s best if you do.
We’ll adjust the levels (midtones, shadows, contrast, lighting, and highlights in a few moments but let’s continue on first with the basics). Notice the composition: it’s off-centered. When composing your single subject, you should always try to off-center them slightly, no matter how slightly. This is where you’ll learn about “rule of thirds”. Imagine that a 4 lined grid is over your image: 2 lines vertically- 2 lines horizontally. It would look like this:
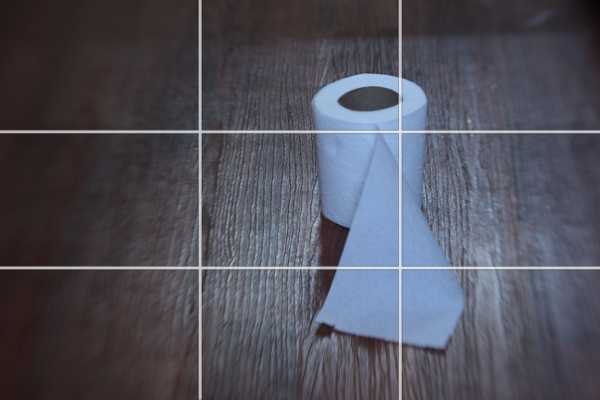
Notice the 4 connecting areas in the center: these are known as “power points”. Always place your subject, or subjects, in one of these areas. I have an invisible grid in my mind’s eye that is always there when I shoot and I’m always mindful of this. Over time, your “natural rule of thirds grid” will kick in and it will become like a second skin: you won’t even need to think about it.
Now let’s do a bit of post processing.
We’ll start with our levels.
We’re going to use GIMP because it’s a free photo editor. It’s a lot like Photoshop and much of the time, I actually prefer GIMP over PS/Photoshop. It can be daunting or overwhelming if you’ve never used it. Remember, fear is nothing more than the lack of education in an area. We’re afraid of what we don’t know much of the time. By learning the basics of photo editing, you’ll take the fear out of the equation and it won’t seem overwhelming any more.
You can find GIMP here:
http://www.gimp.org/downloads/
Just click on the 3rd or 4th line down in the first section.
Install the program and open up your pic : FILE/OPEN
It should look like this:
Be sure to open up your Toolbox panel on the left and have your “layers” there on the right. If these two crucial boxes do not open up on their own, you can do it manually by clicking on the WINDOWS tab at the top right corner. WINDOWS/DOCKABLE DIALOGS/LAYERS and WINDOWS/TOOLBOX.
You’ll need to keep these two boxes open throughout all of your editing.
Almost everything I do has to do with “layers” and this is not uncommon in photo editing. Even the most basic of editing (level adjustments) will often contain several layers and it’s one of the areas of photo editing that is an absolutely MUST to learn. Otherwise, you’ll be stuck with cheesy filters and one dimensional photos.
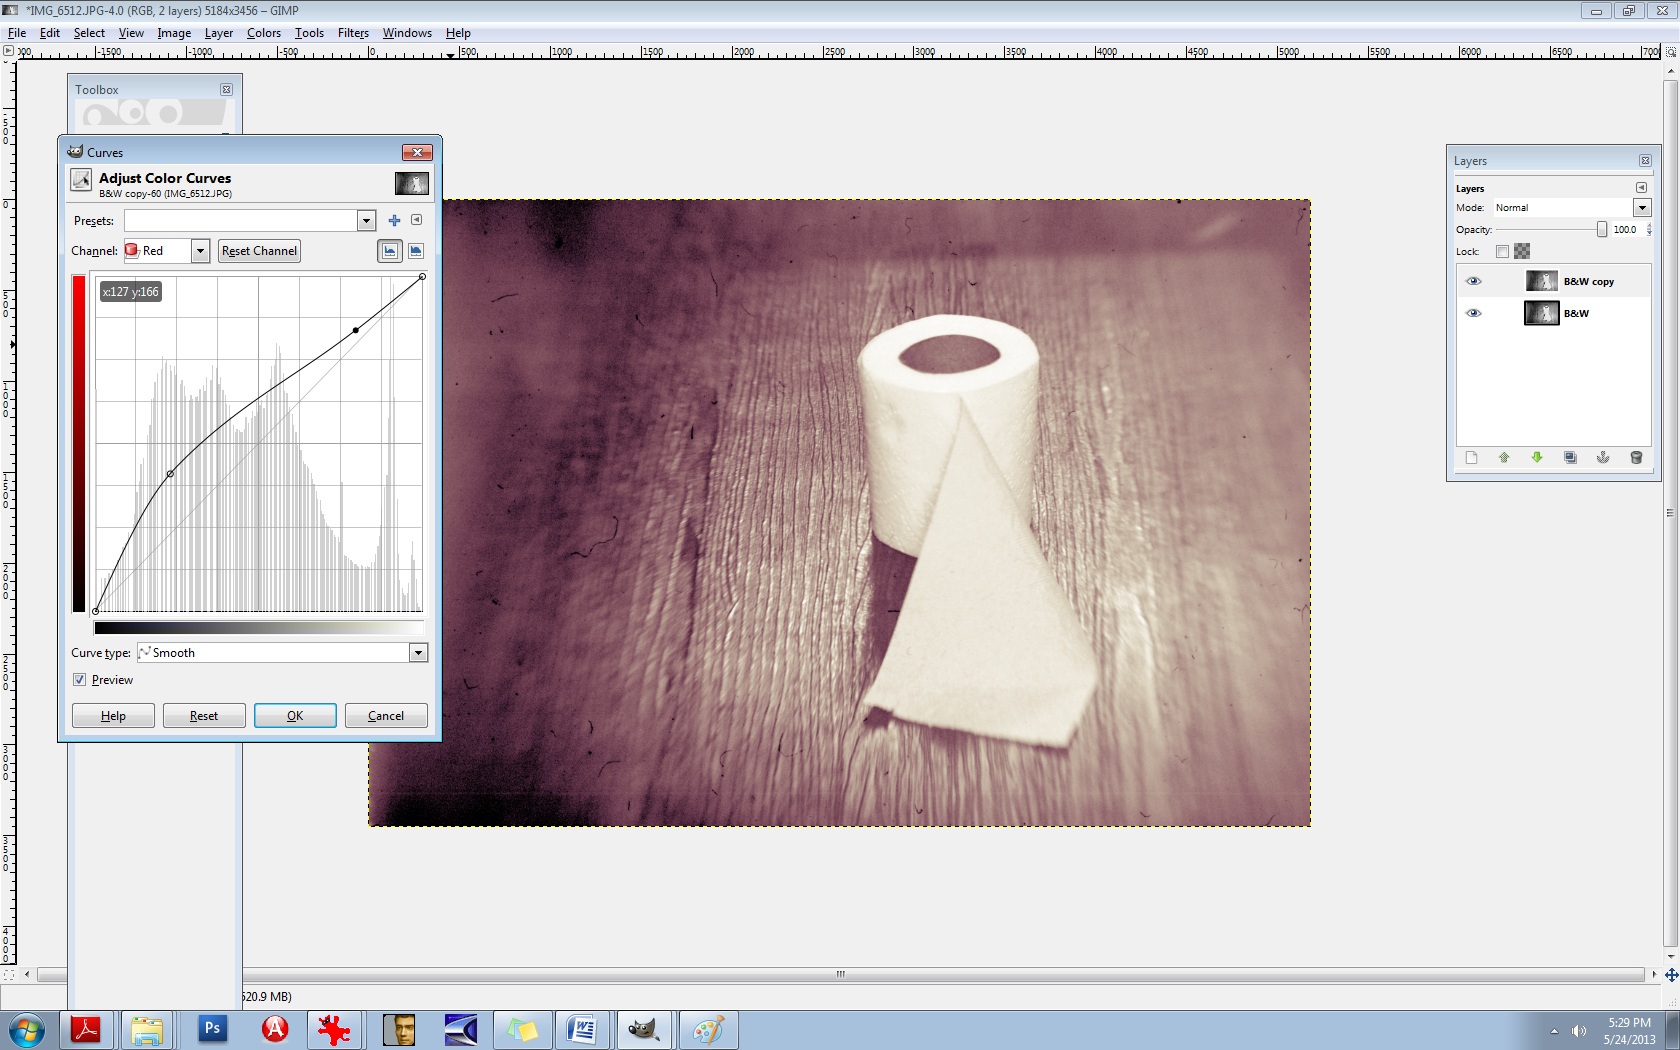
Right click on the Background layer in the LAYER box on the right. Select DUPLICATE LAYER. Now let’s go to the LEVELS area so you can make some minor adjustments.
Go to the COLORS tab at the top and select LEVELS.
You’ll see the LEVELS box pop up:

The diagram at the top is what you’ll want to adjust. Underneath the words INPUT LEVELS you’ll see 3 sliders. These control your shadows/midtones/and highlights. The shadows are the blackest/darkest parts of your image, the midtones are the midrange tones and the highlights are the brightest parts of the image. Always be careful with the highlights slider- you can easily blow out your whites. Let’s start with the middle slider:
It’s naturally set at 1.00 so set it at 36. Set the 1st slider (on the left) that controls the blacks or the shadows to 1.11 and set your highlights slider (the one all the way to the right) to 1.97.
You can see that the lighting is a bit more dramatic. Go ahead and duplicate this layer again. Double click on the text to rename it, (Rename it LEVELS) and then press enter to stabilize it. Rename the new layer CB for COLOR BALANCE.
Now let’s fix the colours and the WB/white balance. Go to your COLORS tab at the top and select COLOR BALANCE. This is another area that I’m constantly using. Let’s get rid of that blue cast. You’ll notice in your COLOR BALANCE area 3 specific ranges: shadows, midtones, and highlights. There are 3 sliders for each one and 6 hues to adjust, per slider. Remember, your highlights are the brighter areas of the photo, in this case, it pertains directly to the toilet paper, so select HIGHLIGHTS. Your goal here will be to move your sliders AWAY from the dominant colours here, which hare CYAN and BLUE. Every photo is different and the colour values and ranges will be different for every one. Instead of simply telling you which values to set your sliders to here, I want you to analyze the photo’s values, highlights in this case, and adjust each slider accordingly. I’ve learned over the years that a good counterbalance to CYAN is yellow and red, so let’s increase those channels’ values, decreasing the CYAN. Again, be sure that your HIGHLIGHTS channel is selected. Be sure to check that it’s indeed the top layer you’re working on (the layer named CB). Ok, let’s go.
Highlights:
Move slider AWAY from CYAN- +29
Move slider AWAY from MAGENTA- + 13
Move slider AWAY from BLUE (toward the YELLOW) -17
Be sure that your readings are the same:
29, 13, -17
The midtones look pretty good so let’s move on to the shadows and give them some warmth.
Move the top slider TOWARD the RED- +9.
Keep the center slider set at 0.
Move the bottom slider TOWARD the YELLOW- -11.
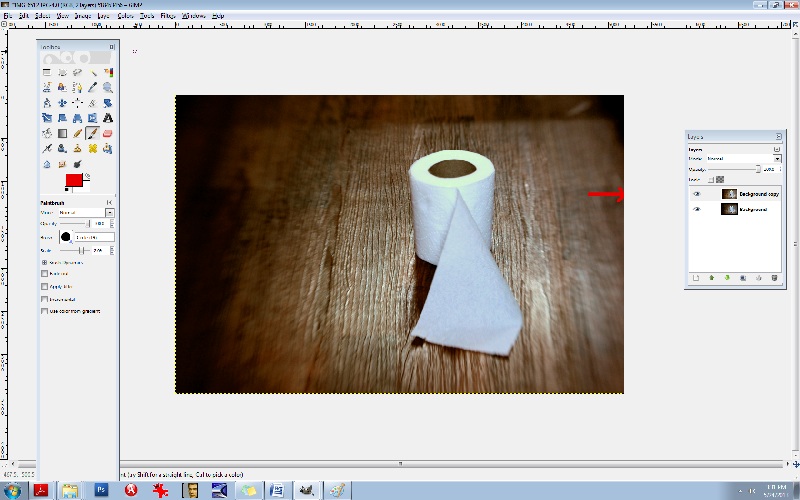
Notice in the LAYERS box, you’ll see a small EYE icon. This is your visibility toggle. If you can see the eye there, it means that that layer is visible. If you uncheck the eye, it means that that layer is currently invisible. This is especially useful as it allows you to toggle back and forth between pics for comparisons. Go ahead and click on the top layer which will set it to “invisible”. Continue clicking the CB-layer EYE and compare your LEVELS pic and your CB/color balance pic.
You’ll notice that the top layer has more reds and yellows- it’s your “warmer” layer. The layer underneath has stronger greens and blues- this is your cooler layer. Let’s mix the two. Notice that each layer has an OPACITY slider. This controls the visibility amount for each layer. Again, always be sure that you’re working in the correct layer beforehand. Choose the top layer, and bring your OPACITY slider down some. Let’s take it to 45%. This will give us a well balanced amount of reds, greens, yellows, and blues in the pic. What this does is increases your colour ranges and adds more depth.
Now, merge all of the layers together. Go to the IMAGE tab at the top, and select FLATTEN IMAGE.
It’s always best to duplicate any image you flatten. You’ll find in editing, it really is a continual cycle of merging and duplicating. So, duplicate it and be sure that you’re working in the top layer. Now, let’s add a textured layer to this. We’re going to bring a dramatic flair to this and give it a haunting feeling.
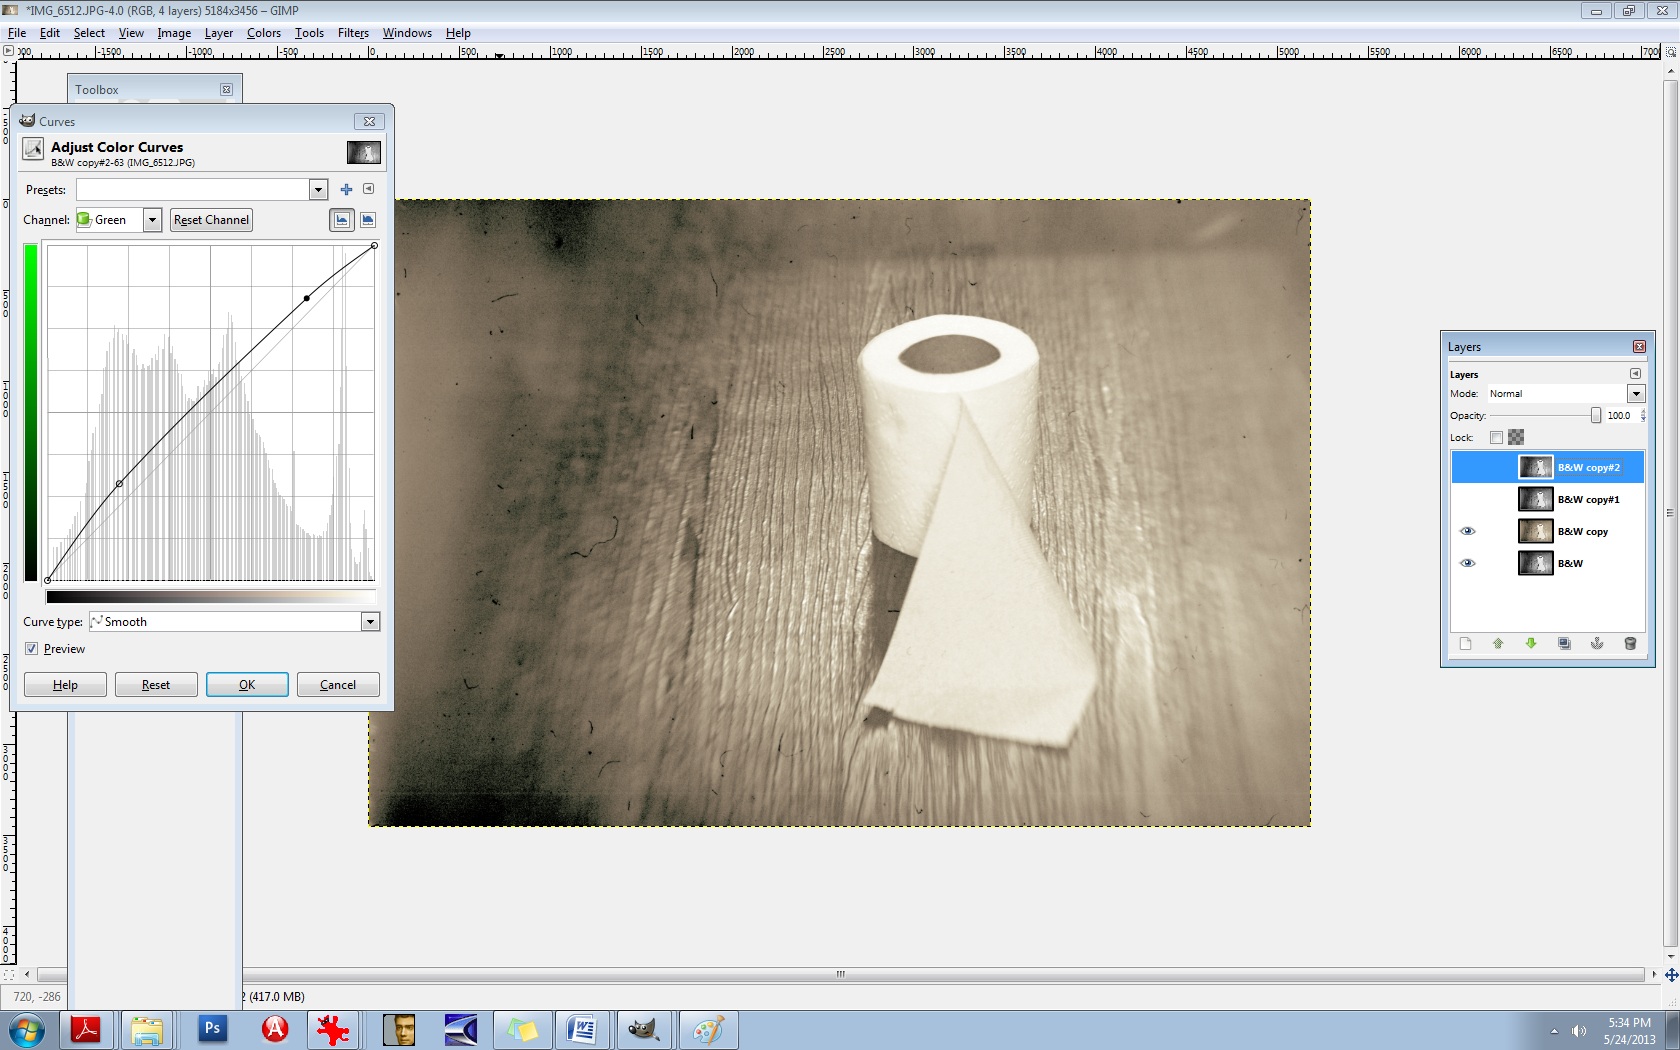
For this, let’s convert it to a B&W. Yes, all of that colour modification just to convert it to a B&W! The reason for this is to give it a better value and tonal range once it has been converted. There will be added layers of depth by adjusting the colours beforehand.
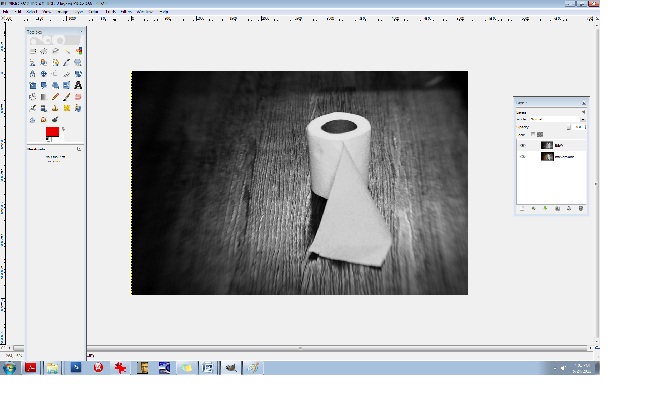
Click on your COLORS tab at the top and select DESATURATE. A small box will appear allowing you to choose from one of 3 areas: lightness, luminosity, and average. Select AVERAGE if you’re not sure which one to go with, but again, because every photo is different and every photo contains different values and ranges, some photos would be best suited for “luminosity” and so on so be sure to test all three for every image and choose the best one. (If you’re still unsure what to go with, choose AVERAGE.)
You’ll notice that we have a good range of tones here from the deepest of black to the brightest of white: this is what makes a good black and white photo. Rename the top layer to “B&W”. You should have the coloured image on the bottom and the B&W one on the top. Now, duplicate the B&W layer. You can rename it B&W2.
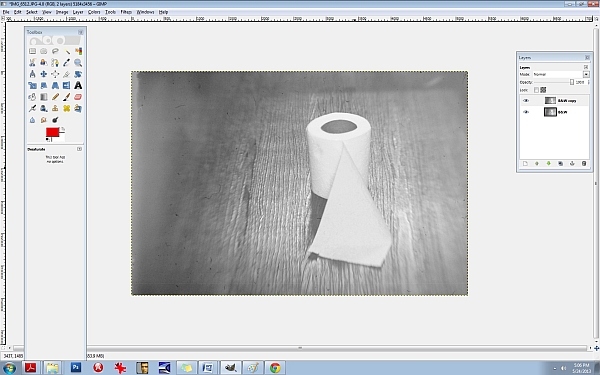
Let’s add a texture. (Adding a texture isn’t necessary at all, and it can be very tricky at first, but it compliments many photos, especially portraits, abandoned houses and such.) I like to add a texture or several sometimes because it too adds depth to your photo. I like things that look like hair or old film scratches- it gives my images a dirty, ugly-ish appearance and that’s exactly what I like.
So let’s add a dusty old film-scratch texture to this. Here’s what the texture looks like by itself:

It’s one of my favourites.
When adding a texture to a photograph, it’s very important to make sure that your sizes match up. Check to see what size your image is in GIMP. You can do this by clicking on the IMAGE tab at the top and then select SCALE IMAGE. Notice the sizes there. Be sure that it’s set to PIXELS (the box on the right) and that the width and height are written down (or memorized). Those are the exact measurements that you’ll need to resize your texture to. I recommend using IRFANVIEW as a basic photo viewer, it also reads RAW files so that’s perfect. (I’ve used IRFANVIEW for 8 or so years now and it’s one of my most used tools.) You can get it here:
Download and install that. Once you’ve opened up your pic in IRFANVIEW, resize it to your proper width and height, and then IN IRFANVIEW- select EDIT/COPY. Now we’re ready to paste the texture into GIMP. After copying the texture, go to GIMP and select EDIT/PASTE.
Once the textured layer has been pasted into GIMP, you’ll notice on the right side in your LAYERS box that the top layer has been added. It’s what is now called a “floating channel”. You’ll need to stabilize it like the rest of the layers and it’s very simple to do. Right click the (top) floating channel (your texture layer) and click on ANCHOR LAYER.
Now you should see 3 stabilized layers there in your box. The texture in the top layer, the B&W image in the middle, and the coloured BG/background image in the bottom. We no longer need the coloured image in the bottom channel/layer so you can go ahead and click the eye, switching it over to invisibility if you like, or, you can leave it as is- it won’t hurt anything.
Now it’s time to learn about BLENDING MODES. In the LAYERS box you’ll notice the word MODE above the OPACITY slider. This is the area that gives your layers different effects. The blending modes I use most often are: overlay, multiply, screen, and soft light. There are lots of useful blending modes here though.
Be sure that you’re working in the top layer of the LAYER box (should be named B&W2 copy I think) and take the OPACITY down to about 63.4%. Go to your blending mode area which is MODE (again, it can be found above your OPACITY slider in your LAYER box) and set the mode to SCREEN. This is a bit of a light, silkscreen and gives your images a soft, smoky look. Afterwards, go ahead and flatten the image, again, you can find this area at IMAGE/FLATTEN IMAGE at the top tabs, and then immediately DUPLICATE the layer. It will then look like this:
Next, let’s run it through the LEVELS again to increase the blacks/SHADOWS. I often repeat my processes two and three times throughout one photo edit. Increasing the shadows at this point will give the blacks a smeared/chalky chemical look. Let’s try it:
50/80/46
INPUT LEVELS/3 sliders:
Shadows (1st slider all the way to the left)/ middle slider- midtones- .80/3rd slider all the way to the right (Highlights)- 245. Now, DUPLICATE the top layer again, and let’s hit the LEVELS one more time.
Set them at or around these levels:
INPUT LEVELS:
Shadows/1st slider all the way to the left- 29
Midpoint/middle slider- 1.34
Highlights/3rd slider all the way to the right- 255
Notice the darker “burned” looking areas in the shadows now. It will look like this:
Now I’m going to teach you another useful trick. It’s the CURVES area and it will give us master control over our colours and hues. Go here: COLORS/CURVES from the tabs at the top. You’ll see a CHANNEL dropdown menu box. Inside you will find the RED, GREEN, and the BLUE channels. We’re going to edit each of these three channels individually. Think of your primary colours and the various colours you can create by mixing them. Let’s make a base/foundational colour of bluegreen/yellow. Select your BLUE channel, and then make a backwards or inverted “S”, like this:

Don’t go over the top or it’ll be overkill. Remember to do all things in moderation. Now, let’s kick up the reds. Select the RED channel from the same area (dropdown menu):
Let’s do something a little different here. Experiment. You don’t have to do the exact same thing- find your distinct style here and work with it.
Let’s experiment with the GREEN channel, found in the same area:
There’s no right or wrong way to do this. Do what makes you happy.
Now, merge the two layers IMAGE/FLATTEN IMAGE and then DUPLICATE the layer once again.
Now you’ll use the same thing: CURVES to adjust your overall lighting. Select COLORS/CURVES. In the CHANNELS box there- the drop-down menu, it’s preset to VALUES. Leave that as is. The diagonal line that you see is the line you’ll be using. Pull the bottom left part of the line straight down to increase your shadows/blacks. As seen here:

It’s still a bit too red for my liking, so let’s run it through the colour balance again to decrease the reds.
Go to COLORS/COLOR BALANCE from the tab at the top and select your MIDTONES channel. Move the slider toward the CYAN -14. Leave the middle slider as is, but set the bottom slider to -1 in the direction of the YELLOW. (In other words, TOWARDS the YELLOW.)
It should now look like this:

It’s a mixture of yellow, red, cyan, magenta, green, and blue but the dominant colours are yellow and green. You’ll notice that it’s not one “flat colour” or tone. There’s more depth here because of the broan ranges in colours. Let’s do one final thing to it to give it a bit of a smoky vignette around the edges. Select your BURN tool. In your TOOLBOX area it’s the tool that is at the bottom, just aboce your colour palette boxes. Move your cursor over it and it’ll read: DODGE/BURN tool. (The DODGE lightens it the BURN darkens it.) We’ll need a bigger brush than the ones offered so let’s create a larger one.
Select your BRUSH tool.
At the very bottom of the pop-up box that displays your brush selection, find the bottom right brush icon and select it. You’ll need to click on the actual CIRCLE brush picture in your brush area to activate it first. That can be found just underneath the OPACITY slider and above the SCALE slider. Once the popup box opens up, you’ll see the needed brush icon in the bottom right corner. If you move your cursor over it, it should read: Open the brush selection dialog
Now at the bottom of THAT area, you will find a NEW BRUSH icon. Click on that. Increase the radius to your desired amount and rename the brush something like LARGE. It will then be added to your brush collection. If you do this, it will come in handy tremendously. You’ll need larger brushes for partial erasing, burning, etc.
Now let’s go back to the burn tool and select your large brush. You’ll need to decrease its size right off the bat, significantly. I set mine to .74% SCALE and 28% OPACITY. Your goal will be to burn the very edges of it neatly, not add a big, puffy smears.
After it’s finished, it should look something like this:

Last but not least, we need to add a bit of a guassian blur to it and then sharpen it. The blur gives it bit more of a vintage finish and we’ll slightly sharpen the focal point afterwards. Let’s go ahead and merge the layers again, IMAGE/FLATTEN IMAGE. (From the tabs at the top.)
DUPLICATE the layer, of course.
Then you’ll choose (from the tabs at the top) FILTERS/BLUR/GUASSIAN BLUR. You’ll see a BLUR RADIUS area which will allow you to set your horizontal and vertical blur radius. Select 2 for both. Click OK.
Next, you’ll need to select (from the tabs at the top) FILTERS/ENHANCE/UNSHARP MASK.
Set the amounts for the following:
RADIUS: 6.4
AMOUNTS: 5.0
THRESHOLD: 0
Over time, you’ll grow more aware of what radius you’ll need for each image.
Now we’re going to layer this underneath our blurred layer. First, let’s name these layers accordingly so we don’t confuse the two. First, be sure to duplicate the bottom layer, always. Anytime you make significant changes to your layer, it’s good practice to duplicate the BG or base layer so you can go back to it if you mess up. So, duplicate that bottom layer. Toggle the EYE icon to invisibility (again, on the bottom BG/layer).
Now, rename the top layer to SHARP and the middle layer to BLUR. The middle layer should be the Guassian Blur layer.
Now you’re going to learn how to erase. First, let’s switch the layers. We want the blurred layer on top and the sharp layer underneath it. You can do this easily by pushing the BLUR layer right up to the top.
We’re all set to erase. Go to your eraser tool which you’ll find in the TOOLBOX area. Select your LARGE brush that you’ve just created. Our goal here is to isolate the focal point, which is the center of the toilet paper roll in this case. We’re needing to erase the blur from the top layer so the sharpened bit can bleed through from the layer underneath. This is one of my most used techniques in editing and I use it with lighting, tones, colours, practically everything. You’ll be able to “paint things” into your photos with your eraser brush this way. I can’t stress the importance of doing this for added depth in an image.
Let’s set our brush to .96% SCALE and about 24% or so for the OPACITY.
Now because we’re going to be erasing FROM the BLUR layer, we’ll need to right click on that layer and select “Add alpha channel”. You’ll need to do this for every layer you’re needing to erase onto. (Only the BLUR layer in this case.)
So let’s erase just around the toilet paper roll itself so that the sharpness will be revealed underneath. If you find that you’re still needing more sharpness, increase your eraser brush’s OPACITY to 60% or so.
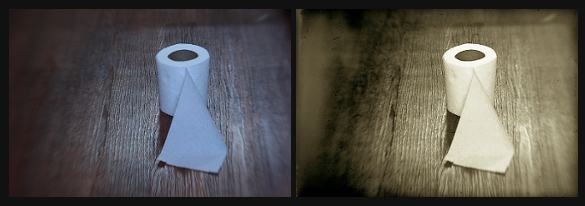
I think we’re just about finished here. You can use these steps to create moody, dramatic, “haunting” images or chemically processed, burned “ugly” type works. They’re not for everyone, but they’re my favourite. Here is a comparative before and after:
I strongly encourage you to experiment with these steps. Again, there are no right or wrong ways to do them and really, every person is different and we all like different things. In time and through trial and error mostly, you’ll come to find your own distinct style. It took me a good 7+ years to discover most of these things. (Lots of tears, frustration, and aggravation.) I know this seems like a lot of work, but this is actually a “quick edit”. It can become a complex procedure when 5+ textures are involved. All of this is a lot of fun though. I hope I was able to help you some.
xo
-Birgitta


