Road Trip!
Welp- it’s official. Josh and I are going to see his family! He hasn’t been there (apart from two times, shortly) in about 7 years. Losing both parents at an early age and then being shuffled through foster homes, he had all of the odds stacked against him in life, and like me, should have ended up a statistic. But he’s kind, strong, loving, and highly intelligent (I know you’re reading this Brianna, and I know you’re laughing!) but he really is. He’s overcome great odds; it ripped my heart out of my chest to see him writhing on the floor last night, wailing and crying out for his Mother.
So, after pulling a few strings today, I’ve managed to coordinate a road trip. The house is stocked with $300 of groceries- Bob’s got his smokes- Brianna’s got her Carl back (he had escaped earlier) and after fueling up, we’re headed out to Huber’s Winery to pick up a couple of bottles of Catawba Rose to go with Josh’s Aunt’s “Wild Gypsy” candle we bought for her. I’ve heard about his family for so long now, I feel like I know them already, and I love them all truly. I’ve been missing his sister, Kat, lately. I feel sad in my heart for her and I just can’t put my finger on it, but when my fall aid is finalized, we’re going to take a trip to see her too.
I had an odd dream last night. I dreamed that I was walking in the snow but it was warm, like a mild summer day. (I usually dream in monochrome and sepia tones, much like my photography.) But last night, the palette was explosive! Wild, vivid colours. I walked into a patch of sunshine: I could tell by the grass’s shadows that it was about 6:00 p.m.- just when the shadows are stretched to their peak (and the best time for photographing them if you want dramatic photos). As I stepped into a triangular area of bright sunlight, the snow became mingled with dollar bills. It was literally “snowing money”. I walked with my eyes closed and a bizarre smile plastered on my face, and when I woke up, there was a warm glow all around me. Is that…is that what happiness feels like?!
I suppose it was a bit prophetic in a way- I was able to access $500 for groceries and a road trip- last minute. Josh is strangely tense. I know there are a lot of emotions he feels right now. It’s like being around a brooding storm without thunder- but a very quiet one just the same. I understand.

Rough Sailing
Josh has been a heap of tears on the floor, wailing and howling: last night was his Mother’s birthday anniversary. She was shot/murdered when he was only 7. It’s always rough around this time of year, understandably. His pain is so intense that all I can do is wrap myself on the floor around him there and hold on tight- trying to absorb his pain as he wails. I cry too. He told me that his Aunt Bev released a balloon today for her sister, Josh’s Mom. It broke my heart that Josh wasn’t able to be with his Aunt Bev during these hard times. I know it will do them both a world of good to spend some time together, and time with the rest of his family there too. Hopefully we can go very soon.
He’s feeling better now; chit-chatting with (Bob). He’ll feel better tomorrow.
He always does.
By the Grace of God and the Skin of my Teeth
…I’ve finished the semester. Having been told that my financial aid fall disbursement was being held back until my Public Speaking grade was submitted, I kicked things into high gear and completed all 6 speeches in just two days- complete with their full speech outlines and a 9 chapter test. (Two days!) I made an A. The written assignments for that class were insane- they were 7-9 pages each (per assignment).
I have three full days until my next semester begins- that’s a luxury at this point. I haven’t been on a photoshoot in weeks and I’ve barely played my guitar and sung, but there will be time for all of that after graduation. One semester to go!
My fall classes will be:
Intro to Criminology
Social Psychology
Lifetime Fitness and Wellness (College P.E.)
Therapeutic Interventions with Substance Abusers II
Study Skills
Not that I need “Study Skills”, but in order for my Frank O’Bannon grant to kick in, I have to be full-time, so my adviser suggested that I add a course (Study Skills) that won’t count toward my major but will increase my credit hours to 14. It’s doable.
I’ll receive an additional $1,380 for the Frank O’Bannon grant, or thereabouts. My Mom has a $900 debt from a bad car deal- how can I not help my own Mother out? If it weren’t for that, I might let the last class slide and settle for 11 credit hours but I simply have to help her out. Besides, nothing will be as difficult as College Algebra. After that (and Public Speaking)- it’s all gravy.
I was planning to celebrate earlier and in fine spirits, when I received a knock at the door. It was the police. (Good golly here we go again…)
“Are you Mrs. Lindsey?” they asked.
“Yeah.”
“Is this your son?”
Sigh.
“Yeah…”
Brian Bob was in an accident. Thank God he wasn’t hurt too badly. He ran right into a big, orange truck at a red light. He was on a bicycle. (These things happen.) My joy was short-lived today but hey, on the larger scale of things- my son’s alive. His Dad and I are going to have to pay for the damage out of pocket, seeing how Bob’s only 17. Busted tail light, scraped bumper… On the even larger scale of things, I don’t have a migraine! All in all, it’s been a good day still.
I have this weird smile on my face- even after all of that.
I finished Public Speaking! And made an A!
Definitely smile-worthy.
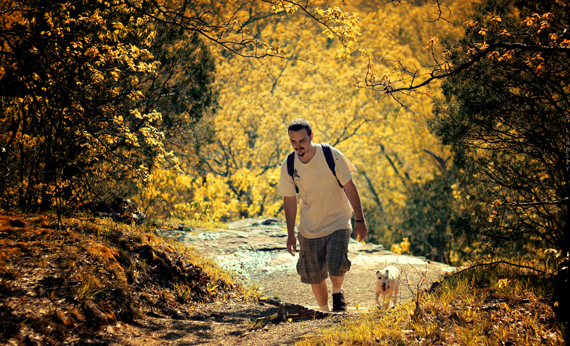
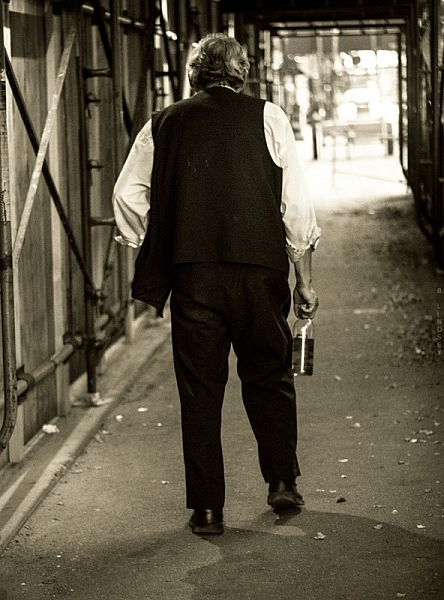
Heidi and Josh- abandoned farmhouse- semi-HDR
Madison, Indiana
Kitty AIDS
It’s a sad day here. Perhaps today will be brighter than yesterday.
Carl has “kitty AIDS”: a feline autoimmune deficiency disease. It’s not exactly the AIDS that is the problem as much as the cat’s compromised immune system, which allows other bacteria and viruses to attack its systems.
Carl was healthy here:
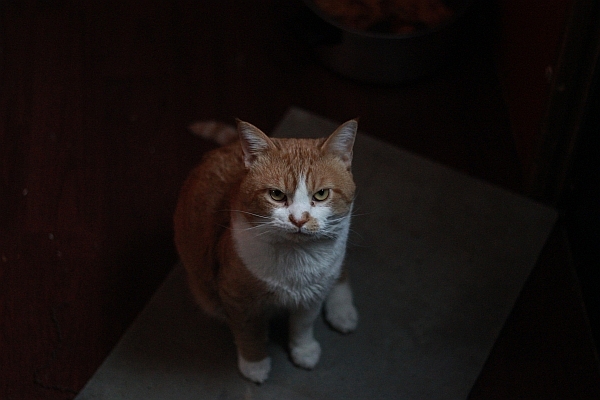
Brianna noticed that Carl has been turning yellow on his skin and inside of his ears- jaundice. He came in from a fight recently with a gaping wound on his head, which later became infected. We cleaned it daily with peroxide and eventually applied Neosporin, which helped. It’s looking much better now, but he’s lost a good bit of weight and has developed kitty-bulimia. He’ll overeat, almost always, and regurgitate immediately afterwards. It’s hard to say if this stems from a behavioral or physiological process. Brianna rescued him two or so years ago; he’d had a fairly hard life beforehand, always scrapping for food.
We took him to the vet yesterday and the vet blatantly shared with us that Carl should be taken home, given the best soft food available, and “made comfortable”. I know what that means. When my Dad was dying in the hospital, the doctor was farting around with his words, so I pulled a nurse out into the hallway and asked her to shoot me between the eyes. She told me to take him home and “make him comfortable”. It was her hard stare that solidified the impact: we both knew what she was saying.
Brianna has been crying her heart out. Carl is her best friend! He looks like a total bruiser but really, if you give him a small piece of steak, he won’t just take it from you; he rubs his head on your hand to show his appreciation, then he gently takes it. He’s a gem.
We were told by Dr. Strong (the vet) that there are a pack of cats in our area that have feline AIDS: it’s transferred through a saliva to blood interaction, or blood to blood, or mating. Often, cats who fight will transfer this deadly virus to other kitties. It doesn’t transmute over to humans, however.
We’ve quarantined Carl; he’s staying in Brianna’s room at the moment. The vet donated a $56 antibiotic shot from her own Angel Fund Foundation- it was hard to hold back the tears on that one. I’m going to make her a thank you card, using Carl’s picture.
Although the prognosis looks fairly grim, as Dr. Strong stated, “There are always miracles…”
Road Kill

The last month or so has been so horrendously awful that I haven’t been able to write anything. Everything has been so bad: I’ve been like a dying woman on a deserted island.
School has been kicking my butt…as usual. I’ve been incredibly bitter.
On the brighter side of things, I have only my Public Speaking class to polish off. And then, my fall semester begins on August 15th- no summer break for me. I’m working through it all. I keep reminding myself that I only have one semester to go before I get my degree. The joy will be short-lived as I’ll move right into my B.A. in Criminal Justice. It’s never ending, isn’t it?
Tomorrow is Josh’s birthday. He’s been saddened by the fact that he hasn’t been able to go and visit his family. He’s been crying lately…
Last night something really crazy happened. Josh and Brianna and I had just returned from a trip to see Heidi in Bloomington. After blowing back into town, we stopped at Kroger to pick up some cat food. Josh and I had been bickering much of the way home- who knows what started it this time- we’ve both been on edge lately given the circumstances- and when we walked out to the car, we saw that it was surrounded by no less than 5 cop cars. It was crazy! Brianna was in the back seat and was slumped down, holding Heidi’s cat, Numa, and the cops were shining flashlights all in her face and all inside the car.
I asked what was going on, and one of the officers sheepishly apologized saying that they’d had a call stating that “somebody had left a toddler in a carseat in the back- alone and unattended”. I was furious!
I explained that Brianna was actually 19 (thank you very much) and that we were “just fine” (thank you very much).
Good golly…talking about pissing a woman off. I’ve pretty much had it with the Barney Fifes in this town “playing cops”. I wasn’t really as pissed at the cops as I was at the very ignorant people who’d called.
After the cops had completely cleared out, I was told that the people who had called the cops on us were actually the couple right across from us in the parking lot, holding their baby. Lovely.
I drove around to them and confronted them, saying (and playing dumb, totally), “Excuse me, do you know who called the cops on us?”
“Um,” the woman said, stuttering, “Yeah, um, we…we didn’t know who was in there- we thought it was a baby and…we didn’t want to snoop but…” (yada yada yada)
“Listen,” I said, ” Always make sure that you know exactly what you’re doing when you call the cops like that. You can destroy people’s lives. You have to make sure that you know exactly what you’re talking about before you just ‘call the cops’ all right?”
I was supremely pissed. We were in there for all of 5 minutes!
K. Moving on…
Josh is doing schoolwork: we’ve really been through the wringer lately. We’ll be able to take a much needed vacation in a few more weeks. Life has been a little… too exciting lately.
Until we meet again!
Final Grade- Health PSYCH
Email from instructor:
Thank you for the comments. It has been a pleasure to oversee your excellent work. Your final grade for the Health Psychology class is 92% which is an “A”. I wish you success in your future academic pursuits and career choice. Stay well!
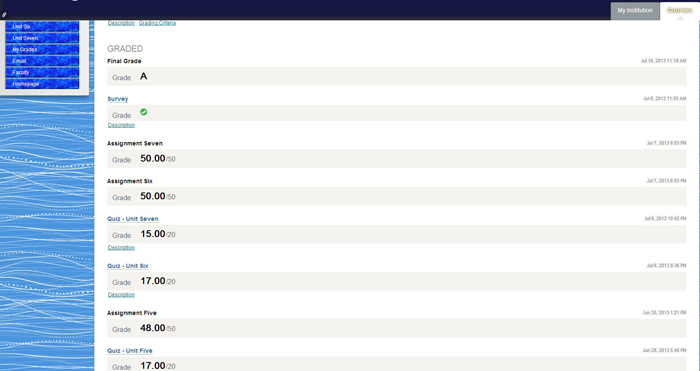
1 down- 3 to go!
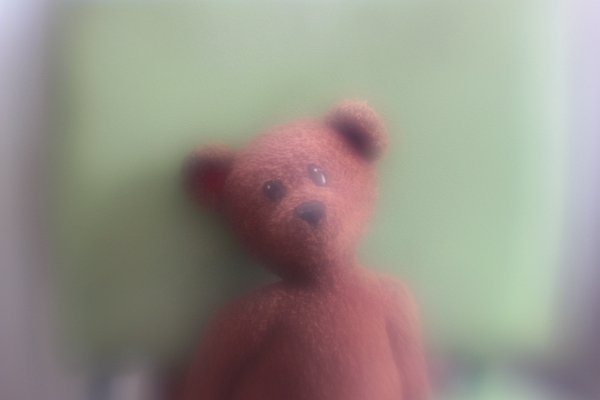
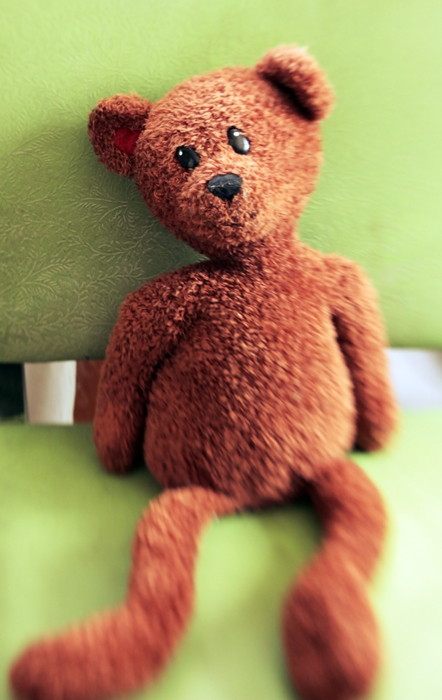
No Dreams Tonight
 Josh, blemishes and all
It’s 5:29 a.m. and I’ve been up all night. Josh is sleeping in the other room, bathed in the (deliciously) cold air. We’re now the semi-proud owners of three air conditioners! That’s reason to celebrate around here; things have been so rough lately. Apart from general hassles and stressors in life, the extreme heat was making us all a little bit crazy. It quite literally felt as if our brains were simmering in our own stupid juices.
Maddening!
I can actually think now and focus on my schoolwork again (which is drastically overdue). My teachers gave me an extension; I really don’t like to do that, but in this case, it couldn’t be helped. I’ve decided that I’ll be more than likely working on my B.A. in Criminal Justice after I graduate, minoring in Psychology. I’m interested in working in the areas of probation, parole, and rehabilitation. Here’s my theory:
There are two major gaps in our penal system. The first gap is within the age ranges of 17-24. Many of these candidates are still juveniles/young adults and have never been incarcerated for an extended length of time. They’re petty offenders and are still in a somewhat malleable state: they can still be reached and easily molded for correction and productivity. Some of these people will fall through the gap however, ending up in prison after several bouts with crime. This is the first gap and should be considered to be at one end of “prevention”. This is also the area that falls into probation rather than parole.
The second gap deals with people who are between the ages of 40-55 (give or take a few years). These are the ones who have fallen through the first gap and have been through the many revolving doors of the penal system, having never been rehabilitated. These are much harder cases because they have spent years in prison already, and when they are released, they hardly stand a chance at successfully rebuilding their lives due to the fact that the majority of our U.S. prisons aren’t implementing applicable programs that will help to restructure their lives. This is the second gap, and should be considered to be at the other end of the line, which is “cure”.
Prevention……………………………(Incarceration)…………………………………..Cure
The two gaps are crucial points for either category, because they are both PRIME TIMES for a juvenile delinquent (or former inmate) to utilize ready programs that will help him or her change their lives for the better.
My main area of interest will be in working in one of these areas: prevention/probation or cure/parole. And I don’t want to go and punch a time card, “do my job”, and go home. I don’t want that to be my life. I want to put every bit of what I have within me into my job, wherever it will be, and combine my personal and empirical experience in life with my academic education so that I can “actually make a difference” in the lives of others.
We’re heading out of here at 10:00 a.m.
We’re going to Tennessee to pick up Brianna from her friend’s house; it’s a beautiful stretch of country.
Time to see the sandman…
High Notes
I’m headed out into the rain for an impromptu photo shoot. I’ll be going to Bernheim Forest- beautiful place. I’m not satisfied with the shadows vs. highlights in my pics- I think I need to drop my AP and increase my ISO- I want heavy blacks. Yeah, these are the things that I ponder much of the time. :0)
I received a super special email from my Health Psychology instructor; it made me cry. It said:
For assignment three;
Your work continues to be excellent. Your answers to each item were complete, supported, reasonable, and demonstrated understanding of the key concepts. It appears your absorption of the health related information will not only help you but, as an example and source of information, those whom you affect personally and/or in your career. It is a pleasure to have such a capable student.
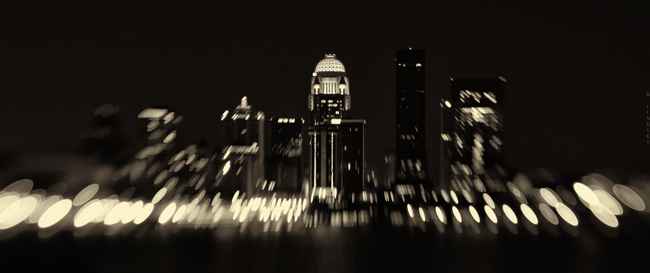
Homeless man wanders off with Josh’s change, and his booze.
Louisville, KY- 50 MM/natural lighting/manual
Hell Week x 3
The heat is making us all a little crazy. It’s 86 degrees in this place.
“How do you feel about being cremated, mom?” Brianna asked me nonchalantly.
“Is that what you want? To be cremated?” I asked her.
“Being buried is one of the most vile things you can to to another human being. They drain your blood, fill you with embalming fluid, and stuff cotton in all of your holes.”
“They stuff cotton in all of your holes?” I asked.
“Yeah.”
“Well, there’s a Scripture that says we’ll return to the dust. I think that’s a commandment, not a request,” I said. “Do they really stuff cotton in all of your holes?” I asked again.
She said something else but my mind wandered off to thoughts of me, lying on a cold table with bits of cotton hanging out of my holes. Not that I would feel it at all.
“And I don’t want a funeral,” she continued.
“So you’d rather be burned up?” I asked her.
“I don’t want a funeral either,” I said. “Actually, I’ve left that up to Heidi. She’ll do what she wants with me.”
We sat quietly and reflected on the possibilities.
‘”Oh damn! Where did I put my mother?!'” I said to Brianna, mimicking Heidi.
“No,” Brianna said, ” she would pick up a homeless man with you in the back seat. He would be like, ‘What’s in the back?’ And she would be like, ‘ My dead mother,'” said Brianna, sitting upright with a no-nonsensical far away look, pretending to be Heidi.
I laughed as I pictured Heidi toting my cold body halfway across the city, picking up transients along the way- pushing bags and shoving heavy body parts to make more room.
“Well, I’ll tell you what,” I said to Brianna. “God forbid, if you should go before me, I’ll honour your request and have you cremated. I give you my word.”
She seemed appeased.
I got up to make noodles.
Josh and I were up at the buttcrack of dawn, as Heidi puts it, praying and getting ready to start our day. We went for a “coffee walk” at 9:00 a.m. which lasted for 20 minutes or so. We’re planning a chamomile tea-walk this evening. We’ve been working relentlessly on our schoolwork since this morning (squeezing in a doctor trip in between classes). I’m so glad Josh and I are both in school simultaneously; we’re a great support system for one another. We know when to put extra pressure on each other and when to tell the other to take a break.
The next three weeks will no doubt be the most academically challenging thing I’ll have ever done. I have no earthly idea how I’m going to do everything I’ve scheduled. It’s shocking to think about. My schedule looks like this:
June 12-Wednesday
Study for Midterm Exam in Earth Science/Take Midterm Exam
Math 2.5 & 2.6
Health Psychology Unit 3
Read Public Speaking Chap 7
June 13-Thursday
Take Math Quiz 2.4-2.6
Read Chapter 10 Earth Science
Read Public Speaking Chap 8
June 14-Friday
Take Earth Science Test 10
Do remaining Assignments in Earth Science
Read Public Speaking Chap. 9
June 15-Saturday
Public Speaking ALL DAY
Do # 3 Public Speaking Written Assignment
Take next EXAM in Public Speaking
Prepare for next 4 speeches
And that’s just the next few days.
Each chapter of each course covers 30-40 pages.
The remainder of the month is staggering. I’m fairly certain that after I graduate, I’ll be working on my B.A. in Sociology and a double minor in Criminal Justice and Psychology. Lots of fun in store for me!
I have so little time now; I’m off to compose a 5 page Health Psychology assignment, read another chapter in Public Speaking and do 25 (more) pre-calculus problems- that will be 50 total for the day. That will add up to over 200 math problems in just the past few days, apart from my other courses.
Time to get cracking.
Au revoir!

The Fine Art of Picking up Strange Black Men
I remember driving in Lousiville, Ky one night. It was summer, loud, stereos were bumping- it was a Saturday night and I was out and about in the bad side of town trying to track down my BFF at the time, Olivia; a large black woman with a brood of kids and grandchildren she’d raised. Olivia is pure gold in my eyes. We met in a homeless shelter. I had been standing along the wall “people watching” and suddenly, a burst of music rolled into the room: Olivia was laughing and dancing and spinning around- completely entertained- with a boom box on her shoulder. She was larger than life! I smiled and knew I had to meet her.
We talked after some time and realized we immediately liked each other. We spent the next few weeks hanging out together and passing time- smoking weed out back with many of the residents there. One day, I returned to the shelter and Olivia was gone. They told me she’d gotten her own place. So is the life at a homeless shelter; people come and go- you have to get used to that. Some you see later, some you never see again. It teaches you to love people hard while you have them and let go quickly. That was worked into me many years ago.
As life would have it, I ended up moving into her neighborhood just a few weeks later. For the next three years we were virtually inseparable. She helped me through some very dark times and I gleaned so many good things from her. I have a very special love for that woman. And a high respect.
After some time, we both moved out and we lost contact with each other. I had made up my mind on that particular Saturday night that I would track her down. Very much like a gypsy or nomad, I’ve traveled as a wanderer in this world. Nothing has held me back. Being poor certainly hasn’t. If anything, it’s been a catalyst.
But on that night, I set out in my car purposefully driving to the bad end of town. I knew Olivia had moved to the next state over in Kentucky, so I cross the bridge and drove into downtown Louisville. It was a hot, muggy night.
As I headed deeper into the back parts of the city, I popped open an beer, lit up a smoke and turned up the radio. (Back in those days, it was standard to find me driving with a beer nestled in between my legs- a joint or two always close by. A lot has changed since then!)
People stood out on the corners, openly dealing drugs. They knew others knew what they were doing- didn’t care. Cops rarely bothered the little fish anyway. As I was pulling up to a red light, I saw a black guy standing on the corner. I don’t know what grabbed me about him, but something did. Let’s say, it was destiny.
“Hey, you need a ride, man?” I asked him.
“Yeah, yeah…” he said and he hopped in the car.
Now this isn’t the wisest of things to do, no doubt- pick up a black guy I don’t know in the bad part of town. But at that time, I really didn’t care. I was governed by my instincts and driven with a purpose. I had no idea what my purpose was half the time, but I new that I needed to do what I was doing and that’s all I knew.
“Where ya going to, man?”
“My mother’s house,” he said.
We chitchatted briefly and he told me his story. He had been excommunicated from his family some years before. They had given up on him and pretty much cast him out. I felt really bad for the guy. He went on to tell me that he had only just decided to go and see his mother on that very night, and was in fact pondering the decision when I picked him up. I felt honoured that he would include me in that. Totally.
We bonded immediately. I may have even smoked a joint with him. It’s no big secret that I was a total stoner back then. I smoked 1 to 3 joints every day for 18 years. As a matter of fact, “stoner” is putting it mildly. My Dad had the best stuff for miles and everybody knew it. He was known for that and so I never lacked for good weed. It’s no wonder I ended up being an artist in life. Weed does that. I know everybody thinks it’s so “bad” and it’s a gateway drug and all kinds of other things that they’ve been taught to believe, but I will always be an advocate for marijuana and a person’s right to smoke it. I just don’t smoke it myself anymore and haven’t for years but I’m strongly for it, if the person and the circumstances are agreeable- let’s put it that way.
Moving right along, we eventually made it to his mother’s house. I thought we would say our goodbyes right there but he invited me to come along. Wow. He hasn’t seen his mom in years, and is hoping to be reintegrated back into the family unit and now he’s going to bring a stoned white girl with him who picked him up on the corner. Ok!
We stood outside on the porch and I stole a few glances in his direction. Even stoned, I could see a lot. He was hopeful and meek. I really like that guy. That took guts.
The door opened and a small woman stood before us, small in stature but full of expression and total shock. My mind plays it as if it’s in slow motion- her mouth, open with shock- she was yelling and mumbling and screaming to somebody else that their man had come back. I don’t remember his name now. It was 18 years ago.
She ushered us inside and we followed her to a back room where a woman lay in bed. I sat down quietly on the side of a chair and tried to disappear. I could hardly believe I was there and I felt a bit like I was in a movie. The woman in bed was his mother, who immediately cried upon seeing her son. They embraced and he crawled right up next to her and they just held each other and cried together.
I have absolutely no idea how we got on the subject but they found out that I sang and was a songwriter. What happened next can only be described as something so bizarre that it now seems more like a dream than a memory, but I sang. I sang A Capella, a song that I had written, a song about Jesus. Four strangers sat in the room there- eyes fixed on me- in a semi-petrified state, mouths slightly open. They felt honoured that I would sing for them. I was honoured that they let me.
I sang from my heart and sang especially for that mother and son. It was one of those rare moments in life that you know has been brought together- orchestrated by God even- that will never happen again: A true once in a lifetime moment.
The mother cried again and thanked me repeatedly for bringing back her son. I was especially emotional because at that time, I was separated from my own two children who the system had taken from me years before. It brought me great comfort that I could reunite a mom with her son like that, and I cried too.
I hugged them all and made my way back to my car alone. I smiled all the way home.
“You’re awesome, God,” I said, smiling, tears still in my eyes.
He smiled too.
Prelude to a Photo Walk
I’m supposed to be house cleaning. I cut a deal with Josh- he would clean the back part of the house and I’ll clean the kitchen, etc. He’s living up to his half- no wait- I hear metal clinking outside around his moped area. Hmm…I may have been outfoxed.
We’re going to go on a photo walk today in downtown Old Louisville (Kentucky), home of the Kentucky Derby. It’s an interesting place- a mixing pot. Old, young, poor, wealthy, strange artists (my favourite kinds of people ever), and an array of collective and colourful personalities. We’re going to park in Indiana and walk over the bridge, into Kentucky, have a beer, grab a bite- shoot some people.
With the camera, of course. 🙂
Damn. I’m really going to have to stop with the smilies. It’s ruining my tougher than nails image.
Anywho, we’re lounging about cleaning the house at the moment. Josh starts school soon too. Back when he was here before and we were having major problems, I sort of…smashed his computer. It’s shameful, I know. I was raging at the time and livid about what he was doing online. (As if smashing the computer would help.)
Now, he’s starting school and desperately needs a computer. Although we’ve settled our financial differences and have squared things up, he’s still without a computer so, I did what I had to do and sold my Lensbaby. Ouch. That hurts just typing that. I also sold my swap kit- which was an additional 4 lens set. There’s just no way I could feel good about having my luxurious toys while he suffered. So, I don’t regret it at all- it was the right thing to do. I still have my 18 MP. DSLR and my 50 MM 1.8 (my personal fave). It’s enough.
I feel good knowing that I’ve made retribution and have given Josh enough money to be able to get his computer and book access code. I think I’ve learned a pretty good lesson in all of this. Leave the man alone! Let him breathe and be a person apart from me, even if that means doing something that I deem “bad”. For me, that’s huge.
We went out for drive yesterday to Lexington, Indiana and had a really good time. We took a turn down a long country road and followed a sign that announced “fresh strawberries”. It was like a wild Utopia. The clouds were semi-overcast and casting a cool, grey glow over everything. Almost like golden hour lighting- that pre-storm lighting, which to me is the best ever, and the best for HDRs.
Large thistles grew out of thick stalks in the ground on either side of the road. Although they were deep purple and quite beautiful, I found them even lovelier in black and white:
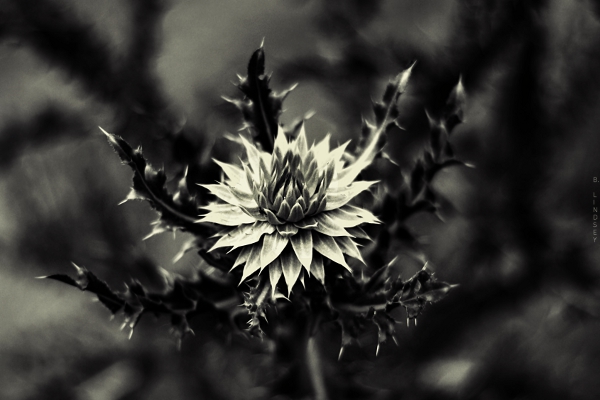 50 MM/shot in monochrome/manual/RAW
I have an abundance of shots taken from yesterday but haven’t had time to get to them. I’ve discovered the beauty of shooting in RAW again. Makes a big difference with image quality.
Josh just pulled up on his sugar-cycle. (I’ve renamed his moped- he does store runs late at night because we’re sugar freaks and consume large amounts of candy while watching Locked Up Abroad late into the night like we did last night.)
And now I have to get back to cleaning. We’re off on a photo walk soon and my regret is that I don’t have a super-wide to shoot with. All of those old architectural jewels in downtown Louisville and I only have my 50 MM. UGH. (Must get a 10-20 soon.)

50 MM/shot in monochrome/manual
(The strawberries were delicious, by the way.)
Praying Down the Rain

“Oh my goodness, I have a screaming migraine and it’s that time of the month. Is there anything else worse than that for a woman?” I asked.
“Is there anything worse than that for a man?!” Josh answered.
He has a valid point.
I knew it was too good to be true that I wouldn’t get a migraine, especially after mentioning it only yesterday. I awoke this morning with a skull-crushing migraine. it’s 1:15 a.m. and it’s now been almost 24 hours (straight) that I’ve had this. And that’s with pain medication. After several years of battling these things, you really do learn to live with them. I shop, cook, clean, write, do schoolwork- I do everything with a migraine and there really are no words to describe the pain. “Intense” just doesn’t do it and keep in mind that I chose to give birth to 3 children “naturally”, so I would know a thing or two about serious pain. This pain is far worse than childbirth. I didn’t cry or scream when I gave birth to my children. I went in like a soldier- no baby stuff! (Well, ok, “baby stuff” but no “sissy stuff”.) When I delivered my oldest daughter, Heidi, the woman down the hall was screaming her head off. I politely asked the nurse to ask her if she could be a bit quieter because she was distracting me. (Yep, true story, I’m afraid.)
My point is that I believe in “mind over matter”. I went in believing I could control my own pain during childbirth and I certainly did, or at least I psyched myself out to believe that I didn’t have to yell or scream or fall apart during it. (It worked.) So yes, I can take some massive pain. These migraines are no joke! I cry. Lots. I can’t liken it to any other pain I’ve ever known. Because this kind of pain comes with nausea, so it’s not enough that you feel as if your head is being sawn in half (from the back) but also, you get the added benefits of feeling like you’re going to barf continuously. Without ceasing. For 24 and 48 hours straight. It’s there when you go to sleep and it’s there when you wake up and it turns your dreams into night terrors.
Barfing and babies and pain and stuff really does have something to do with praying down the rain. That’s coming up.
In all of this pain, I can be grateful that my prayers were answered. I was in the kitchen yesterday and was so hot and miserable. I said a little prayer: “God, please let it cool down. Send the rain, Lord,” I said. And that was it. No big prayer meeting. It was said in one breath and with little after thought.
I woke up this morning and immediately was surprised. It was almost cold in the room! I looked out the window and the sky was grey and congested. My prayers had been answered, speedily. But it seems I traded in my “speed dial” prayer for a heavy dose of pain. I got the cool air and the rain, but my head was a total mess.
I remember a time when it was raining torrentially and Josh and I were helping a friend move. I was in a pickup truck and there was nobody around.
“God, could you hold off the rain so we can get this stuff moved?” I asked.
It didn’t rain for almost two months afterwards. We had one of the biggest droughts we’d had in years. And another time, I was walking home with a few bags of groceries. Not sure what the car story (or lack of it) was at the time, I just remember walking about a mile or so in the rain. No picnic.
“Lord, please make the rain stop.” And that was all I said. It stopped within the next 2 minutes. I could hardly believe it.
So yes. Now we have rain.
My head is screaming so badly at the moment. I have to go and lie down. The pain is reaching the “maddening” stage and I feel like I could smash glass. 24 hours of relentless pain is right up there with torture. I’m simply exhausted.
The peppermint tea is a small comfort.
Josh made homemade chicken soup.
That was a huge comfort.
🙂
Time to collapse.
Absolute Value is Always Positive

Absolute value is always positive. (Nice to know.)
It’s been almost 100 degrees every day in this place: the sun is screaming hot and the air is stifling. We lay around like rags covering the furniture. We have an AC but we need three. Tomorrow we’ll get a couple more.
It’s 1:34 a.m. and it’s deliciously cool in here at the moment. Josh and I are considering exchanging our days and nights so we can work in the cool hours and sleep in the heat. It’s likely.
To recap for the day, we took a mile walk at the park after eating chicken salad sandwiches. The mile walk is a fair trade for a frozen pumpkin yogurt in a large waffle cone. Not that I have to, mind you. I still have a kicking little figure (even at 43) and although I rarely exercise, I do take very good care of my cells, particularly from the inside out. I’ve learned that if your cells are healthy, the rest of you follows. People are quite hung up on “the big picture” with their bodies- over all weight, etc. and I really think the answer to good body maintenance is in blood cleansing, colon cleansing, and proper oxidation. (Because well…proper oxidation does cleanse the blood.)
I really can’t get started on colon cleansing at 1:40 in the morning. Don’t I have better things to write about?
Which brings me right back to absolute value.
I’ve manages to bring my grade up a whole notch in pre-calculus. Just that word “precalculus” used to scare the crap out of me. Who knew that I’m actually pretty good at it? Go figure. I love it, and, I find it very easy to understand. (Hence my notes above.) Let’s see…let’s see…I scored a 50 out of 50 on a monster assignment in Health Psychology- didn’t see that one coming.
Josh is fiddling around with his gadgets and electronics- he continues to amaze me with his inventions. He’s always building something. I hear him now singing and playing his guitar. He’s happy. So am I. :0)
My head is throbbing and I’m sure I should go to bed but I have some reading to do in Public Speaking. Bob is out with friends, and Meatball has come home again! I may have forgotten to mention that Meatball (our 17 lb. cat) went missing several days ago. Alas, Josh rescued him earlier today. Josh is picking away “hillbilly style” now and having a downright foot-stomping jamboree in the other room.
“Wow, you sound really good,” I said to him.
“I sound like Hank Williams, don’t I?” He asked me.
“No,” I said. “You sound like Josh trying to sound like Hank Williams.”
There’s a celebratory vibe hanging in the air now. It’s 1:51.
I think we’re celebrating the cool night air! We know we’re going to be comfortable for at least 6 more hours. I’ve just realized that I haven’t had a migraine in quite some time.
Speaking of which, it’s time to hit the books.
Stress Management
Take picture. Edit photo.
It always works for me.
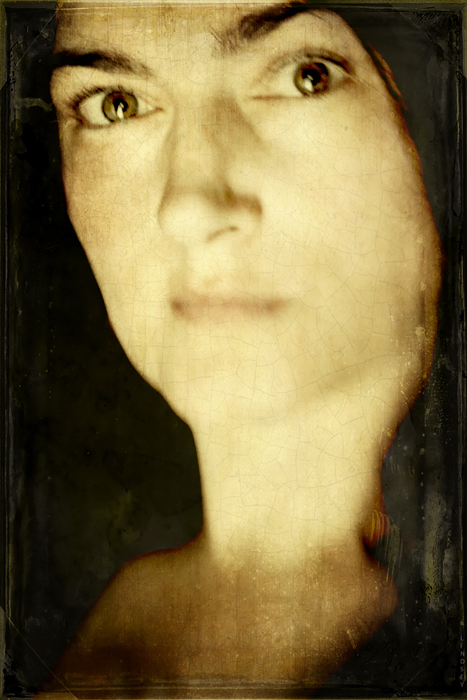 Selfie. Taken this morning. Lensbaby Composer/Double Glass/f/ 5.6
[20+ layers in GIMP]
Lensbaby Composer (Plastic Optic)
I may or may not go out today and experiment with my new Lensbaby lens: the plastic optic from the Swap Kit. It’s so darn hot.
I took this SOOTC/straight out of the camera pic using the plastic optic:
I like the soft focus haze it puts over everything: in the right setting, this would be perfect. Of course, it wouldn’t work for everything. A street scene or a detail-oriented shot such as facial features wouldn’t be ideal for this lens, but a forest shot, any flower shot, or landscape (barn, abandoned house, etc.) it would be great.
I’m still stuck on the Double Glass optic- I love the focal control it gives you while allowing the warped blur in the rest of the frame.
I’m looking at another solid day of schoolwork. All of these toys and no time to play!
On Green Things and other Deep Subjects

I love my very, VERY weird kids.
This is Brian Bob.
He has a green mouth. It’s usually blue. Today it’s green.
I don’t ask him why his mouth is different colours any more.
I just accept the fact that my kids are a little bit…different looking sometimes.
This makes me smile. And feel very proud of my weird artistic children.
If more people in the world had green mouths then…I guess there would be more green in the world.
This concludes my deep thoughts for the day.
It was good to get away from the schoolwork for a few minutes.
For more on this subject, see: TAGS.
Photo Walk [For Y]
Sometimes, when I don’t have the words of comfort that I’m looking for, I take pictures instead. This is for you, Y, and your friend. I wanted to take pictures of flowers for you, and I changed my mind at the last minute. I took a few pics of the riverside instead.
I hope you like them. xo

Unknown couple, sharing an intimate moment
Lensbaby Composer/Double Glass/f/2.8

Josh existing my mother’s house after dropping off his homemade burgers
Lensbaby Composer/Double Glass/f/2.8
 A drinking crowd gathers outside of Third Base tavern.
Lensbaby Composer Pro/Double Glass/ f/2.8

Second Street bridge- joining Indiana and Kentucky
Lensbaby Composer/Double Glass/f/2.8
 Brianna sleeps on a picnic table by the riverside
Lensbaby Composer/Double Glass/f/2.8
“The most painful goodbyes are the ones that are never said and never explained …”
-Anonymous
The Dance

“I’m swearing off all sugar,” I said, to Josh.
“Good! You can do it.”
“Yep. Starting tomorrow. ‘Cause I start my fast tomorrow, so…that would be a good time to start. Besides, there’s a strawberry cake on the stove.”
“Well good, Birgy. I know you can do it,” says Josh again with a hint of boredom.
“Oh crap! I just found a whole bag of Blow Pops!”
I can’t explain this sugar craze I’ve been on lately. I’ve been eating so many Lifesaver Gummies- it’s sick. Whole packages. Generally, I fast 5 days per week. I do this because it brings me closer to God. I intentionally suffer. On the week ends, I eat whatever I want, but really, I usually eat in moderation- never a second plate and I don’t eat until I’m stuffed. Why blow your levels all out of whack?
Besides, I eat to sustain life- not to cram stuff in my face. I respect that my body belongs to God- and it’s His “house”. So I keep that in mind when I’m preparing food and cooking. Usually, I’ll have a small (healthy) breakfast, oatmeal, etc. and take my daily regimen of pills which consist of:
Cayenne pepper
Evening Primrose Oil
Super B Complex
Milk Thistle (cleanses and detoxes the liver)
Fish Oil
Colon Cleanser (psyllium husk/herbal)
Multi-vitamin + Iron
After this, I won’t eat until 6:00 p.m. After breaking my fast at 6, I’ll eat a healthy meal: veggies cooked in either 100% canola oil or imported cold pressed olive oil, + meats (beef/chicken/pork, usually) + multi-grain baguettes toasted in olive oil or something along those lines- but always pretty healthily. I allow myself to snack on fruit and cheese usually, and ice cream and chips- I don’t limit myself to ounces and stuff. I don’t count calories. I don’t “diet” as it were, not in the traditional sense. I don’t fast for aesthetic purposes. I fast for spiritual discipline and cleansing- I’m a big believer in fasting.
Five days per week- Monday-Friday.
What this does is teaches me inner strength and control. When you have the ability to control what you do and do not eat most every day and aren’t “governed” by it, then you’re able to control your thoughts, behaviors, willpower, and many other areas that we often battle and give up control to.
And generally, I don’t go around telling people that I fast often- many people don’t understand. They don’t see why it matters. But it brings me closer to God and His will rather than my own. Also, when you take food out of the equation and “pleasing the self” for 8 hours of the day- it teaches you to “lay down”. It teaches you to be still and be very quiet. At least for that time. And over time, you learn to appreciate these low places in the spirit and soul. Good comes from it. Growth.
So usually, I don’t go hog-wild on whole bags of Lifesavers. I justified it by my fasting I suppose, but then, it does little good to fast like I do, if I give up complete control and eat whole bags of candy after my fast ends. It defeats the purpose of the whole thing.
So, no more wheelbarrows of sugar!
I thought it was about time for an update on my relentless jaw and tongue chewing habit. “Habit” is a mild way of looking at it, actually. When you spend 10 hours a day doing something, it’s no longer a habit, but an obsession and addiction. I was biting the sides of my tongue and jaws on the inside so much that it often bled and was sore much of the time. This exacerbated my TMJ tremendously. What I was doing daily went against all of my beliefs and norms and everything I knew to do. I simply couldn’t stop. I researched it and made a remarkable discovery: this is an area in psychology that is rarely focused on and discussed! I couldn’t even find the scientific name for it and barely was able to find forums where it was openly discussed. Not many cries for help- not many confessions. This confirmed my suspicions that this disease is still done in secret mostly, and so well hidden that it’s rarely discussed. There’s a tremendous amount of shame that accompanies this disorder because it doesn’t make sense to begin with. To confess would be an open acknowledgement that “something is wrong with me”. It’s so much easier to keep it in a locked closet and pretend that it doesn’t exist.
It’s no different than cutting or any other form of self- mutilation. It’s the same processes in the brain that sanction gashing open the flesh and feeling the pain. Not only feeling it, but welcoming it. In my case, it was my teeth doing the cutting instead of a knife. I guess I had to get so sick and tired of being sick and tired of the disease controlling me rather than me controlling it, but finally, I was able to get to the place and recognize that “jaw-biting” was like an abusive partner that I swore to love and commit myself to and even protect. I needed to view it differently if I expected real change. I needed to break up with it.
Update:
After “breaking up with” my sick disease, it’s been three months. I haven’t done it once even! A life-time addiction- gone in once second. And I have been through some serious ^&%$ since then. At first, my thoughts were overwhelming. My anxiety was through the ceiling. I didn’t know what to do with my hands. My thoughts were working overtime and very much in an OCD-related way. So much chatter. It wasn’t easy- I just knew I needed to stick it out. After many uncomfortable weeks, the chatter dissipated and all was quiet. Finally, there was peace.
Recapping the letter:
[Originally posted February 12, 2013]

Dear bad habit,
I don’t know how to tell you this, but I just want to be friends I want to break up with you. You know I love you! And it’s not you- I swear- it’s me. I just can’t do this anymore. I don’t like the way you’re constantly attacking me, and it’s like I have no time to myself. What you’re doing to me seems harmless, but it’s abuse, and I will not stay with somebody that abuses me. We’ve been together for 35 years. I know I’ll never see you again after today. I can’t say that I’m sorry about that. Goodbye. And thanks for everything.
-Birgitta
Photography Basics and Layering with Textures
So Jen, I realize that if I’m waiting for a chance to “open up” for me to not be so busy, I’ll be waiting for a very long time. I’ve decided to sacrifice a bit of my schoolwork to share with you some of the photography tips and tricks that I’ve developed over the past decade. I’m going to demonstrate the four main areas of a photograph that are the most important to me:
- Composition
- Lighting and exposure
- Mood
- Rule of thirds
These are four areas that must be present in most of my photos and if they aren’t, then I supplement one of the other areas with an extra amount. Such as, if the lighting isn’t the best, kick up the mood. (Etc.) This is a good short list to stick with and think about these things always when taking your photo. Because of the ability to simply slap a filter on a photo in post processing (Iphone apps, Photoshop, Gimp, Picmonkey, etc.) it’s all too easy to fall into the “lazy photographer” trap and think, “Eh…I’ll fix it in Photoshop.” But again, this makes for bad pictures that are heavily “shopped”. I’m going to teach you a few in-camera basics that will give you a good solid pic to start out with. That way, when you dress it up, it’ll be that much better (not that much worse). What I’m going to teach you is going to seem like a lot of hard work! That’s because it is. Everything I do is manually done in “layers” – sometimes one photo can have 20+ different layers blended together. If you learn how to do these things though, instead of just “slapping a filter on it”, you’ll have your own style that is tailor made and it will be very difficult to replicate. Editing is very much like gourmet cooking. We photographers all have our own “recipes” and we guard them closely! I’m going to give you all of the ingredients for you to create your own style. And, if you have your own style- you’ll stand out from your peers in this area. Compare every photograph you take with a painting. The SOOTC / straight out of the camera pic is the canvas. We’re going to use our photo editor to “paint it”.
First, here’s a small list of abbreviations that you’ll need to learn:
SOOTC: straight out of the camera
AP: aperture
Sh. Sp.: shutter speed
WB: white balance
PS: Photoshop
“Shopping”: Photoshopping
BG: background
FG: foreground
B&W: black and white
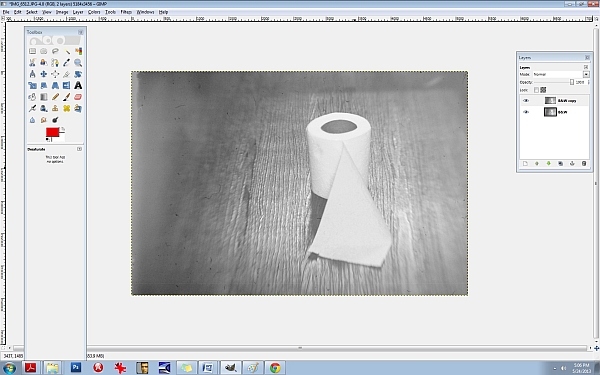
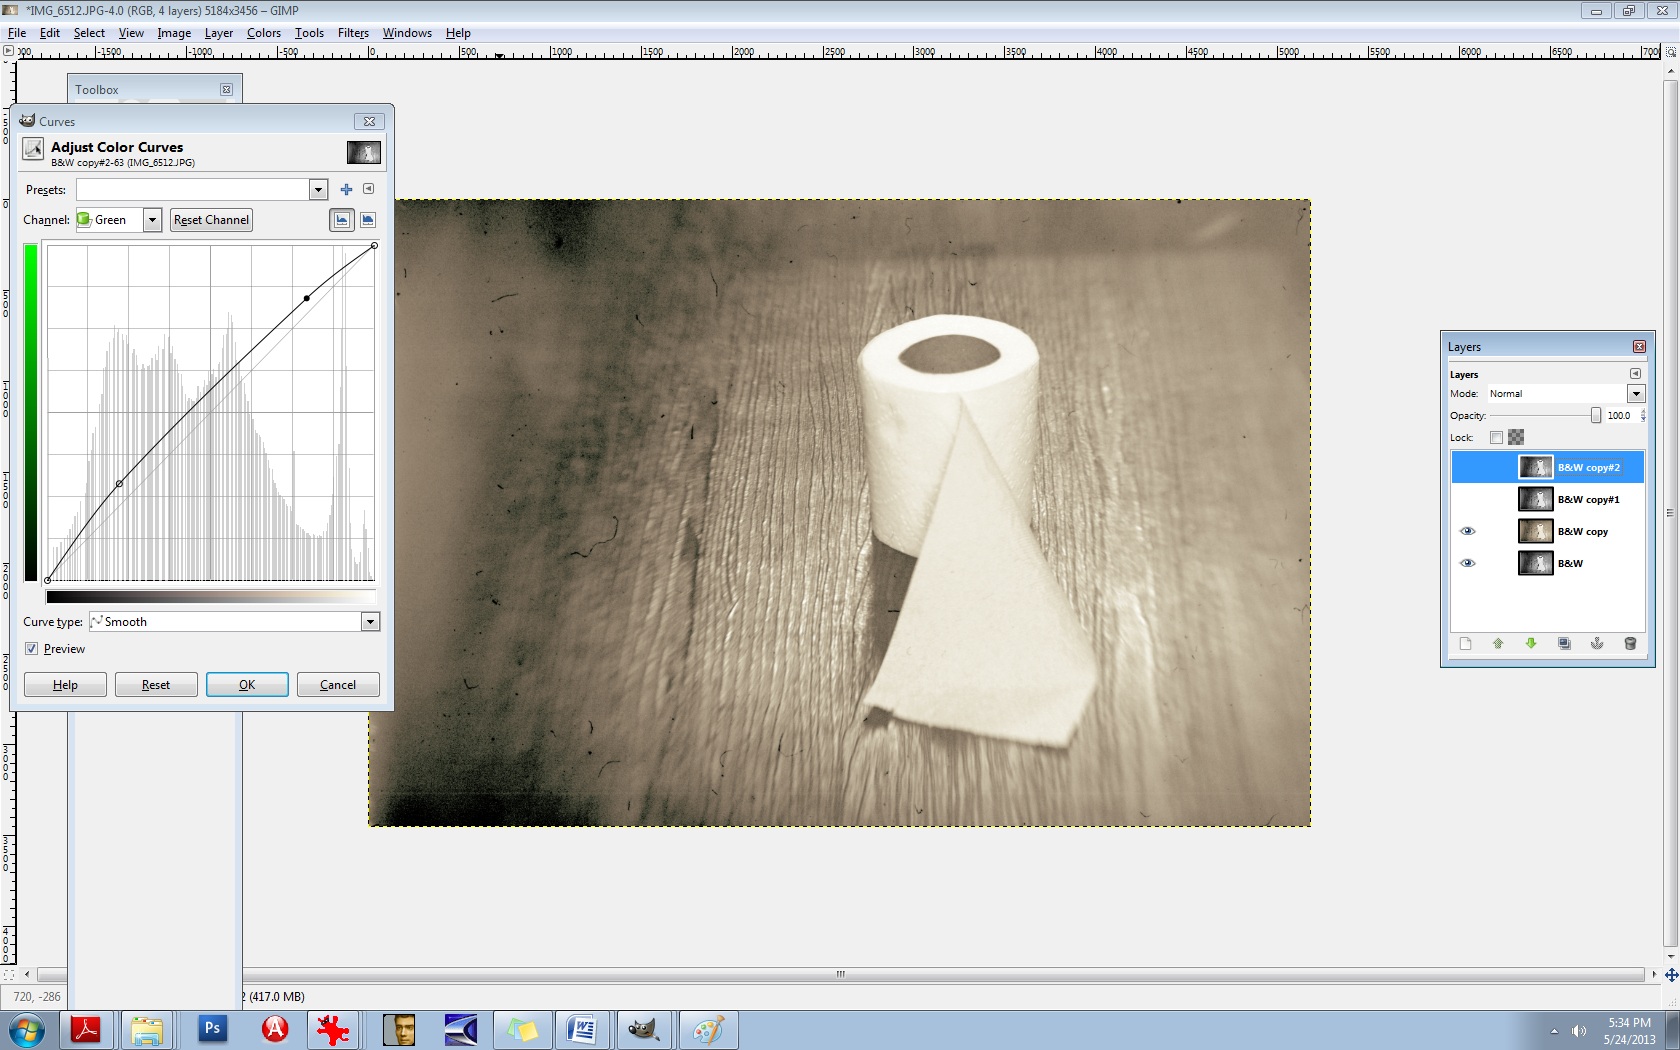
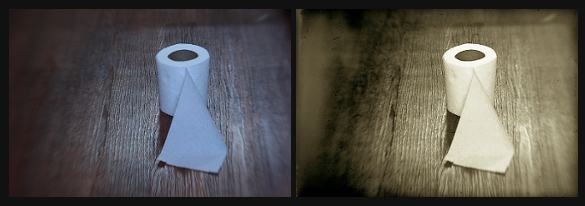
Let’s start with toilet paper.
I took this shot a moment ago on my bathroom floor. I like using toilet paper because it’s simple.
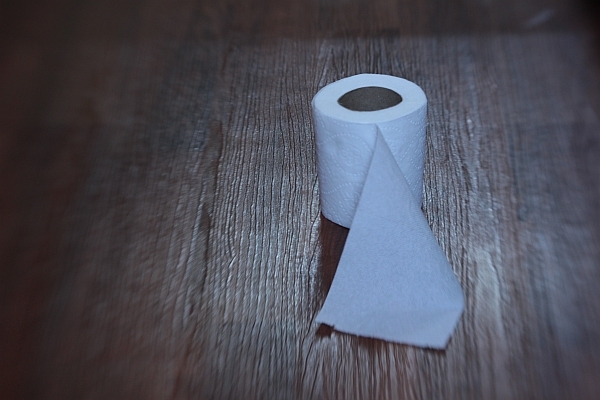
This is a SOOTC shot, or, “straight out of the camera”. I like using the Lensbaby Composer lens because as you can see, it naturally blurs the edges of the frame. This particular kind of lens is great for moody, dramatic images (my trademark style) and especially vintage pieces. Here are the specs for this shot:
Lens used: Lensbaby Composer
Aperture: f/4
ISO: 400
Shutter speed: 1/15 sec.
I know you’re using a point and shoot and that’s ok; it’ll do just fine for this.
The first thing to do, always, with a shot is correct the WB/white balance if necessary, and much of the time, it’s necessary. You can see that the toilet paper is a little blue looking. It’s a good thing to make sure your WB/ white balance is preselected on your camera (this is the shady, cloudy, night shot area). If I would have paid attention beforehand, I would have selected “cloudy”, alas, half the time I don’t. For the record, it’s best if you do.
We’ll adjust the levels (midtones, shadows, contrast, lighting, and highlights in a few moments but let’s continue on first with the basics). Notice the composition: it’s off-centered. When composing your single subject, you should always try to off-center them slightly, no matter how slightly. This is where you’ll learn about “rule of thirds”. Imagine that a 4 lined grid is over your image: 2 lines vertically- 2 lines horizontally. It would look like this:
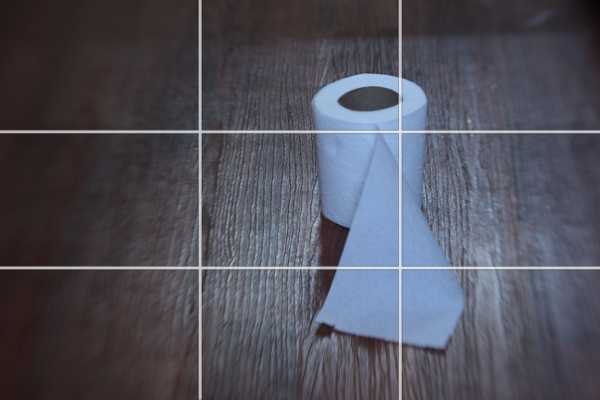
Notice the 4 connecting areas in the center: these are known as “power points”. Always place your subject, or subjects, in one of these areas. I have an invisible grid in my mind’s eye that is always there when I shoot and I’m always mindful of this. Over time, your “natural rule of thirds grid” will kick in and it will become like a second skin: you won’t even need to think about it.
Now let’s do a bit of post processing.
We’ll start with our levels.
We’re going to use GIMP because it’s a free photo editor. It’s a lot like Photoshop and much of the time, I actually prefer GIMP over PS/Photoshop. It can be daunting or overwhelming if you’ve never used it. Remember, fear is nothing more than the lack of education in an area. We’re afraid of what we don’t know much of the time. By learning the basics of photo editing, you’ll take the fear out of the equation and it won’t seem overwhelming any more.
You can find GIMP here:
http://www.gimp.org/downloads/
Just click on the 3rd or 4th line down in the first section.
Install the program and open up your pic : FILE/OPEN
It should look like this:
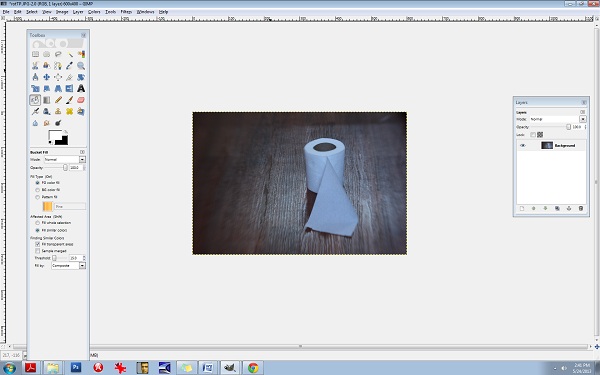
Be sure to open up your Toolbox panel on the left and have your “layers” there on the right. If these two crucial boxes do not open up on their own, you can do it manually by clicking on the WINDOWS tab at the top right corner. WINDOWS/DOCKABLE DIALOGS/LAYERS and WINDOWS/TOOLBOX.
You’ll need to keep these two boxes open throughout all of your editing.
Almost everything I do has to do with “layers” and this is not uncommon in photo editing. Even the most basic of editing (level adjustments) will often contain several layers and it’s one of the areas of photo editing that is an absolutely MUST to learn. Otherwise, you’ll be stuck with cheesy filters and one dimensional photos.
Right click on the Background layer in the LAYER box on the right. Select DUPLICATE LAYER. Now let’s go to the LEVELS area so you can make some minor adjustments.
Go to the COLORS tab at the top and select LEVELS.
You’ll see the LEVELS box pop up:

The diagram at the top is what you’ll want to adjust. Underneath the words INPUT LEVELS you’ll see 3 sliders. These control your shadows/midtones/and highlights. The shadows are the blackest/darkest parts of your image, the midtones are the midrange tones and the highlights are the brightest parts of the image. Always be careful with the highlights slider- you can easily blow out your whites. Let’s start with the middle slider:
It’s naturally set at 1.00 so set it at 36. Set the 1st slider (on the left) that controls the blacks or the shadows to 1.11 and set your highlights slider (the one all the way to the right) to 1.97.
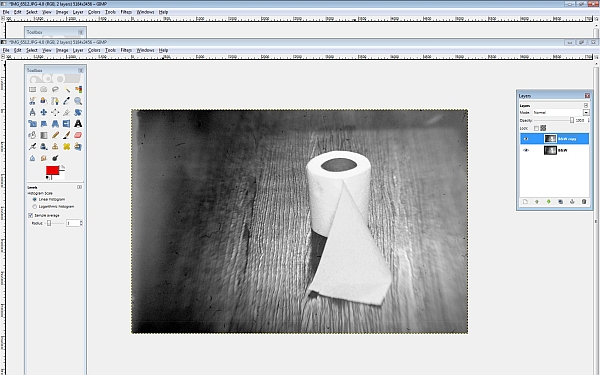
You can see that the lighting is a bit more dramatic. Go ahead and duplicate this layer again. Double click on the text to rename it, (Rename it LEVELS) and then press enter to stabilize it. Rename the new layer CB for COLOR BALANCE.
Now let’s fix the colours and the WB/white balance. Go to your COLORS tab at the top and select COLOR BALANCE. This is another area that I’m constantly using. Let’s get rid of that blue cast. You’ll notice in your COLOR BALANCE area 3 specific ranges: shadows, midtones, and highlights. There are 3 sliders for each one and 6 hues to adjust, per slider. Remember, your highlights are the brighter areas of the photo, in this case, it pertains directly to the toilet paper, so select HIGHLIGHTS. Your goal here will be to move your sliders AWAY from the dominant colours here, which hare CYAN and BLUE. Every photo is different and the colour values and ranges will be different for every one. Instead of simply telling you which values to set your sliders to here, I want you to analyze the photo’s values, highlights in this case, and adjust each slider accordingly. I’ve learned over the years that a good counterbalance to CYAN is yellow and red, so let’s increase those channels’ values, decreasing the CYAN. Again, be sure that your HIGHLIGHTS channel is selected. Be sure to check that it’s indeed the top layer you’re working on (the layer named CB). Ok, let’s go.
Highlights:
Move slider AWAY from CYAN- +29
Move slider AWAY from MAGENTA- + 13
Move slider AWAY from BLUE (toward the YELLOW) -17
Be sure that your readings are the same:
29, 13, -17
The midtones look pretty good so let’s move on to the shadows and give them some warmth.
Move the top slider TOWARD the RED- +9.
Keep the center slider set at 0.
Move the bottom slider TOWARD the YELLOW- -11.
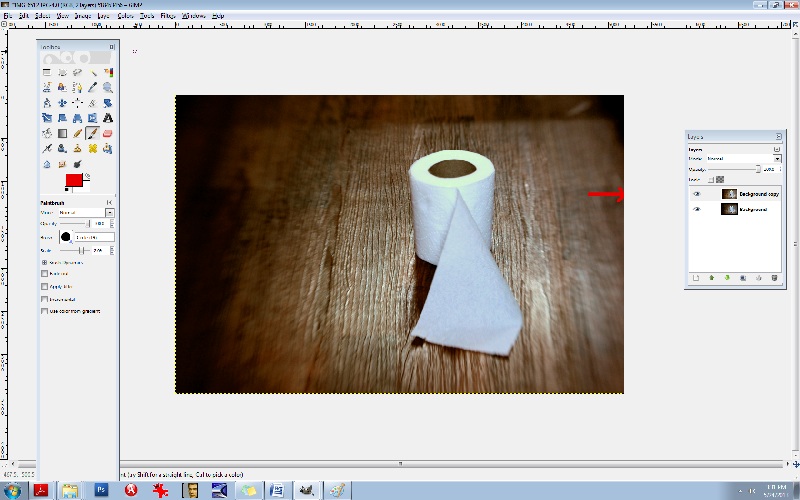
Notice in the LAYERS box, you’ll see a small EYE icon. This is your visibility toggle. If you can see the eye there, it means that that layer is visible. If you uncheck the eye, it means that that layer is currently invisible. This is especially useful as it allows you to toggle back and forth between pics for comparisons. Go ahead and click on the top layer which will set it to “invisible”. Continue clicking the CB-layer EYE and compare your LEVELS pic and your CB/color balance pic.
You’ll notice that the top layer has more reds and yellows- it’s your “warmer” layer. The layer underneath has stronger greens and blues- this is your cooler layer. Let’s mix the two. Notice that each layer has an OPACITY slider. This controls the visibility amount for each layer. Again, always be sure that you’re working in the correct layer beforehand. Choose the top layer, and bring your OPACITY slider down some. Let’s take it to 45%. This will give us a well balanced amount of reds, greens, yellows, and blues in the pic. What this does is increases your colour ranges and adds more depth.
Now, merge all of the layers together. Go to the IMAGE tab at the top, and select FLATTEN IMAGE.
It’s always best to duplicate any image you flatten. You’ll find in editing, it really is a continual cycle of merging and duplicating. So, duplicate it and be sure that you’re working in the top layer. Now, let’s add a textured layer to this. We’re going to bring a dramatic flair to this and give it a haunting feeling.
For this, let’s convert it to a B&W. Yes, all of that colour modification just to convert it to a B&W! The reason for this is to give it a better value and tonal range once it has been converted. There will be added layers of depth by adjusting the colours beforehand.
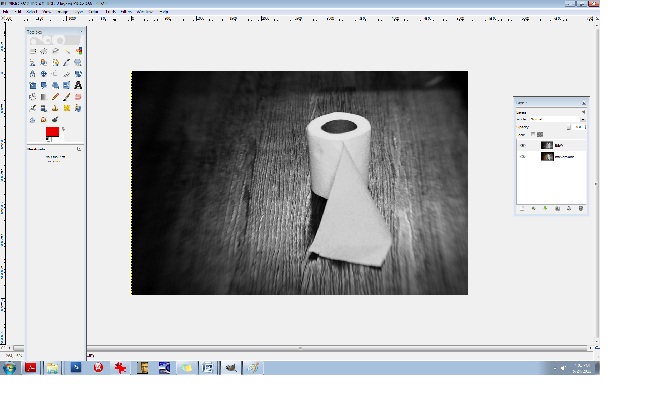
Click on your COLORS tab at the top and select DESATURATE. A small box will appear allowing you to choose from one of 3 areas: lightness, luminosity, and average. Select AVERAGE if you’re not sure which one to go with, but again, because every photo is different and every photo contains different values and ranges, some photos would be best suited for “luminosity” and so on so be sure to test all three for every image and choose the best one. (If you’re still unsure what to go with, choose AVERAGE.)
You’ll notice that we have a good range of tones here from the deepest of black to the brightest of white: this is what makes a good black and white photo. Rename the top layer to “B&W”. You should have the coloured image on the bottom and the B&W one on the top. Now, duplicate the B&W layer. You can rename it B&W2.
Let’s add a texture. (Adding a texture isn’t necessary at all, and it can be very tricky at first, but it compliments many photos, especially portraits, abandoned houses and such.) I like to add a texture or several sometimes because it too adds depth to your photo. I like things that look like hair or old film scratches- it gives my images a dirty, ugly-ish appearance and that’s exactly what I like.
So let’s add a dusty old film-scratch texture to this. Here’s what the texture looks like by itself:
It’s one of my favourites.
When adding a texture to a photograph, it’s very important to make sure that your sizes match up. Check to see what size your image is in GIMP. You can do this by clicking on the IMAGE tab at the top and then select SCALE IMAGE. Notice the sizes there. Be sure that it’s set to PIXELS (the box on the right) and that the width and height are written down (or memorized). Those are the exact measurements that you’ll need to resize your texture to. I recommend using IRFANVIEW as a basic photo viewer, it also reads RAW files so that’s perfect. (I’ve used IRFANVIEW for 8 or so years now and it’s one of my most used tools.) You can get it here:
Download and install that. Once you’ve opened up your pic in IRFANVIEW, resize it to your proper width and height, and then IN IRFANVIEW- select EDIT/COPY. Now we’re ready to paste the texture into GIMP. After copying the texture, go to GIMP and select EDIT/PASTE.
Once the textured layer has been pasted into GIMP, you’ll notice on the right side in your LAYERS box that the top layer has been added. It’s what is now called a “floating channel”. You’ll need to stabilize it like the rest of the layers and it’s very simple to do. Right click the (top) floating channel (your texture layer) and click on ANCHOR LAYER.
Now you should see 3 stabilized layers there in your box. The texture in the top layer, the B&W image in the middle, and the coloured BG/background image in the bottom. We no longer need the coloured image in the bottom channel/layer so you can go ahead and click the eye, switching it over to invisibility if you like, or, you can leave it as is- it won’t hurt anything.
Now it’s time to learn about BLENDING MODES. In the LAYERS box you’ll notice the word MODE above the OPACITY slider. This is the area that gives your layers different effects. The blending modes I use most often are: overlay, multiply, screen, and soft light. There are lots of useful blending modes here though.
Be sure that you’re working in the top layer of the LAYER box (should be named B&W2 copy I think) and take the OPACITY down to about 63.4%. Go to your blending mode area which is MODE (again, it can be found above your OPACITY slider in your LAYER box) and set the mode to SCREEN. This is a bit of a light, silkscreen and gives your images a soft, smoky look. Afterwards, go ahead and flatten the image, again, you can find this area at IMAGE/FLATTEN IMAGE at the top tabs, and then immediately DUPLICATE the layer. It will then look like this:
Next, let’s run it through the LEVELS again to increase the blacks/SHADOWS. I often repeat my processes two and three times throughout one photo edit. Increasing the shadows at this point will give the blacks a smeared/chalky chemical look. Let’s try it:
50/80/46
INPUT LEVELS/3 sliders:
Shadows (1st slider all the way to the left)/ middle slider- midtones- .80/3rd slider all the way to the right (Highlights)- 245. Now, DUPLICATE the top layer again, and let’s hit the LEVELS one more time.
Set them at or around these levels:
INPUT LEVELS:
Shadows/1st slider all the way to the left- 29
Midpoint/middle slider- 1.34
Highlights/3rd slider all the way to the right- 255
Notice the darker “burned” looking areas in the shadows now. It will look like this:
Now I’m going to teach you another useful trick. It’s the CURVES area and it will give us master control over our colours and hues. Go here: COLORS/CURVES from the tabs at the top. You’ll see a CHANNEL dropdown menu box. Inside you will find the RED, GREEN, and the BLUE channels. We’re going to edit each of these three channels individually. Think of your primary colours and the various colours you can create by mixing them. Let’s make a base/foundational colour of bluegreen/yellow. Select your BLUE channel, and then make a backwards or inverted “S”, like this:

Don’t go over the top or it’ll be overkill. Remember to do all things in moderation. Now, let’s kick up the reds. Select the RED channel from the same area (dropdown menu):
Let’s do something a little different here. Experiment. You don’t have to do the exact same thing- find your distinct style here and work with it.
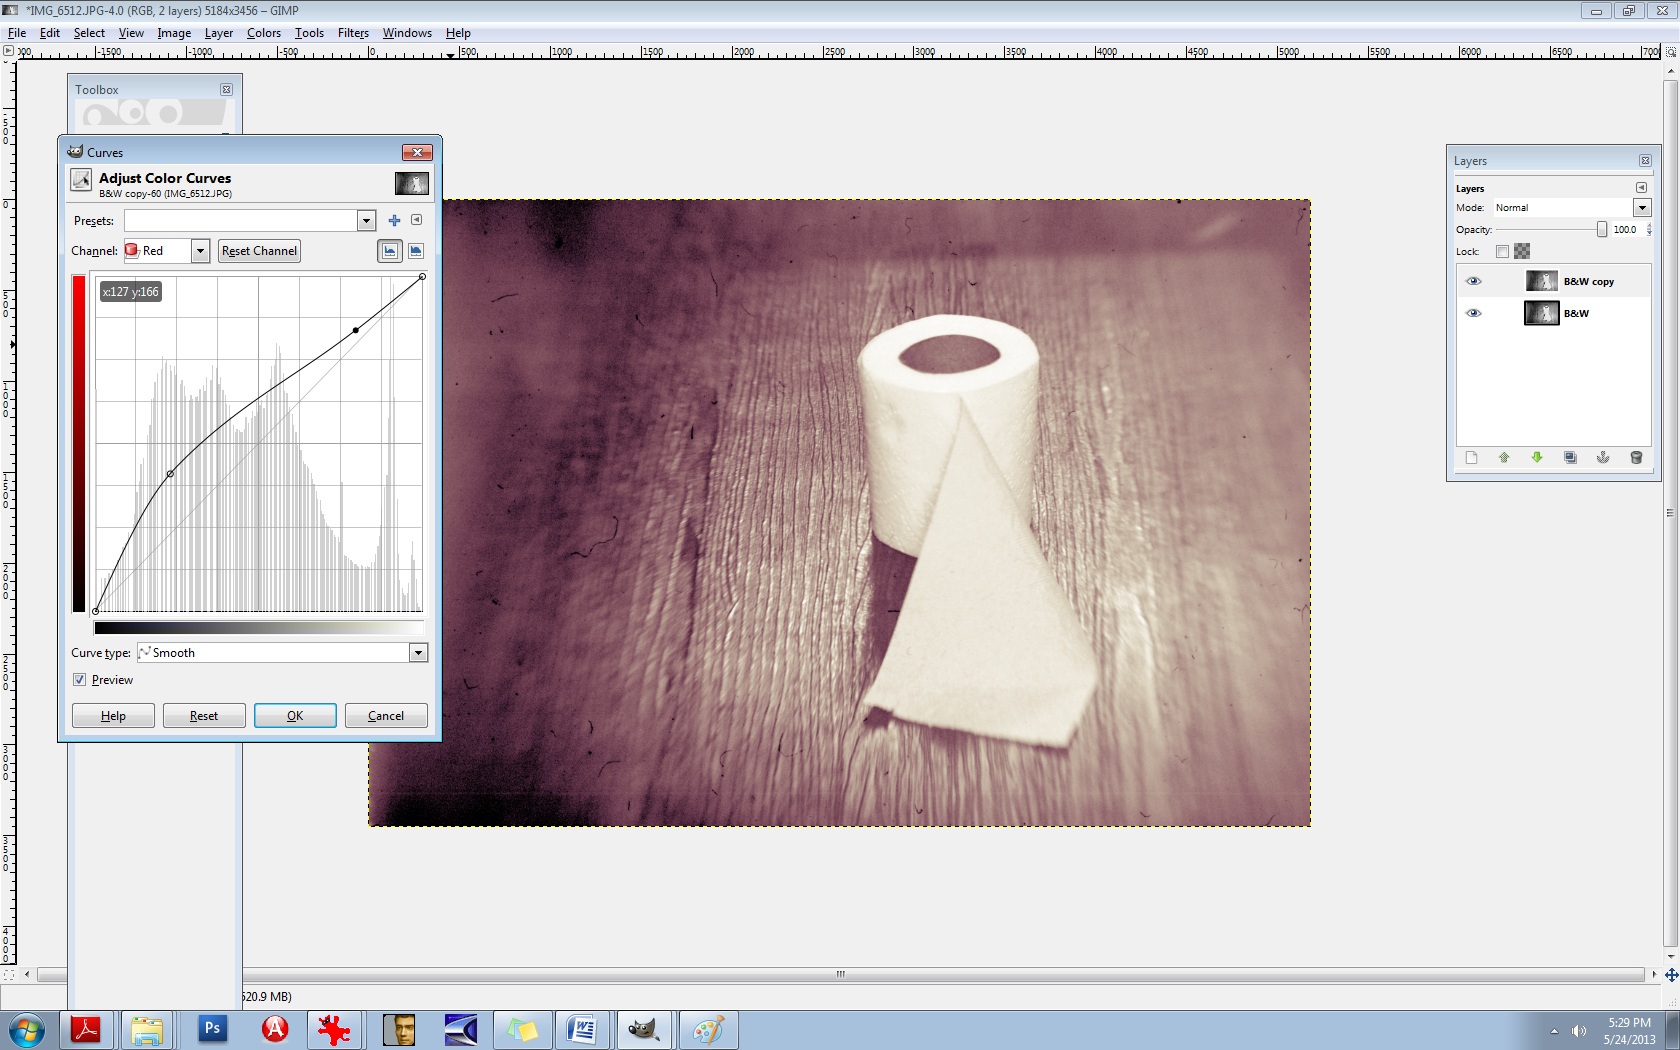
Let’s experiment with the GREEN channel, found in the same area:
There’s no right or wrong way to do this. Do what makes you happy.
Now, merge the two layers IMAGE/FLATTEN IMAGE and then DUPLICATE the layer once again.
Now you’ll use the same thing: CURVES to adjust your overall lighting. Select COLORS/CURVES. In the CHANNELS box there- the drop-down menu, it’s preset to VALUES. Leave that as is. The diagonal line that you see is the line you’ll be using. Pull the bottom left part of the line straight down to increase your shadows/blacks. As seen here:

It’s still a bit too red for my liking, so let’s run it through the colour balance again to decrease the reds.
Go to COLORS/COLOR BALANCE from the tab at the top and select your MIDTONES channel. Move the slider toward the CYAN -14. Leave the middle slider as is, but set the bottom slider to -1 in the direction of the YELLOW. (In other words, TOWARDS the YELLOW.)
It should now look like this:

It’s a mixture of yellow, red, cyan, magenta, green, and blue but the dominant colours are yellow and green. You’ll notice that it’s not one “flat colour” or tone. There’s more depth here because of the broan ranges in colours. Let’s do one final thing to it to give it a bit of a smoky vignette around the edges. Select your BURN tool. In your TOOLBOX area it’s the tool that is at the bottom, just aboce your colour palette boxes. Move your cursor over it and it’ll read: DODGE/BURN tool. (The DODGE lightens it the BURN darkens it.) We’ll need a bigger brush than the ones offered so let’s create a larger one.
Select your BRUSH tool.
At the very bottom of the pop-up box that displays your brush selection, find the bottom right brush icon and select it. You’ll need to click on the actual CIRCLE brush picture in your brush area to activate it first. That can be found just underneath the OPACITY slider and above the SCALE slider. Once the popup box opens up, you’ll see the needed brush icon in the bottom right corner. If you move your cursor over it, it should read: Open the brush selection dialog
Now at the bottom of THAT area, you will find a NEW BRUSH icon. Click on that. Increase the radius to your desired amount and rename the brush something like LARGE. It will then be added to your brush collection. If you do this, it will come in handy tremendously. You’ll need larger brushes for partial erasing, burning, etc.
Now let’s go back to the burn tool and select your large brush. You’ll need to decrease its size right off the bat, significantly. I set mine to .74% SCALE and 28% OPACITY. Your goal will be to burn the very edges of it neatly, not add a big, puffy smears.
After it’s finished, it should look something like this:

Last but not least, we need to add a bit of a guassian blur to it and then sharpen it. The blur gives it bit more of a vintage finish and we’ll slightly sharpen the focal point afterwards. Let’s go ahead and merge the layers again, IMAGE/FLATTEN IMAGE. (From the tabs at the top.)
DUPLICATE the layer, of course.
Then you’ll choose (from the tabs at the top) FILTERS/BLUR/GUASSIAN BLUR. You’ll see a BLUR RADIUS area which will allow you to set your horizontal and vertical blur radius. Select 2 for both. Click OK.
Next, you’ll need to select (from the tabs at the top) FILTERS/ENHANCE/UNSHARP MASK.
Set the amounts for the following:
RADIUS: 6.4
AMOUNTS: 5.0
THRESHOLD: 0
Over time, you’ll grow more aware of what radius you’ll need for each image.
Now we’re going to layer this underneath our blurred layer. First, let’s name these layers accordingly so we don’t confuse the two. First, be sure to duplicate the bottom layer, always. Anytime you make significant changes to your layer, it’s good practice to duplicate the BG or base layer so you can go back to it if you mess up. So, duplicate that bottom layer. Toggle the EYE icon to invisibility (again, on the bottom BG/layer).
Now, rename the top layer to SHARP and the middle layer to BLUR. The middle layer should be the Guassian Blur layer.
Now you’re going to learn how to erase. First, let’s switch the layers. We want the blurred layer on top and the sharp layer underneath it. You can do this easily by pushing the BLUR layer right up to the top.
We’re all set to erase. Go to your eraser tool which you’ll find in the TOOLBOX area. Select your LARGE brush that you’ve just created. Our goal here is to isolate the focal point, which is the center of the toilet paper roll in this case. We’re needing to erase the blur from the top layer so the sharpened bit can bleed through from the layer underneath. This is one of my most used techniques in editing and I use it with lighting, tones, colours, practically everything. You’ll be able to “paint things” into your photos with your eraser brush this way. I can’t stress the importance of doing this for added depth in an image.
Let’s set our brush to .96% SCALE and about 24% or so for the OPACITY.
Now because we’re going to be erasing FROM the BLUR layer, we’ll need to right click on that layer and select “Add alpha channel”. You’ll need to do this for every layer you’re needing to erase onto. (Only the BLUR layer in this case.)
So let’s erase just around the toilet paper roll itself so that the sharpness will be revealed underneath. If you find that you’re still needing more sharpness, increase your eraser brush’s OPACITY to 60% or so.
I think we’re just about finished here. You can use these steps to create moody, dramatic, “haunting” images or chemically processed, burned “ugly” type works. They’re not for everyone, but they’re my favourite. Here is a comparative before and after:
I strongly encourage you to experiment with these steps. Again, there are no right or wrong ways to do them and really, every person is different and we all like different things. In time and through trial and error mostly, you’ll come to find your own distinct style. It took me a good 7+ years to discover most of these things. (Lots of tears, frustration, and aggravation.) I know this seems like a lot of work, but this is actually a “quick edit”. It can become a complex procedure when 5+ textures are involved. All of this is a lot of fun though. I hope I was able to help you some.
xo
-Birgitta


